
How to Use the MRCARTOOL F60 Brake Fluid Tester

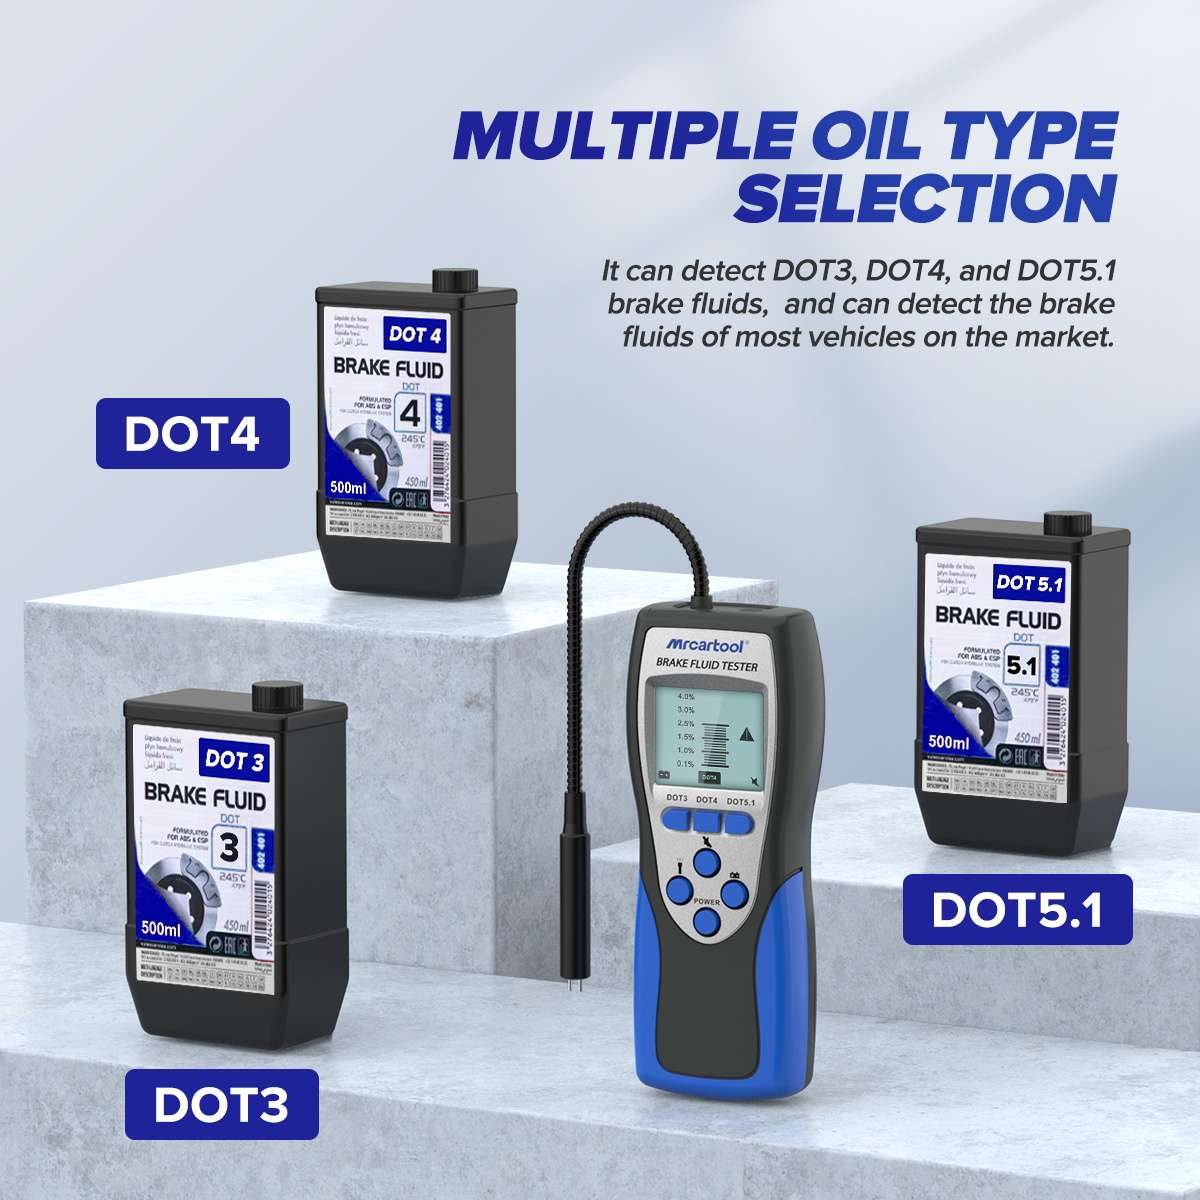
The MRCARTOOL F60 brake fluid tester screens DOT 3, DOT 4 and DOT 5.1 fluids with a flexible probe and an analog-style moisture bar on its LCD. The result is useful only when the selected mode matches the fluid in the vehicle, the 9 V battery and startup self-test pass, the probe is clean, and the sensing end is immersed in uncontaminated fluid. Treat the display as a service-screening result alongside vehicle history, reservoir condition and manufacturer criteria—not as proof that the entire hydraulic system is safe.
Quick answer: Identify whether the vehicle uses supported DOT 3, DOT 4 or DOT 5.1 fluid; do not assume from cap color. Fit one fresh 9 V 6F22 battery, press Power and confirm the startup self-test. Use the DOT button until the exact fluid mode appears. Clean the probe, open the reservoir without introducing dirt and immerse only the sensing end in fluid. Hold it still until the bars stabilize. Read the percentage scale and OK/caution/STOP zone; above 3% the manual says the screen turns red and the buzzer sounds. Use the separate low-battery icon and battery-check button to judge battery condition. Remove and clean the probe, close the reservoir and switch off.
In this guide
Understand what the F60 can—and cannot—tell you
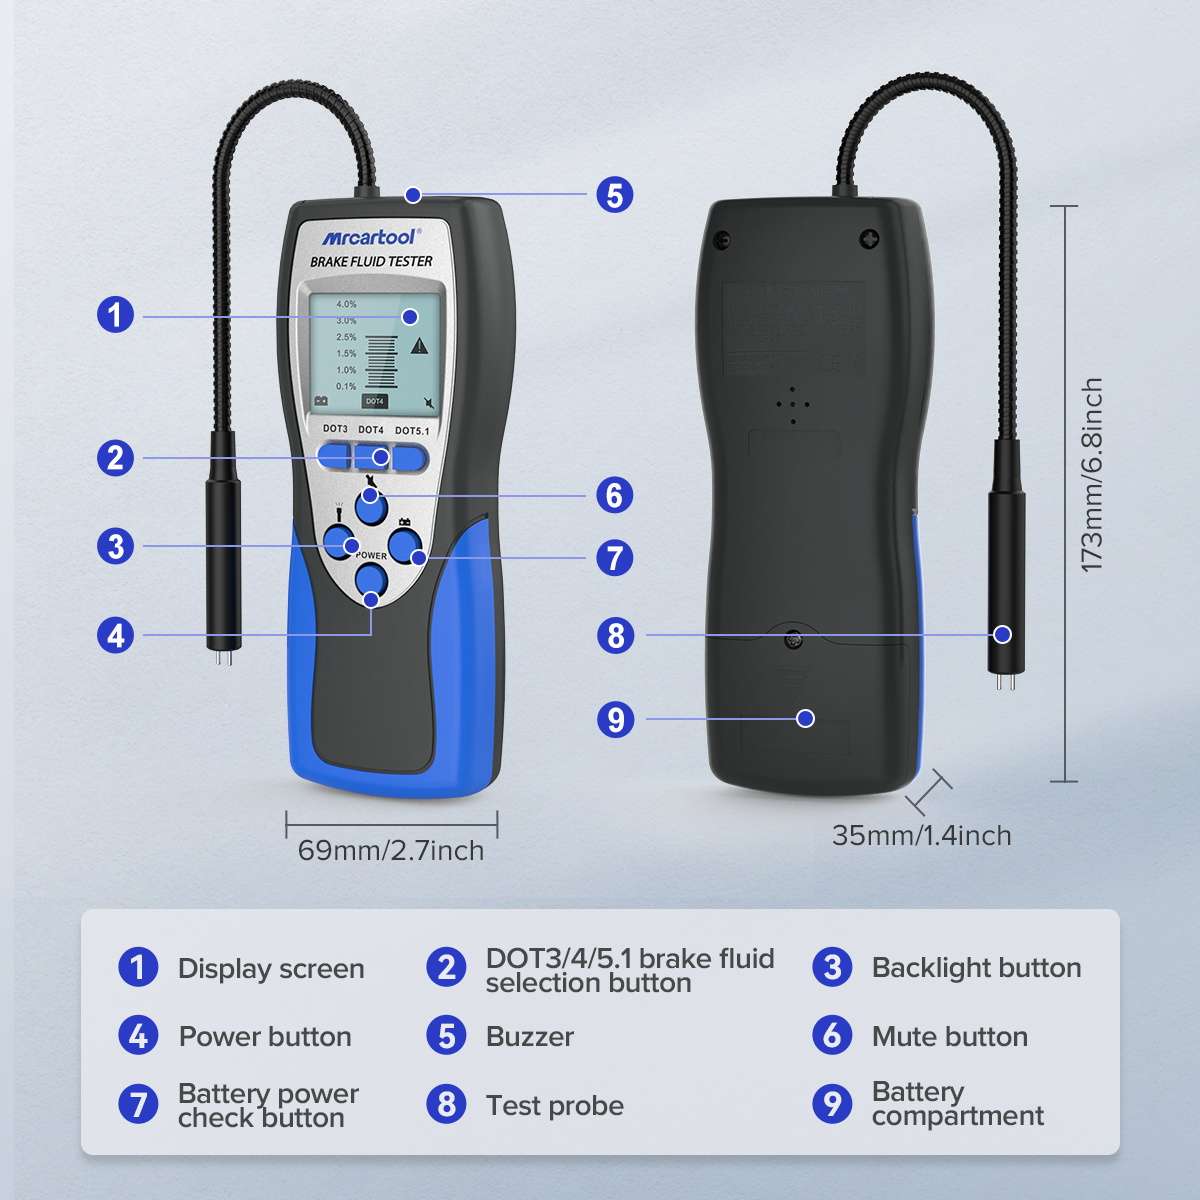
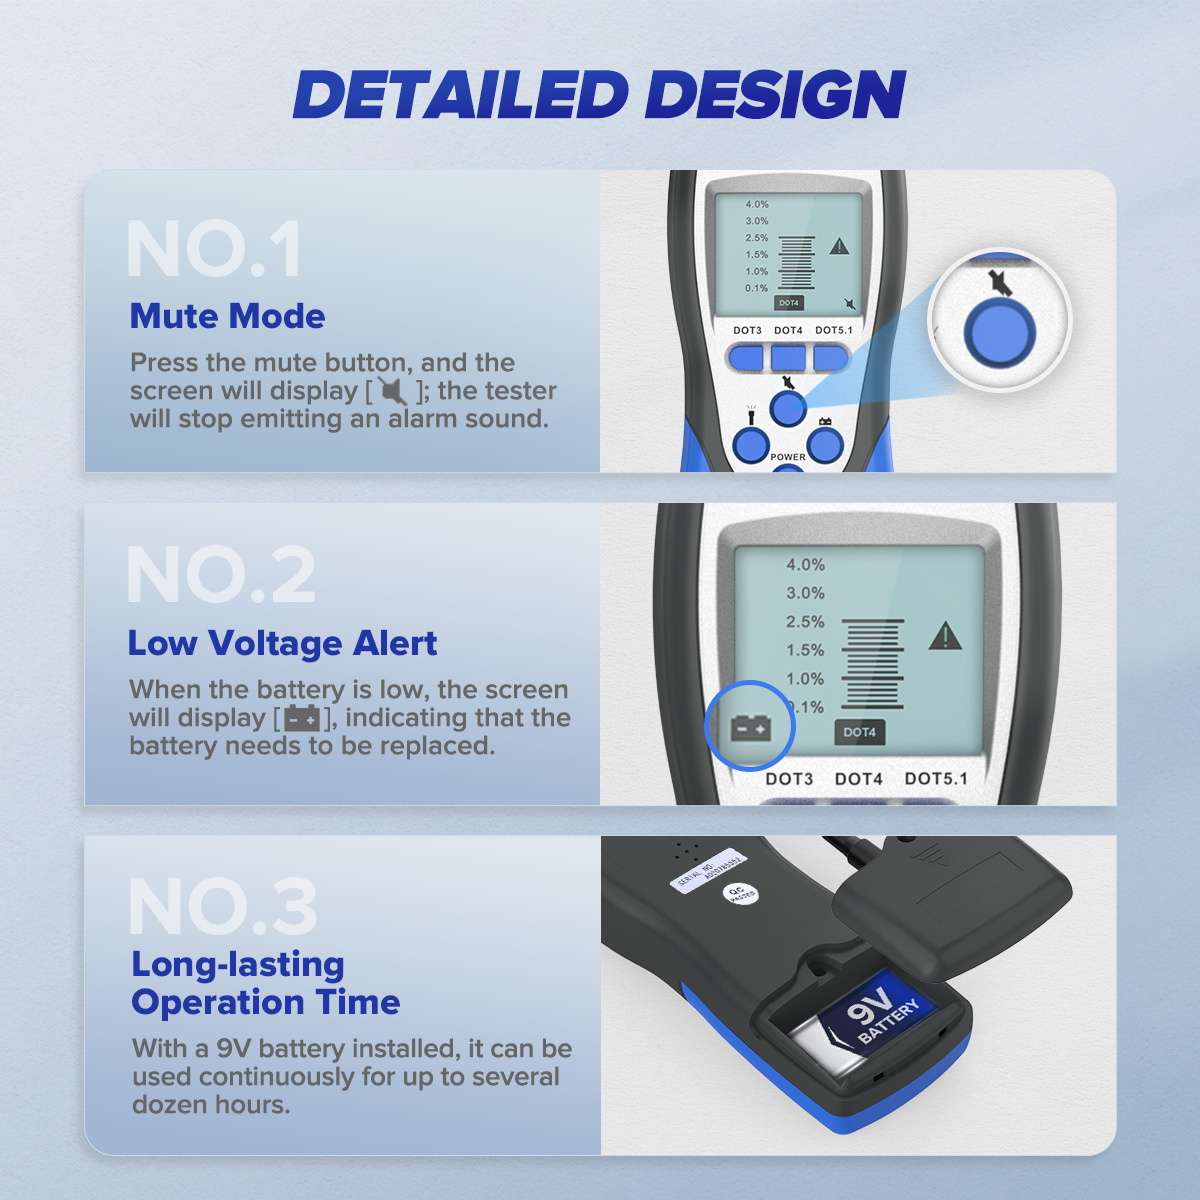
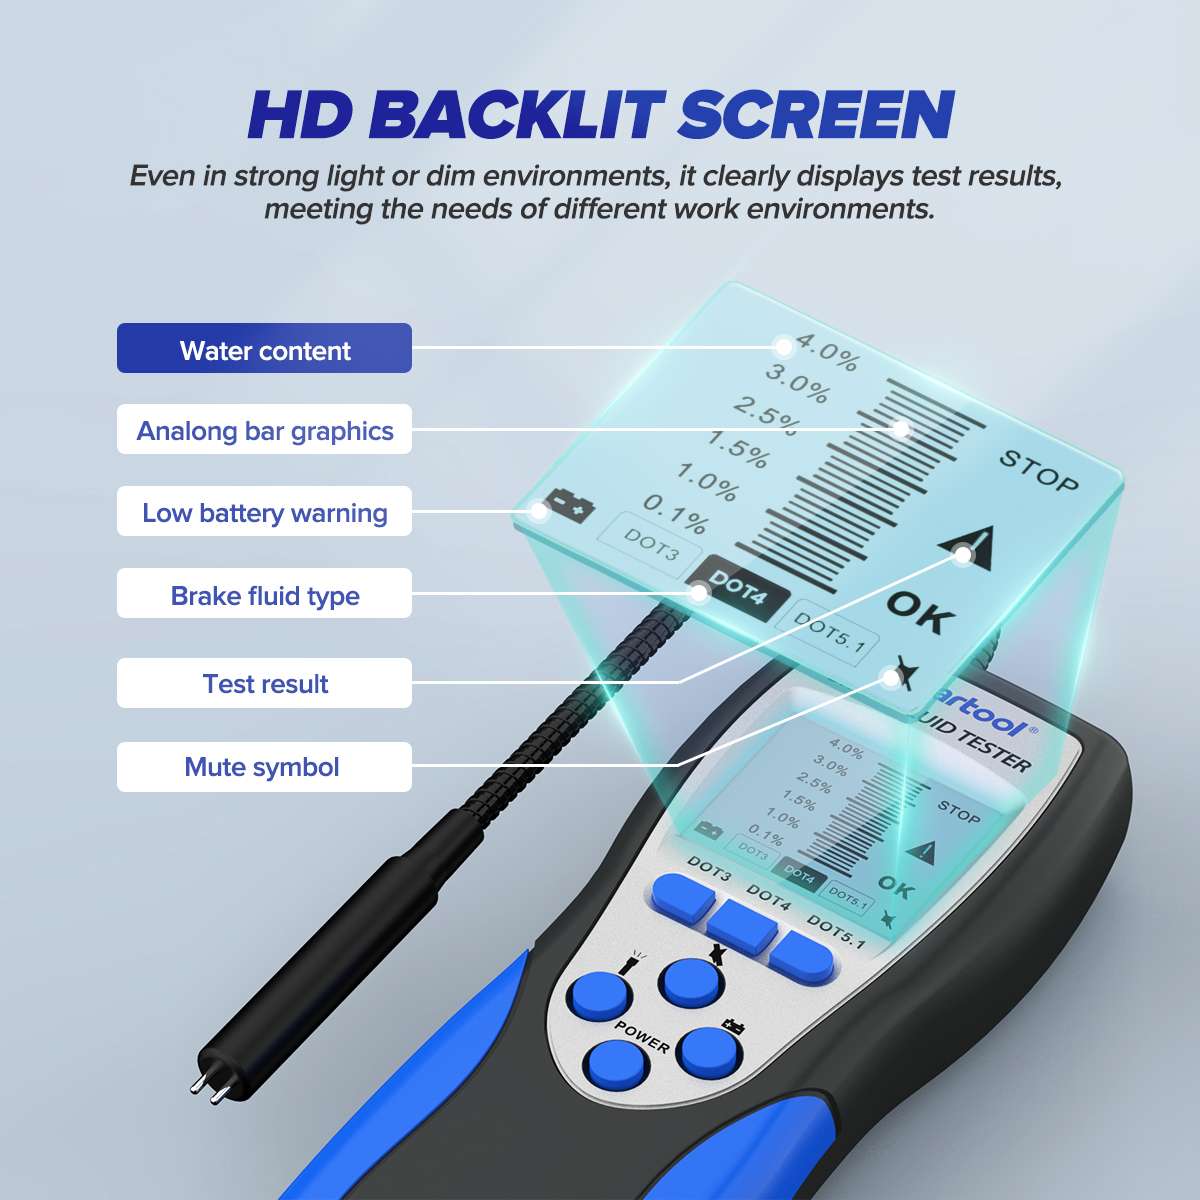
F60 estimates moisture-related condition for three glycol-based brake-fluid selections: DOT 3, DOT 4 and DOT 5.1. The display uses a 0.1%, 1.0%, 1.5%, 2.5%, 3.0% and 4.0% bar scale, with low-moisture, attention and STOP regions. The manual identifies more than 3% as the red-screen and audible replacement warning. The display also shows the selected fluid, mute state and a separate low-battery symbol.
A handheld conductivity-style tester is a screening tool. It does not inspect every caliper, wheel cylinder, ABS modulator or clutch branch; fluid condition can vary within a system. It also cannot find a leak, measure boiling point directly, verify correct fluid chemistry, diagnose pedal feel or confirm a complete brake service. A result that conflicts with vehicle history, appearance, symptoms or manufacturer interval should be investigated with the specified professional method.
Use F60 only with a known supported fluid. DOT 5 silicone fluid is not DOT 5.1 and is not one of the three modes shown in the exact manual. Do not dip the probe into an unknown, mixed or contaminated liquid and then rely on the displayed percentage. Brake fluid damages paint and can irritate skin and eyes; wear suitable protection and clean spills immediately.
Identify the fluid before choosing a mode
Read the reservoir cap, vehicle label and current service information, then confirm the service history. Select DOT 3, DOT 4 or DOT 5.1 only when that identity is known. Compatibility statements such as a higher DOT number being usable in some systems do not authorize changing the vehicle specification. If the cap is missing, unreadable, contradictory or the fluid may have been mixed, stop and identify the fluid through the approved service process.
Prepare the battery and complete the self-test
Open the rear compartment and install one 9 V 6F22 battery with correct polarity. The manual recommends a fresh 9 V alkaline battery for replacement. Press Power. During startup, the bars cycle and the buzzer sounds; the manual treats completion of that sequence as a successful self-test. If the screen is incomplete, controls do not respond or startup is abnormal, do not test fluid until the battery and instrument are corrected.
Press the battery-check button before a service reading. Use the dedicated battery symbol and capacity bars to judge remaining power. Replace a weak battery before interpreting borderline fluid. The manual’s battery paragraph also mentions a red backlight and beep, but the operating section assigns that same red-and-audible response to fluid above 3%. The independent battery icon is therefore the clearer way to distinguish low power from a fluid alarm.
Prepare a clean test point
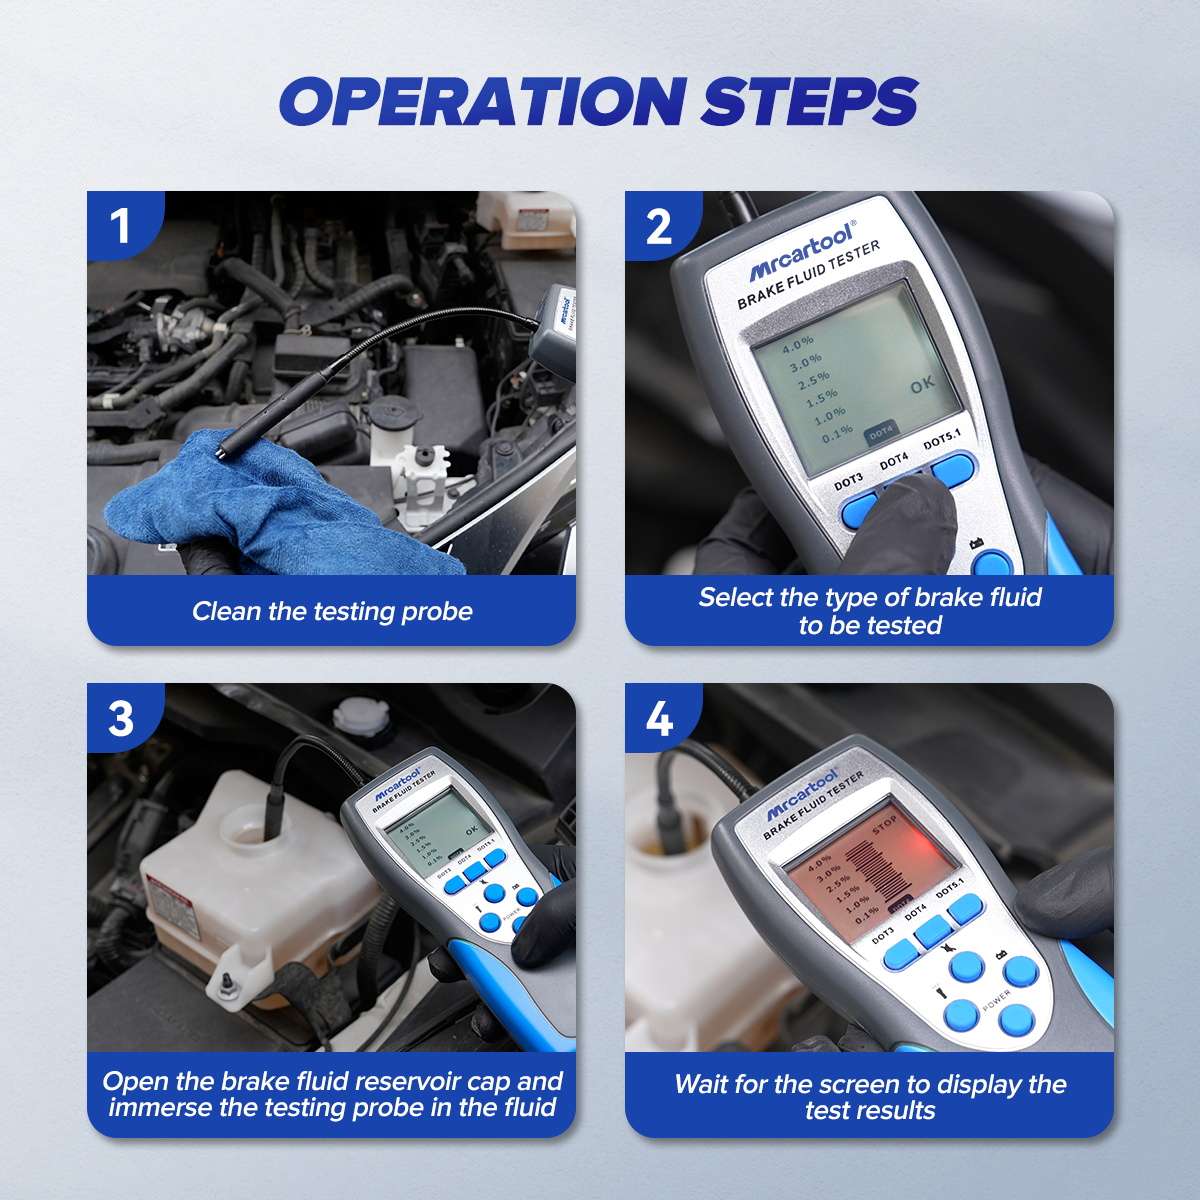
Park securely, switch the vehicle off and follow the manufacturer procedure for reservoir access. Clean dust and moisture from the cap and surrounding area before opening it. Do not allow lint, cleaner or water to fall into the reservoir. If direct probe access would force the sensor against a dirty strainer, damage a diaphragm or contaminate the system, take a small sample with a clean brake-fluid-compatible tool and test it in a clean dry container instead.
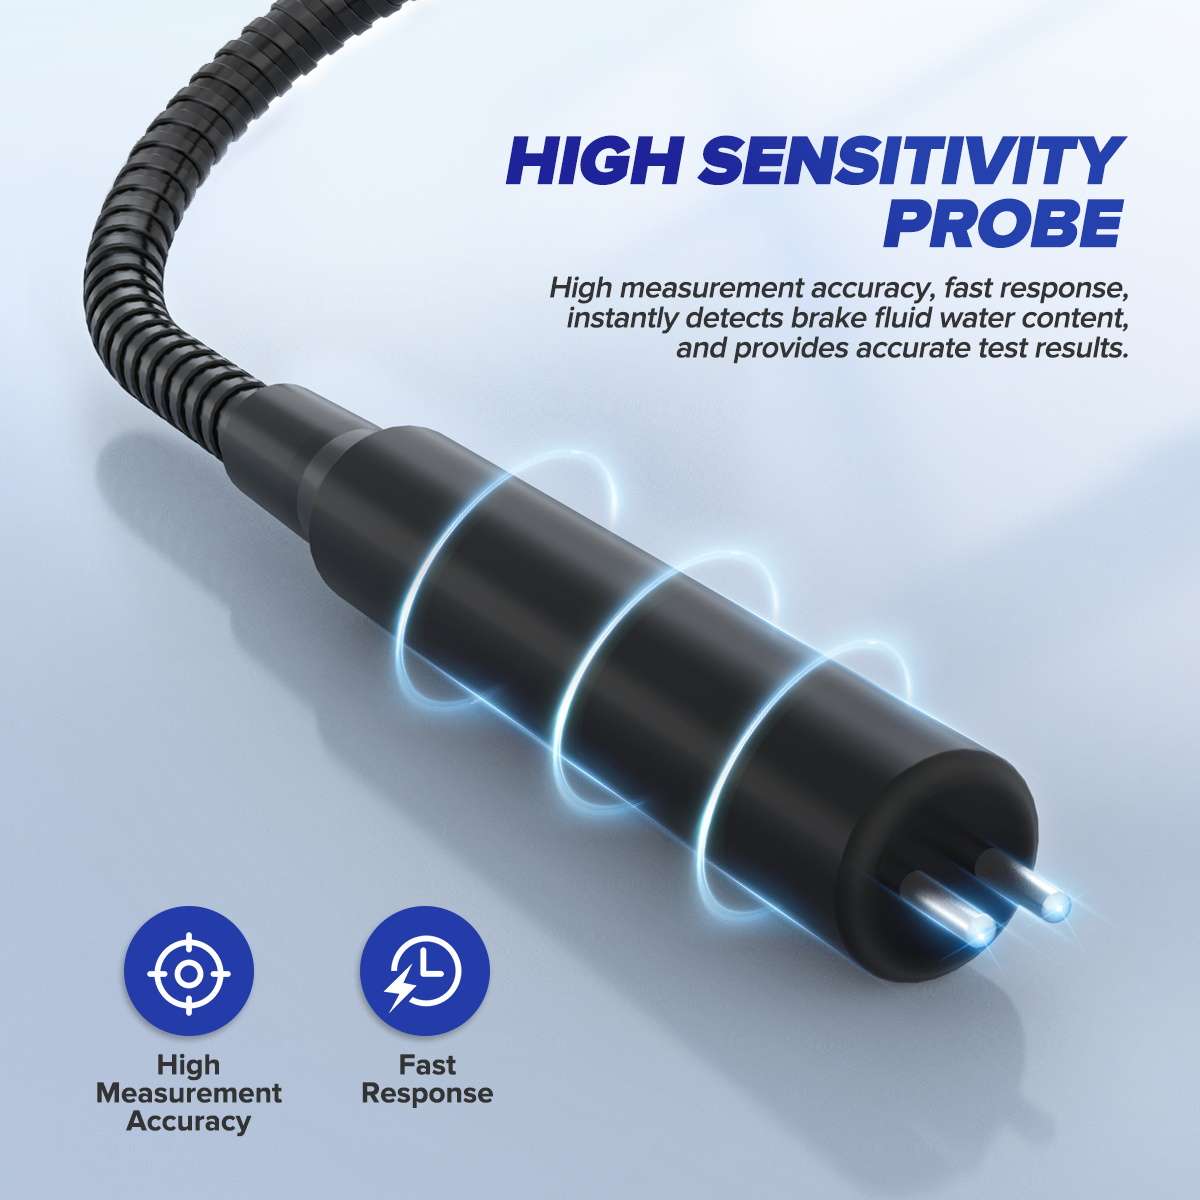
Inspect the flexible probe and sensing tip. They must be dry, free of residue and undamaged. Contamination from a previous fluid, water-based cleaner or shop solvent can bias the result. Never use the F60 probe to stir sediment or scrape the reservoir. Keep the instrument body, buttons and battery compartment away from brake fluid; only the intended probe end enters the sample.
Take a clean, stable reading
1. Select DOT 3, DOT 4 or DOT 5.1
With the F60 powered on and the probe still out of the fluid, press the fluid-selection control until the correct DOT label appears. Pause and verify the screen. An otherwise careful test in the wrong mode is not valid. If you are testing several vehicles, clean and dry the probe between them and reconfirm the mode every time; the prior selection should never be assumed.
2. Immerse the sensing end
Lower the probe into representative fluid without touching dirty cap threads, painted surfaces or the bottom of a contaminated cup. Cover the sensing region but do not submerge the flexible cable connection or instrument body. Hold the probe still. Movement, partial contact, bubbles or a thin film around only one electrode can make the bars fluctuate.
3. Wait for the display to stabilize
Allow the analog bar pattern to settle before recording it. If the reading moves between zones, remove the probe, clean and dry it, verify the selected fluid and battery, then repeat with a fresh representative sample. Two consistent readings are stronger evidence than choosing the more convenient of two unstable values. Record the fluid mode, bar value, warning zone, battery state, date and vehicle mileage when the result informs maintenance.
Interpret the bar scale correctly
The lower bars sit in the manual’s OK or low-moisture area, intermediate bars move into an attention zone, and the upper bars reach STOP/high moisture. More than 3% triggers the manual’s red backlight and buzzer warning. Do not translate a bar into more precision than the scale provides, and do not subtract or average readings from different fluid modes. The screen indicates the sample condition under this test—not the boiling point or remaining life of every fluid pocket in the system.
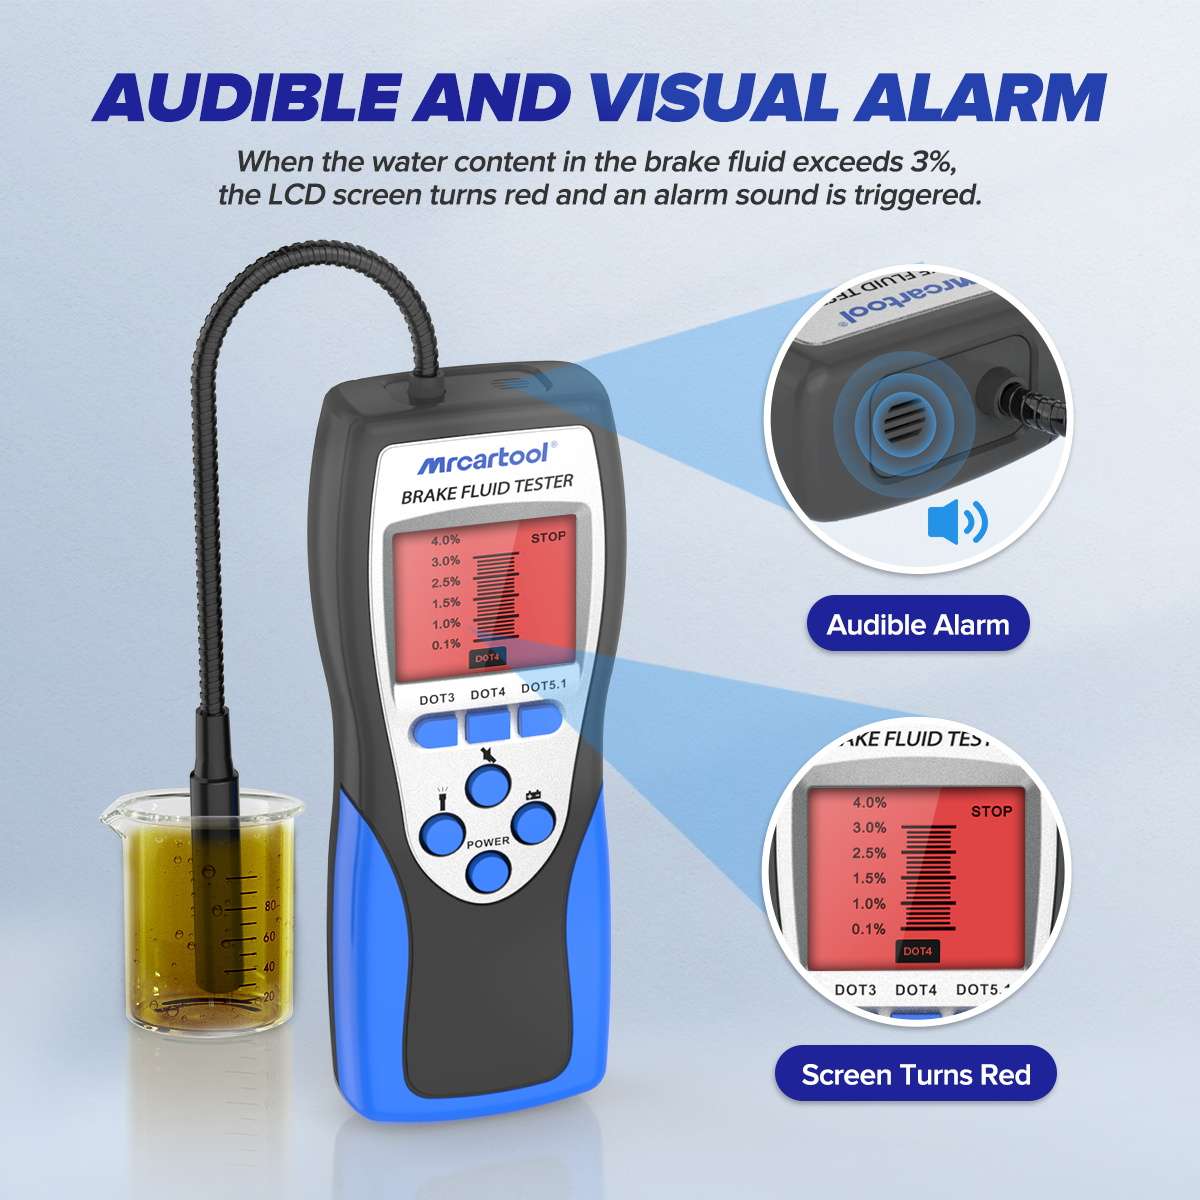
Follow the vehicle manufacturer’s replacement interval and acceptance criteria even when the screen reads low. Conversely, a high and repeatable result in the correct mode should not be dismissed because the fluid looks clear. Color alone does not measure water content, and moisture can reduce boiling performance before obvious discoloration. Where policy or regulation requires a boiling-point measurement, use the specified calibrated method.
When a result should be repeated or escalated
- The fluid identity is unknown, mixed or outside DOT 3, DOT 4 and DOT 5.1.
- The low-battery symbol appears, the battery bars are weak or the startup self-test is abnormal.
- The probe contacted water, cleaner, a dirty cap or another vehicle’s fluid without complete cleaning.
- The display fluctuates between zones or two clean tests disagree.
- The reservoir sample looks contaminated, separated or contains debris.
- Vehicle history, symptoms or manufacturer interval conflicts with the screen result.
- The brake pedal is soft, sinking or inconsistent, or there is visible fluid loss or a warning lamp.
Clean, close and store
Remove the probe without dripping across the engine bay. Wipe and clean it using a method compatible with the probe and brake fluid, then leave it completely dry with no residue. Do not rinse it above the intended immersion area or allow liquid into the tester. Close the vehicle reservoir with its clean original cap and diaphragm, wipe any spill using the approved process and confirm that no dirt entered during testing.
Press Power to switch F60 off. Coil the flexible probe loosely without a sharp bend and store the tester dry at normal room temperature. If it will not be used for a long period, the manual says to remove the battery. Keep the sensing tip protected from impact and contamination. Before the next job, inspect it again and run the same battery and startup checks rather than assuming the prior condition remains valid.
Troubleshooting
| Symptom | Check first |
|---|---|
| No display | 9 V 6F22 battery presence, polarity, terminal contact and battery condition |
| Low-battery icon | Use battery check and replace with a fresh 9 V alkaline battery before testing |
| Bars do not stabilize | Correct DOT mode, clean dry sensor, sufficient immersion, still probe and representative sample |
| Unexpected red screen and beep | Selected fluid mode, moisture bars and separate battery icon; repeat with clean probe and known fluid |
| Two vehicles give implausibly similar results | Cross-contamination on probe, mode not reselected or weak battery |
| Fluid is unsupported or unknown | Do not infer a result; use the approved identification or laboratory method |
| Reading is low but pedal is abnormal | Do not release vehicle; diagnose leaks, air and hydraulic faults independently |
Final F60 checklist
- Vehicle fluid positively identified as supported DOT 3, DOT 4 or DOT 5.1
- Fresh correctly installed 9 V 6F22 battery and normal startup self-test
- Battery-check result acceptable and low-battery icon absent
- Probe clean, dry, undamaged and free from prior-sample residue
- Reservoir exterior cleaned without introducing water, lint or debris
- Exact fluid mode visible before probe immersion
- Sensing end immersed adequately while tester body remained dry
- Bars allowed to stabilize; doubtful or borderline result repeated
- Mode, bars, warning zone, date and mileage recorded where required
- Result interpreted with service history and manufacturer criteria
- Probe cleaned and dried; reservoir restored and spills addressed
- Tester switched off and battery removed for long-term storage
For the current control labels, bar scale and battery instructions, select the exact F60 PDF on the MRCARTOOL manual download page before testing.
A useful F60 result comes from controlling the small details: known supported fluid, exact mode, healthy battery, clean probe, representative sample and a stable display. Separate the moisture bars from the low-battery symbol, repeat doubtful readings and remember that the tester screens fluid condition rather than the entire brake system. That approach turns a quick dip test into a traceable maintenance decision without overstating what the instrument proves.











Comments 0
Questions, fixes, and real-world diagnostic notes from readers.
Be the first to share a diagnostic result or ask a follow-up question.