
How to Use the FXTUL BT50 Battery System Tester

The FXTUL BT50 is a 12-volt lead-acid motorcycle and car battery tester. This guide combines the exact BT50 controls, menu screens and product operating sequence with a complete battery, cranking and charging-system test workflow.
Quick answer: Read the 12V lead-acid battery label first, then connect red to positive and black to negative on clean terminals. Choose the correct in-vehicle or out-of-vehicle path, battery construction, rating standard and printed value before running the standard test. Record voltage, measured rating, health or life, impedance and the decision together; run cranking and charging tests only through their prompts, with leads clear of moving and hot parts.
In this guide
Before you start
A battery can release corrosive electrolyte and flammable gas, while a shorted tool or clamp can produce severe heat. Secure the vehicle, ventilate the area and keep ignition sources away. Do not test a battery that is swollen, cracked, leaking, frozen or dangerously hot. The BT50 is presented for 12V lead-acid battery systems; this workflow does not authorize testing a lithium battery or a higher-voltage pack.
- read the battery label for 12V lead-acid construction, rating standard and printed value;
- confirm the battery and rating fall within the delivered BT50 screen and manual limits;
- inspect the battery case, terminals, hold-down, cables and nearby bodywork for damage, leakage or unsafe heat;
- inspect the BT50 housing, dual-conductor clamp jaws and cable insulation;
- stabilize the motorcycle or car, provide exhaust ventilation for running tests and remove ignition sources; and
- plan a lead route clear of belts, fans, exhaust, steering and rider or driver controls.
Keep the manual supplied with the BT50 beside the exact vehicle, battery or component service information needed for the job. The physical unit labels and delivered manual control if an older web image differs.
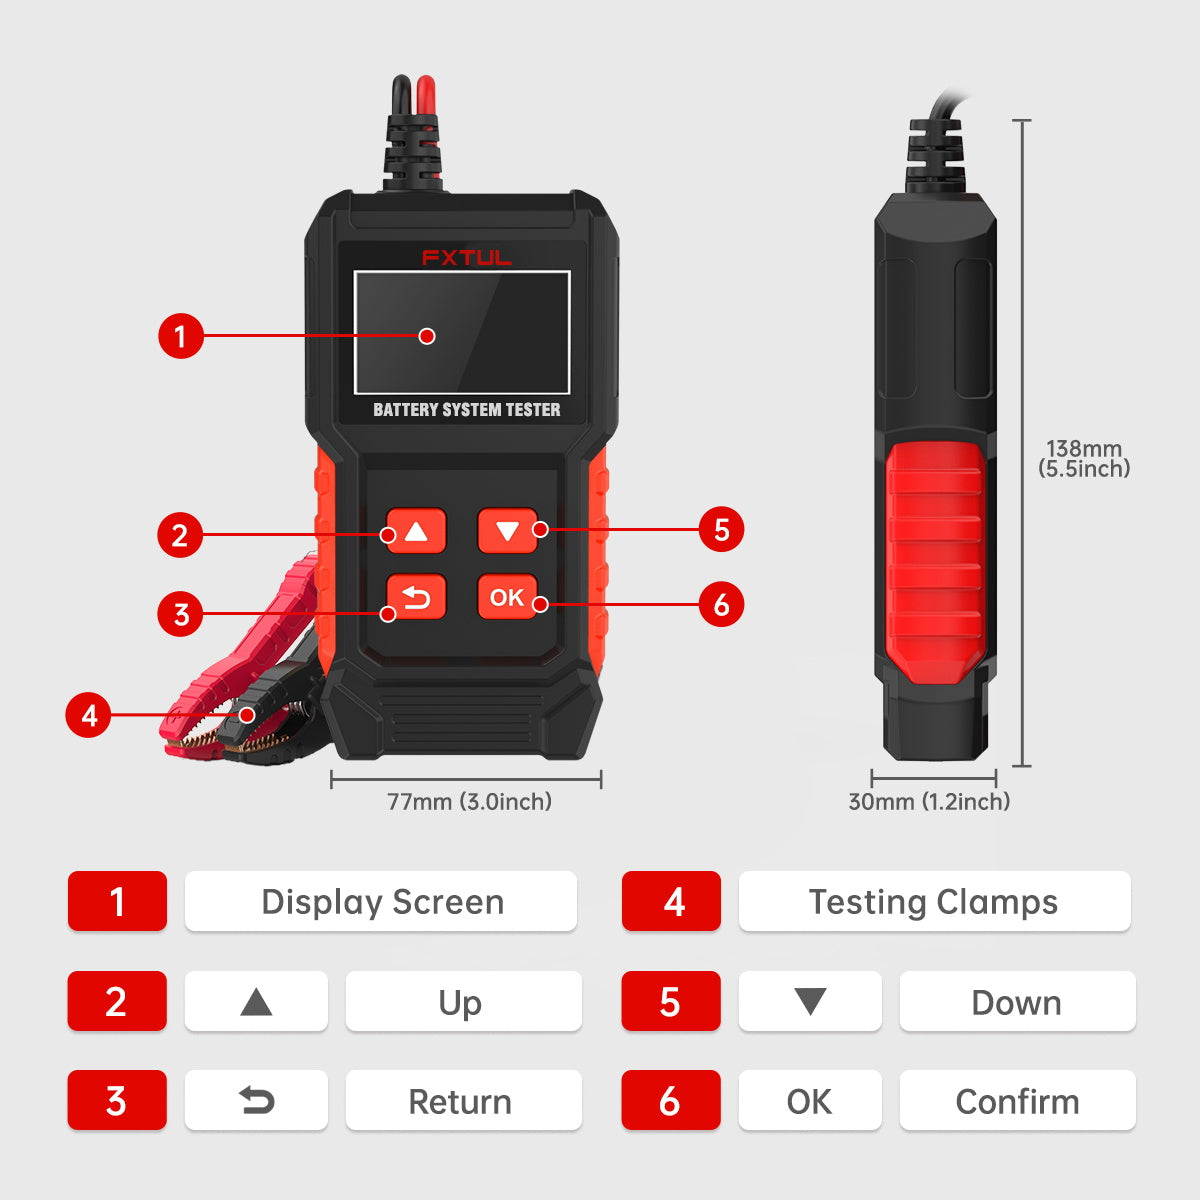
BT50 controls and specifications
The current product record highlights Standard battery test, Prompted cranking test, Prompted charging test, Battery-data review, Kelvin clamp connection. Confirm each relevant control on the physical unit before use; related FXTUL models can look similar while using different ranges, air sources or operating modes.
| Specification or function | Current model |
|---|---|
| Display | 2.4-inch backlit monochrome LCD |
| System scope | Supported 12V lead-acid motorcycle and car batteries |
| Operating voltage | 8-20V |
| Conservative published battery range | 30-100Ah and 20-1000CCA; delivered screen and manual control |
| Lead-acid constructions | Regular, AGM flat plate, AGM spiral and gel |
| Rating systems shown | CCA, SAE, MCA, CA, DIN, IEC, EN, BCI, GB and JIS |
| Test paths | Quick, standard battery, cranking, charging and review data |
| Connection | Approximately 1m four-core lead with dual-conductor Kelvin clamps |
The current product record identifies an 8-20V operating range for 12V batteries and lead-acid support for regular, AGM flat-plate, AGM spiral and gel batteries. Its specifications show inconsistent upper rating limits, listing both a conservative 20-1000CCA battery range and 20-2000 entries for several rating standards. Use the lower applicable boundary shown by the delivered BT50 and printed manual; never force an unsupported chemistry, rating system or value into the nearest menu choice.
How to use the BT50
Step 1: Identify the battery and the test you need
Read the battery label before connecting. Confirm a 12V lead-acid battery within the BT50's supported voltage and rating range, then record its construction, rating standard and printed value. Do not select a chemistry or rating standard from memory, and do not use this lead-acid workflow for a lithium battery.
Before moving on, confirm a safe 12V lead-acid battery, its exact construction and printed rating, clean stable terminals, correct red-positive/black-negative polarity and a cable route clear of moving and hot parts.
Step 2: Make the battery and vehicle safe to test
Work in a ventilated area with the motorcycle or car secured. Switch the engine and electrical loads off for the initial battery test, keep sparks and flames away, and inspect the case for swelling, cracks, leakage, freezing or dangerous heat. Do not connect to an unsafe battery.
Step 3: Inspect and connect the Kelvin clamps
Check the BT50 housing, cable insulation and both clamp jaws. Connect red to the positive terminal and black to the negative terminal on clean conductive surfaces. Keep the clamps from touching each other or nearby metal, and confirm the tester powers normally; the current product guidance says testing cannot proceed below 8V.
Step 4: Select the exact battery test setup
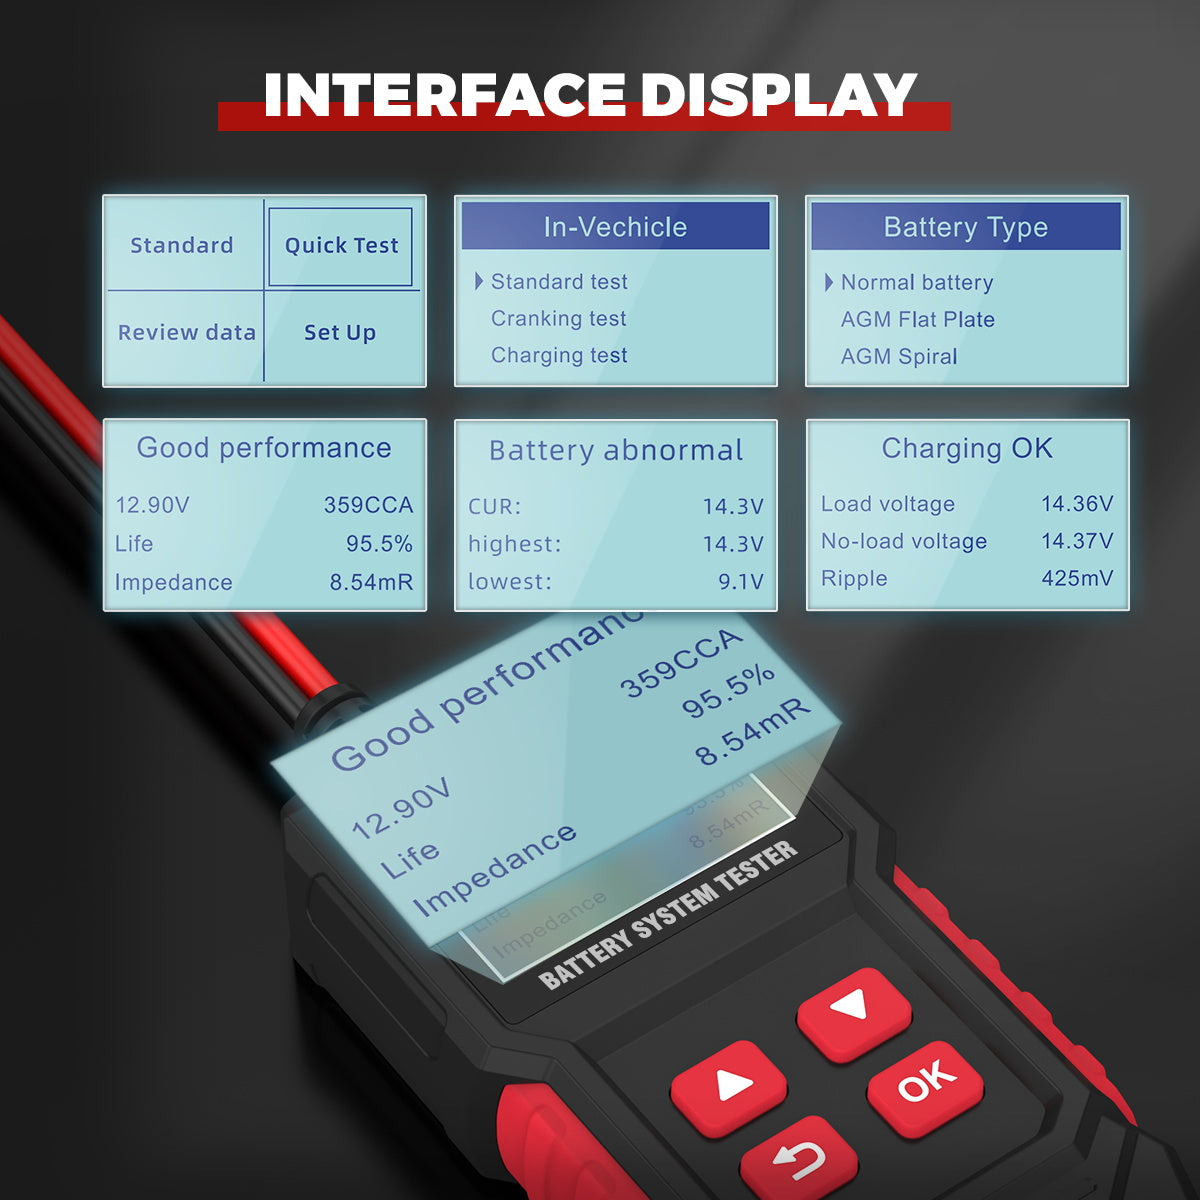
Choose the appropriate Standard Test or Quick Test path, then select in-vehicle or out-of-vehicle as prompted. For a standard test, enter the exact lead-acid construction and the rating system printed on the battery, such as CCA, SAE, EN, DIN, IEC, BCI, GB or JIS, followed by its printed value.
Step 5: Run the battery-health test and save all results
Start the selected battery test and keep both clamps still until the result stabilizes. Record voltage, measured rating, life or health indication, impedance and the displayed decision together. Do not replace a battery from one isolated number without considering state of charge, temperature and the battery maker's criteria.
Step 6: Run the cranking test only when prompted
Select Cranking Test, route the tester and leads away from belts, fans, exhaust and controls, then start the engine only when the BT50 prompts. Record the lowest cranking voltage and the displayed cranking decision, and stop if a lead moves, heats or approaches a rotating part.
Step 7: Run the charging test through the prompted states
With effective exhaust ventilation and the vehicle stable, select Charging Test and follow the displayed idle, load and acceleration prompts. Record the no-load voltage, load voltage, ripple and decision shown by the BT50. Compare them with the exact vehicle charging-system specification rather than treating one universal voltage as correct for every motorcycle or car.
Step 8: Review, repeat and separate battery from vehicle faults
Use Review Data to preserve the result. If charge is low or clamp contact was questionable, correct the condition and repeat the same test. A battery result does not by itself diagnose a starter, alternator, regulator, cable, ground, parasitic draw or control-system fault, so continue the vehicle procedure when the symptom remains.
Step 9: Finish the test and restore the vehicle
Return the engine and loads to the required state, exit the active test and switch the ignition off before removing the clamps by their insulated handles in the vehicle-approved order. Refit every terminal cover or access panel, then store the BT50 with the cable loose and the clamp jaws clean and protected.
Before closing the job, confirm the complete result was saved, the engine and loads are in the required state, both clamps are removed safely, terminal protection is restored and no cable, cover or tool remains loose.
Read and verify the result
Treat the BT50 result as a structured set, not a verdict detached from conditions. Voltage shows the present electrical state; measured rating and impedance support a conductance-based health assessment; cranking and charging screens describe the vehicle during their prompted tests. Temperature, state of charge, terminal contact and the exact entered rating can change the result, so repeat after correcting a known setup problem.
- Save voltage, measured rating, health or life, impedance and the displayed decision from the same standard test.
- If state of charge is low, charge by the battery maker’s procedure and retest before making a replacement decision.
- Compare minimum cranking voltage and behavior with the exact vehicle and battery specification.
- Compare no-load voltage, load voltage and ripple with the vehicle charging-system procedure rather than one universal number.
- Continue cable, ground, starter, regulator/alternator and parasitic-draw diagnosis when the original symptom remains.
Stop for a leaking, swollen, frozen or hot battery; sparking; a heating clamp or cable; an unstable connection; reversed polarity; abnormal vehicle behavior; or a lead approaching a moving or hot part. Switch the vehicle off and make the area safe before touching the setup. A protection feature or plausible screen result is not permission to continue an unsafe test.
Common mistakes and care
- Do not test a swollen, cracked, leaking, frozen or dangerously hot battery.
- Keep sparks, flames and smoking materials away from batteries and provide effective ventilation.
- Confirm red-to-positive and black-to-negative before testing; reverse-polarity protection is backup protection, not a normal connection method.
- Keep the tester, cable and clamps clear of belts, fans, exhaust and moving controls during cranking and charging tests.
- Use the exact lead-acid construction, rating standard and printed value; a wrong input can produce a plausible but misleading result.
- The BT50 result supports diagnosis but does not replace the battery maker's or vehicle maker's test and repair criteria.
- Do not choose CCA, JIS, EN or another rating standard unless that standard and value are printed on the battery or established by exact data.
- Do not test through dirty, painted or loose contact surfaces and then treat an unstable conductance result as battery failure.
- Do not start the engine until the BT50 prompts and the tester and cable are secured outside every rotating and hot zone.
- Do not treat one normal battery result as proof that the starter, charging system, cables, grounds and parasitic draw are all normal.
- Do not connect the BT50 to a lithium battery, traction battery or system outside the delivered 12V lead-acid scope.
Frequently asked questions
Can the BT50 test lithium motorcycle batteries?
Do not use this workflow for lithium batteries. The current BT50 product record describes a 12V lead-acid scope including regular, AGM and gel constructions. Use a tester and procedure explicitly approved for the exact lithium chemistry and battery-management system.
Which rating standard should I enter?
Enter the standard and value printed on the battery label or established by its exact data. CCA, JIS, EN, DIN and other systems are not interchangeable menu labels; choosing the wrong one can produce a plausible but misleading decision.
Does a good BT50 battery result prove the starting and charging system is healthy?
No. The standard battery test, prompted cranking test and prompted charging test answer different questions. Cable resistance, grounds, starter load, regulator or alternator behavior, ripple and parasitic draw may still require separate vehicle-specific checks.
Final BT50 checklist
- 12V lead-acid battery construction, rating standard and printed value confirmed
- Battery case, terminals, vehicle and BT50 inspected; ventilation and ignition control established
- Red clamp on positive and black clamp on negative with clean stable contact
- Correct in/out-of-vehicle mode, battery type, rating standard and value selected
- Voltage, measured rating, health/life, impedance and decision recorded together
- Cranking and charging tests completed only through the prompts with safe lead routing
- Questionable contact or low state of charge corrected before a repeat test
- Clamps removed safely and terminal covers, panels and stored-data record restored
The BT50 is most useful when the input is as disciplined as the reading: identify the battery, make clean Kelvin-clamp contact, enter the exact printed standard, preserve the complete result and separate battery condition from cranking and charging-system faults.











Comments 0
Questions, fixes, and real-world diagnostic notes from readers.
Be the first to share a diagnostic result or ask a follow-up question.