
How to Use the AUTOOL AS502 Brake Fluid Tester Step by Step

The AUTOOL AS502 checks the water content indicated in brake fluid. Identify the fluid first, wipe the probe clean, choose the matching Normal or supported DOT 4 Expert setting, immerse the sensing end, press TEST and read the percentage together with the on-screen status.
Use this result as one maintenance input. The AS502 does not measure boiling point, find a leak, explain pedal feel or confirm the condition of every part of the brake system.
In this guide
Choose the correct AS502 mode
| What is in the vehicle? | AS502 choice | When to stop |
|---|---|---|
| Identified DOT 3 fluid | Normal → DOT 3 | Stop if the cap or service information does not confirm the fluid |
| Identified DOT 4 fluid | Normal → DOT 4 | Stop if the fluid identity is uncertain |
| Identified DOT 5.1 fluid | Normal → DOT 5.1 | Do not select DOT 5.1 for DOT 5 |
| Identified DOT 4 from a brand shown in the Expert menu | Expert → exact listed brand | Stop if the brand is absent or the formulation cannot be identified |
DOT 5 and DOT 5.1 are different fluids. The current AS502 manual lists DOT 3, DOT 4 and DOT 5.1 in Normal mode; it does not list DOT 5. Expert mode is for the selected DOT 4 brands actually shown by the tester, not a universal higher-accuracy mode.
Before you open the reservoir
Have four 1.5 V AAA batteries, a clean lint-free wipe, suitable eye and hand protection, the vehicle service information and the exact fluid specification from the reservoir cap. Park securely on a stable surface, switch the engine off and clean dirt from around the cap before opening it.
Stop if the probe or cable is damaged, the fluid cannot be identified, the reservoir cannot be opened without introducing dirt, or the vehicle requires a service procedure you cannot follow safely. Brake fluid can damage paint, so keep it controlled and follow the fluid manufacturer’s handling instructions.
AUTOOL AS502 step-by-step procedure
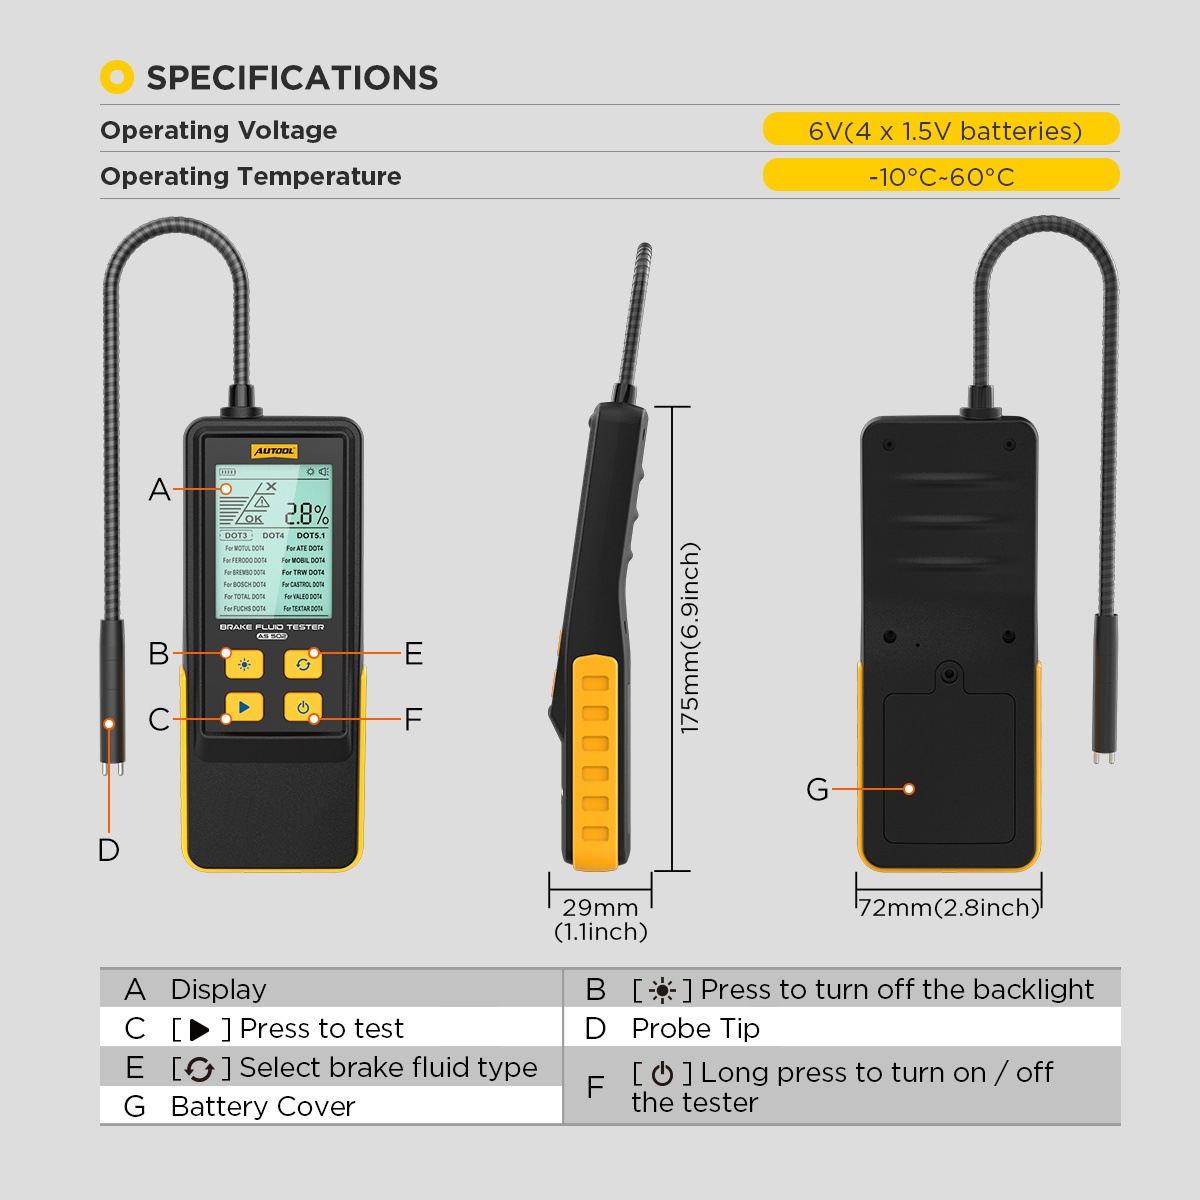
Step 1: Confirm the tester, fluid and task
Verify that the device is an AS502 and that the planned task is a water-content check on identified DOT 3, DOT 4 or DOT 5.1 brake fluid. Read the reservoir cap and vehicle service information instead of choosing from color, age or memory.
Completion check: You can name the exact fluid specification and the AS502 is the correct tester for the task.
Step 2: Inspect the probe and housing
Check the flexible probe, sensing end, display, buttons and battery cover. The sensing end should be intact and free of residue; the outer hose should not be split, crushed or loose.
Stop: Do not place a damaged or contaminated probe into the reservoir.
Step 3: Install four AAA batteries
Open the rear battery cover and install four 1.5 V AAA batteries in the polarity shown inside the compartment. Refit the cover securely.
Completion check: The batteries are seated in the marked direction and the cover closes without force.
Step 4: Prepare clean reservoir access
Secure the vehicle, switch the engine off and make the reservoir area visibly clean. Keep the cap closed until the tester is ready so the fluid is exposed for the shortest practical time.
Common mistake: Opening the reservoir before the probe and mode are ready creates extra opportunity for dirt or moisture to enter.
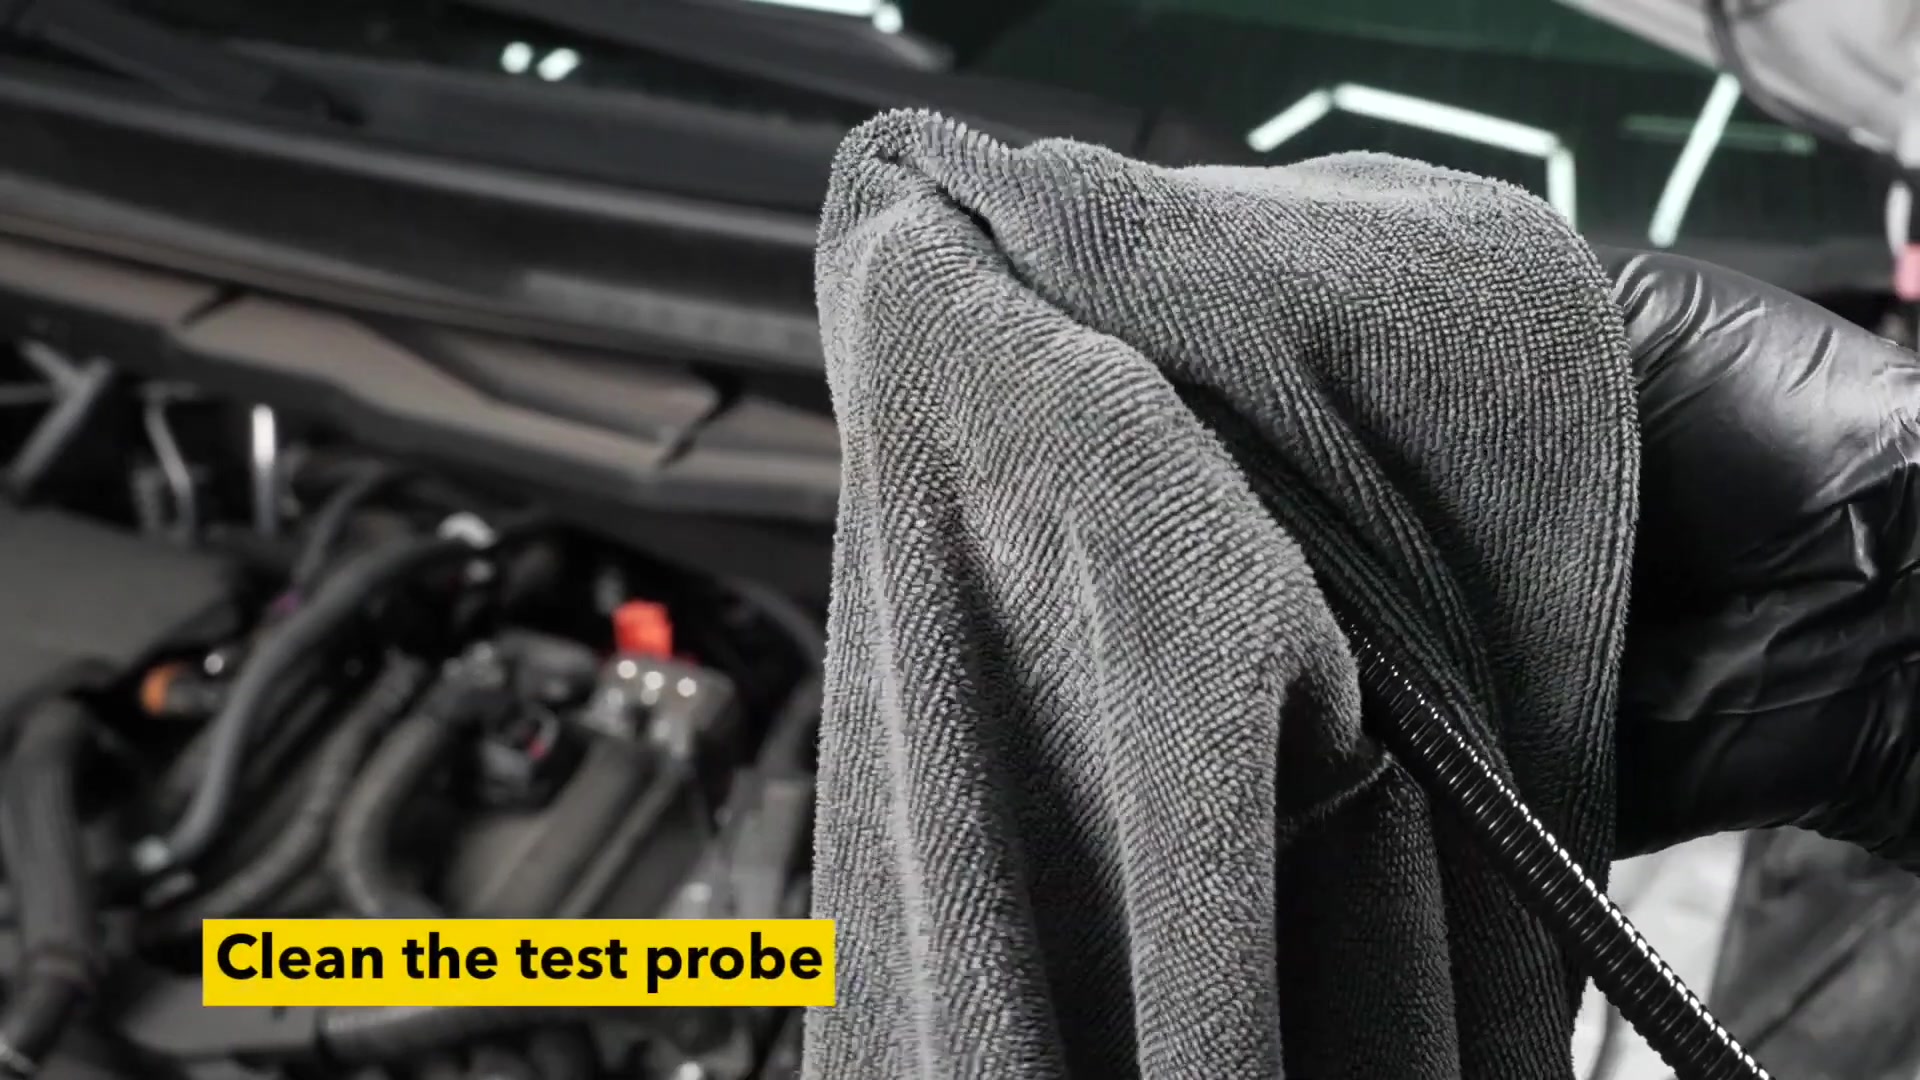
Step 5: Clean the probe before it reaches the reservoir
Wipe the sensing end with a clean, lint-free material. Remove any residue from storage or a previous sample without adding solvent or another fluid.
Completion check: The sensing end is clean, dry and free of visible fibers.
Step 6: Power on the AS502
Hold the power key for more than about two seconds. Confirm that the display starts normally. The unit can switch itself off after five minutes without activity, so restart it if the screen has gone dark before testing.
Stop: Replace or reseat the batteries if the unit will not start or shows unstable power; do not continue with an unreliable display.
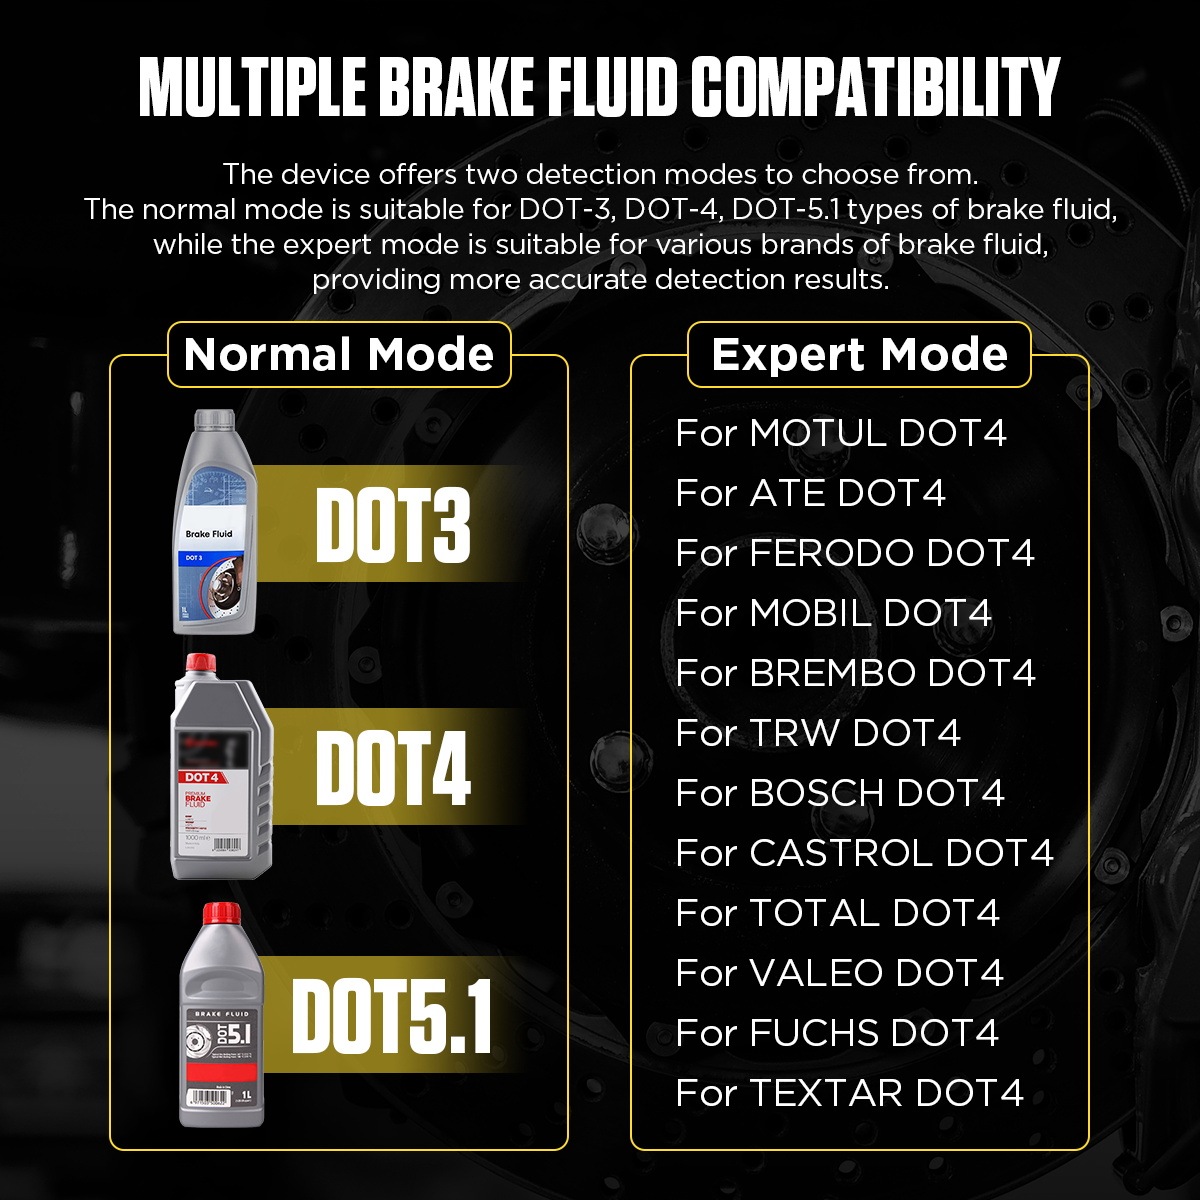
Step 7: Select Normal or Expert mode
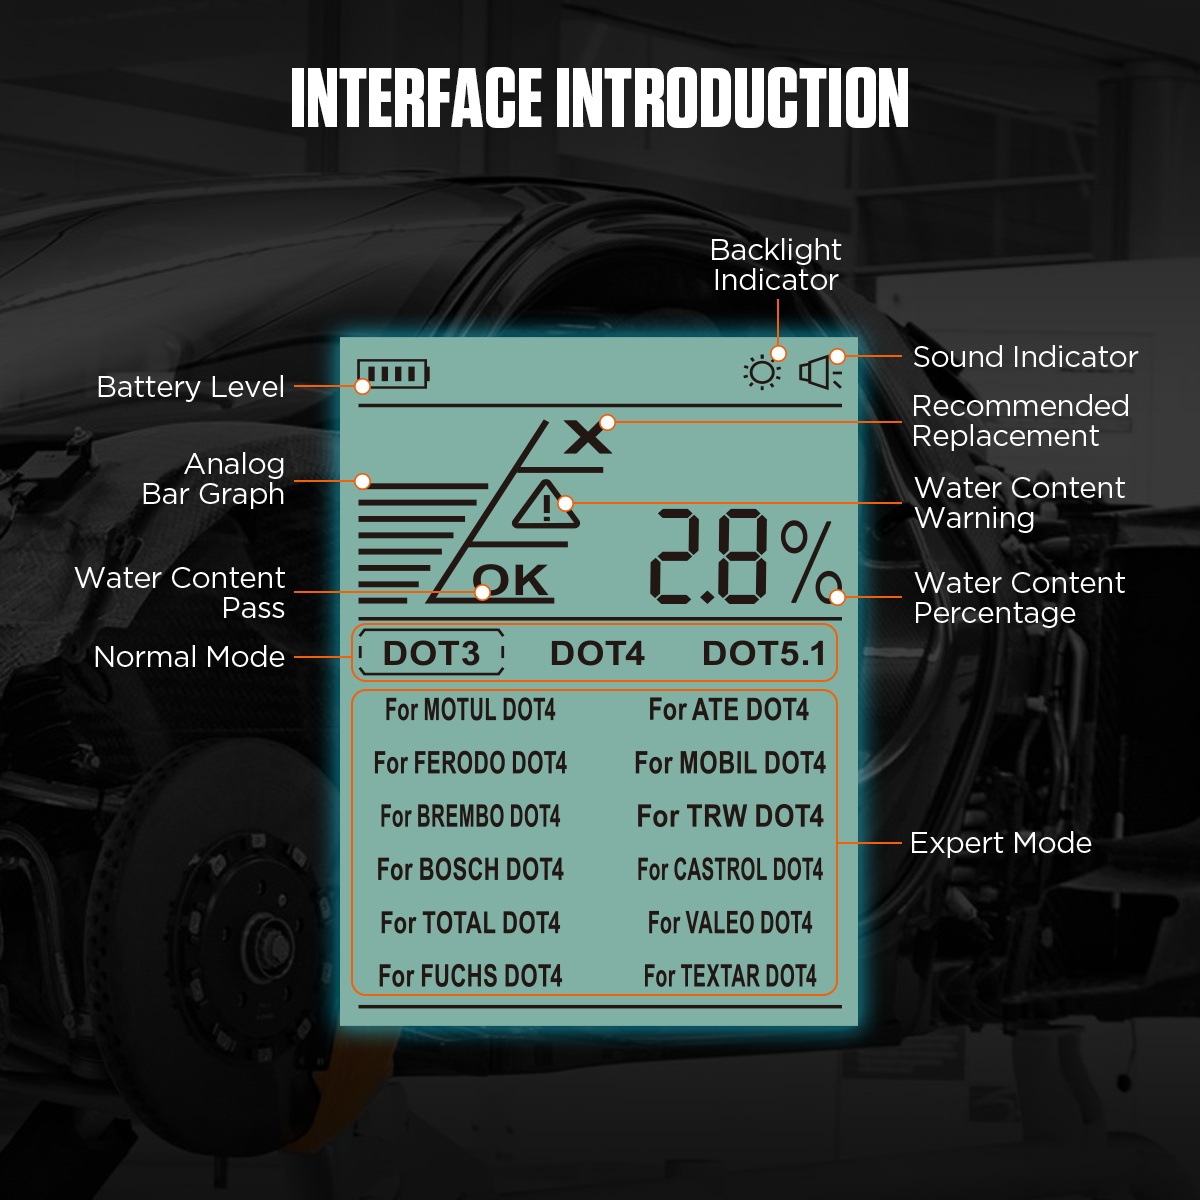
Use Normal mode for identified DOT 3, DOT 4 or DOT 5.1 fluid. Use Expert mode only when the fluid is DOT 4 and its exact brand appears in the delivered AS502 menu. The current manual lists MOTUL, ATE, FERODO, MOBIL, BREMBO, TRW, BOSCH, CASTROL, TOTAL, VALEO, FUCHS and TEXTAR.
Completion check: The selected mode matches the fluid specification; Expert mode also matches the identified DOT 4 brand.
Step 8: Confirm the fluid selection on screen
Use the fluid-type control to move to the required selection, then pause and read the screen before opening the cap. Do not assume the previous test’s selection is still correct.
Common mistake: DOT 5.1 is not a substitute selection for DOT 5. If the vehicle uses DOT 5, stop because it is outside the current AS502 manual.
Step 9: Turn on the backlight if needed
Use the backlight key when ambient light makes the display difficult to read. A clear screen helps prevent a wrong mode or misread result, but it does not change the measurement.
Completion check: The fluid selection and display symbols are readable from your working position.
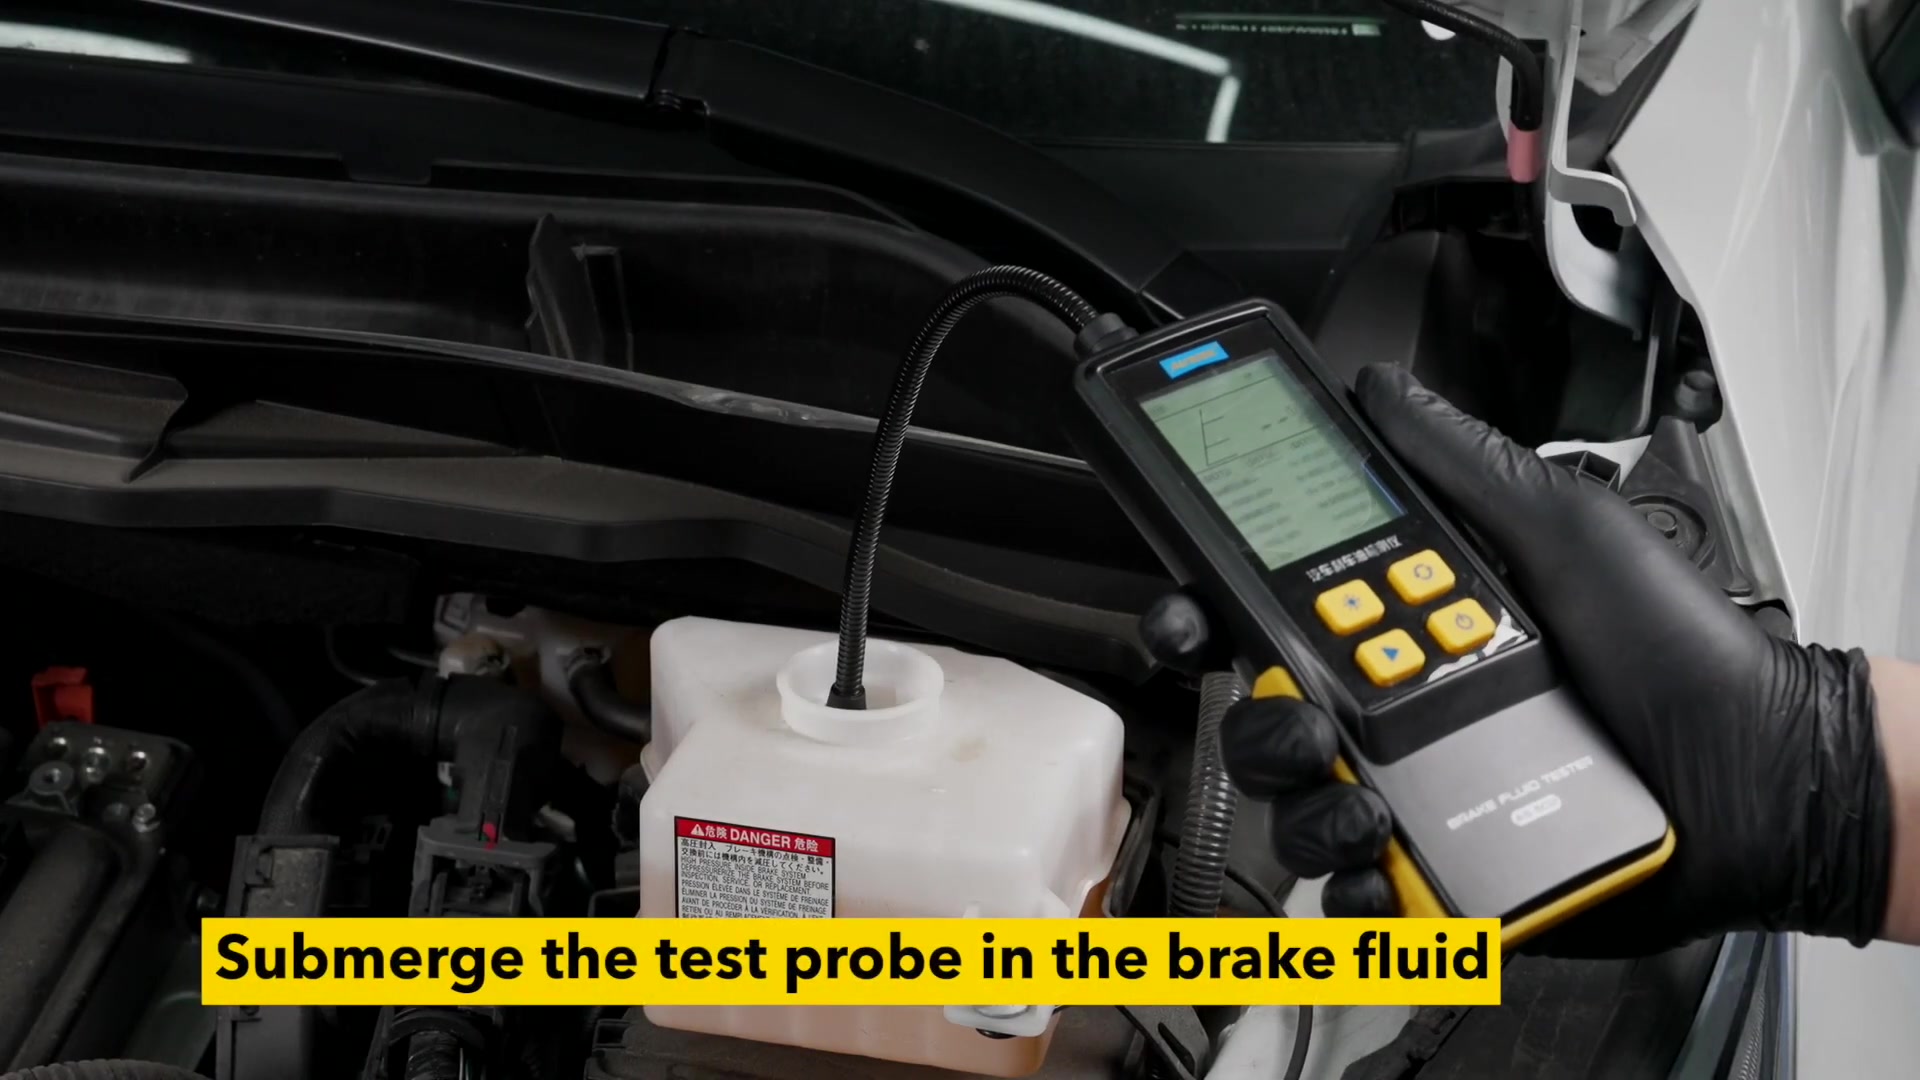
Step 10: Immerse the sensing end
Open the clean reservoir cap and guide the flexible probe into the fluid. Immerse the sensing end sufficiently for contact without forcing the hose against the reservoir, seals or nearby components.
Stop: Withdraw the probe if clean access cannot be maintained or the sensing end cannot reach the fluid without force.
Step 11: Press TEST and hold the probe steady
Press the TEST key once and keep the sensing end in stable contact with the fluid. Avoid moving it against the reservoir wall while the AS502 responds; the manual gives an approximate response time of ten seconds.
Completion check: The display settles on a percentage and status rather than continuing to change because the probe is moving or losing contact.
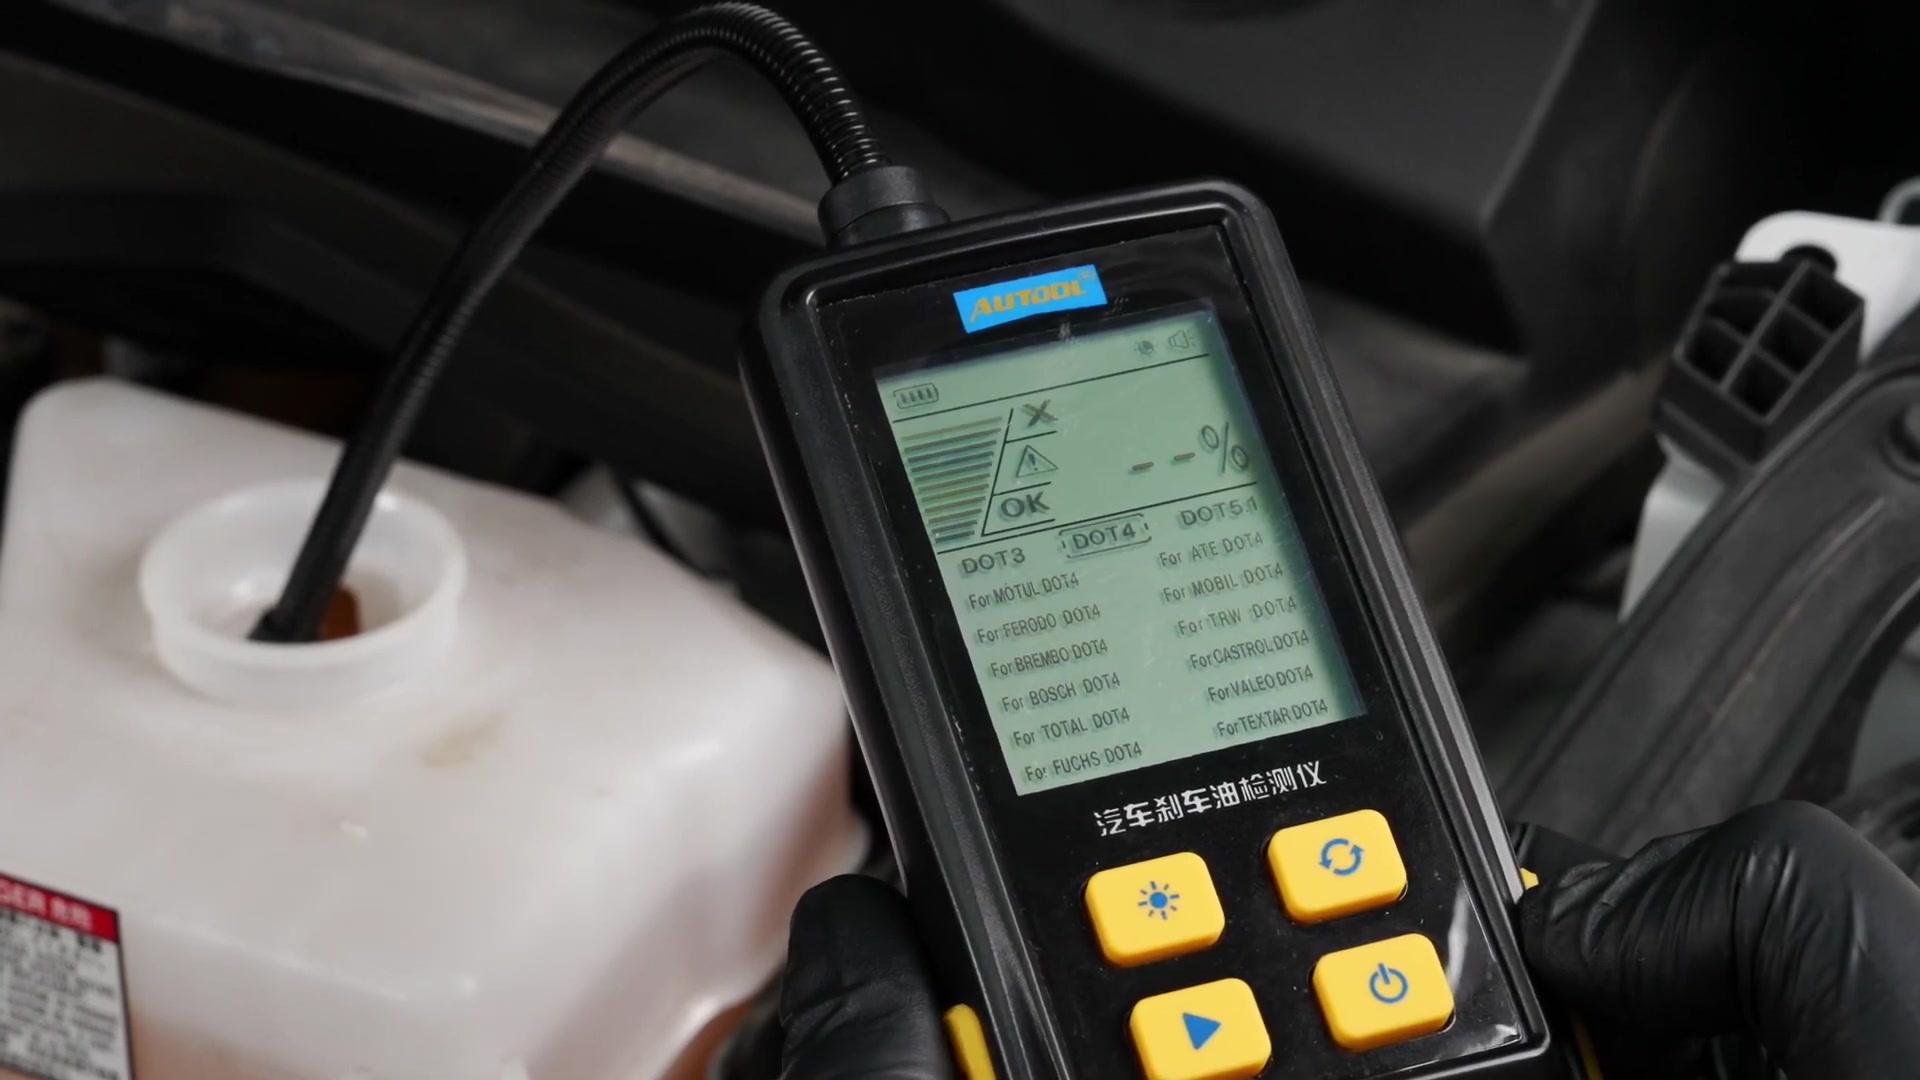
Step 12: Read the percentage and status together
The manual groups 0–2% as good, 2–3% as warning and above 3% as replacement guidance. Because the printed bands share the exact 2% boundary, use the status actually shown on the AS502 and the vehicle’s service information for a boundary result.
Do not convert this one indication into a claim about boiling point or the entire braking system. A warning, a result above 3%, an overdue maintenance interval or other brake concern should be handled through the vehicle’s specified service process.
Pass condition: The percentage and displayed status are both recorded, and the service decision follows the vehicle schedule and service information.
Step 13: Verify an unexpected result once
If the reading looks implausible, remove the probe, wipe it clean, confirm the fluid selection and repeat the test once with stable immersion. Compare the two results without averaging away a warning.
Stop: If repeat readings remain inconsistent, the fluid is uncertain or the tester behaves abnormally, close the reservoir and use an appropriate professional inspection path.
Step 14: Remove and wipe the probe
Lift the sensing end out without touching painted surfaces. Wipe it clean immediately with a lint-free material and keep removed fluid away from the reservoir.
Completion check: The probe is clean and no fluid has dripped onto surrounding components or paint.
Step 15: Close the reservoir and power off
Refit the correct reservoir cap securely, then hold the AS502 power key for about two seconds to switch it off. Check the work area before leaving the vehicle.
Completion check: The cap is correctly seated, the area is clean and the tester is off.
Step 16: Store the tester dry
Let the clean probe and housing remain dry, then store the AS502 at room temperature away from moisture and contamination. Remove the batteries when the tester will be stored for a long period.
Common mistake: Putting the tester away with brake-fluid residue on the probe can contaminate the next reservoir and shorten the life of the sensing area.
What a complete AS502 test looks like
A complete test leaves more than a number on the screen. The fluid was identified before mode selection, the clean probe stayed in stable contact, the percentage was read with its displayed status, an unexpected result was checked once, and the reservoir was closed without contamination.
If the result calls for service, use the vehicle manufacturer’s brake-fluid procedure and interval. For the delivered control layout, regional language pages or an updated revision, find the AS502 entry in the AUTOOL manual download center before beginning work.











Comments 0
Questions, fixes, and real-world diagnostic notes from readers.
Be the first to share a diagnostic result or ask a follow-up question.