
How to Use the AUTOOL CT80 Ultrasonic Cleaning Machine

The AUTOOL CT80 ultrasonic cleaning machine cleans compatible removable parts in a timed ultrasonic bath, with optional heating when the part and cleaning liquid allow it. It does not pulse an injector, create test pressure, measure flow or leakage, or prove that a cleaned part is serviceable.
For a safe first cycle, verify the voltage on your delivered CT80, confirm that the item and a nonflammable ultrasonic-cleaner liquid are compatible, and load the item on the supplied stand while the unit is unplugged. Add liquid only to the level permitted by the markings or instructions supplied with that unit, then set a short, justified time. Enable heat only when every applicable limit permits it. Monitor the cycle without touching the liquid, stop on any abnormal condition, and isolate and cool the machine before handling the item or used liquid.
Last reviewed: August 28, 2026.
In this guide
What the CT80 controls—and what it does not
As an ultrasonic cleaner, the CT80 supplies three parts of the cleaning cycle:
- 40 kHz ultrasonic action with a listed ultrasonic power of 60 W;
- an adjustable timer with a marketed range of 0–40 minutes;
- an optional heating function marketed up to 50°C.
Those are machine capabilities, not one recipe. Forty minutes is not a default cleaning time, and 50°C is not a default target. The correct time and whether heat can be used depend on the item, its coatings, seals, adhesives and finish, the cleaning-liquid label, and the instructions supplied with your exact CT80.
The machine also does not decide whether a part can be immersed. An ultrasonic bath can move contamination away from accessible surfaces, but it cannot make a powered assembly, battery, moisture-sensitive component, soft stone, delicate plating, glued joint or unknown seal safe to submerge.
Check the job before you fill the tank
Continue only when every line below is true:
- The model and input-voltage label on your CT80 are legible, and the available supply matches them exactly. Treat 110 V and 220 V as separate product versions unless your delivered nameplate expressly says otherwise.
- The item is removed from the vehicle or equipment, de-energized and safe to handle.
- The item maker or current service information permits ultrasonic cleaning and specifies which surfaces may contact liquid.
- The liquid is labeled for ultrasonic-cleaner use, is nonflammable, and is compatible with the item and the stainless tank.
- The part has no loose pieces that could detach, and the planned position will not force or jam it into the stand.
- The tank, stand, power cord, plug, controls and case are dry, clean and undamaged.
- You know the liquid-level and post-cycle handling rules for the exact unit in front of you.
Do not place fuel, gasoline, a flammable solvent, or an unidentified chemical in the bath. Do not clean a powered or battery-containing assembly. If the item’s immersion boundary, liquid compatibility or the CT80 voltage is uncertain, stop before adding liquid.
Know the tank and controls
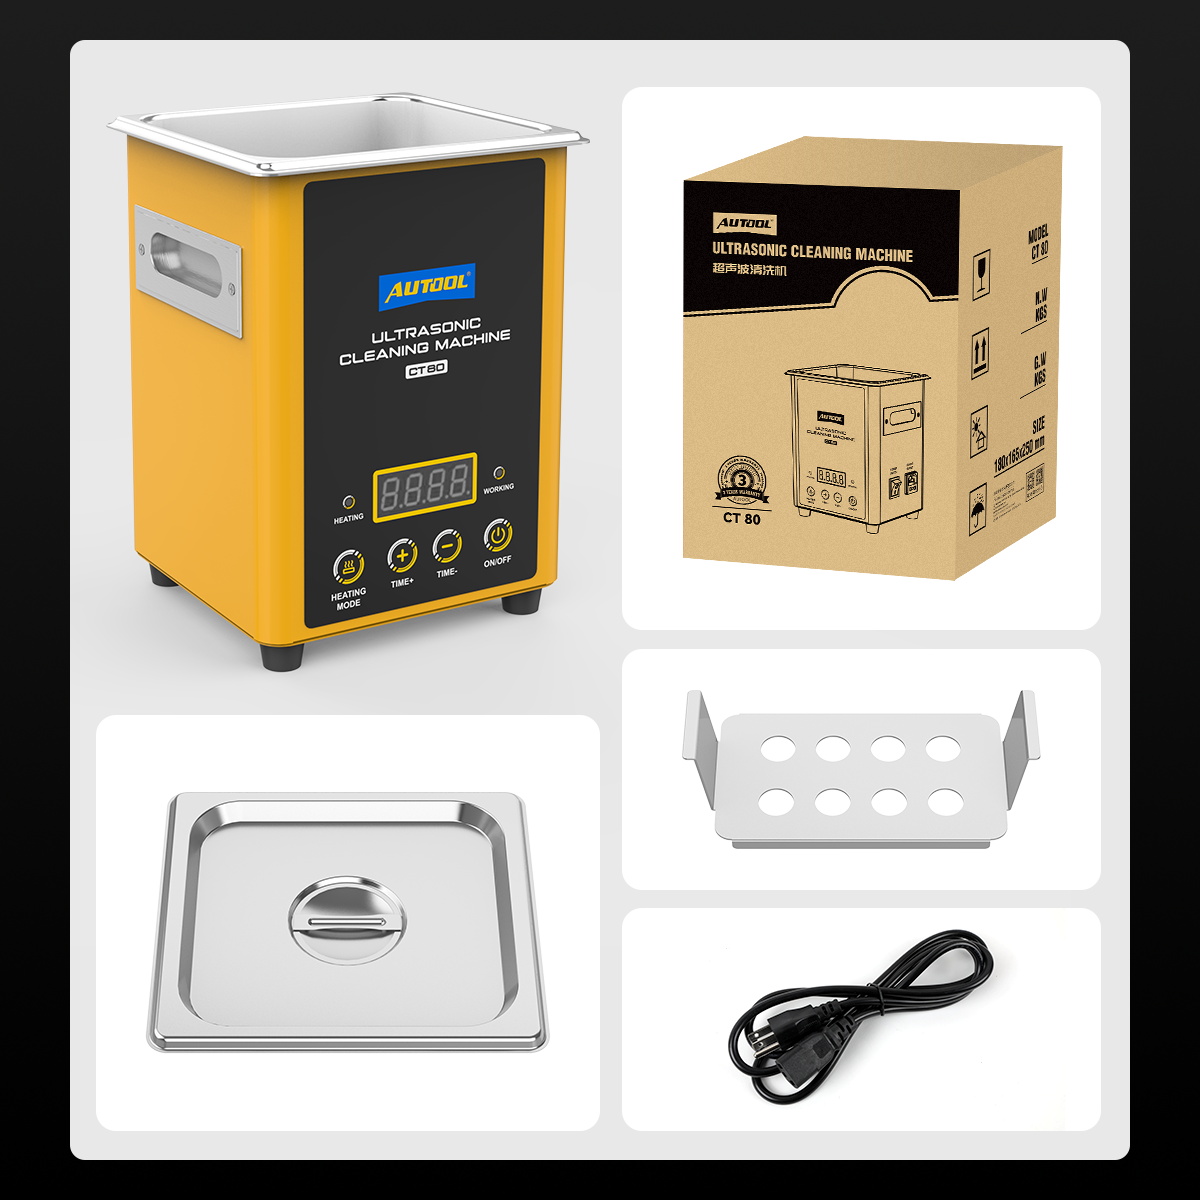
The stainless tank sits at the top of the machine. The perforated stand supports compatible parts in the bath. Handles are fitted to the case, while the power socket and rocker switch are on the side. The front panel contains the display, HEATING MODE, TIME +, TIME − and ON/OFF controls, plus heating and working indicators.
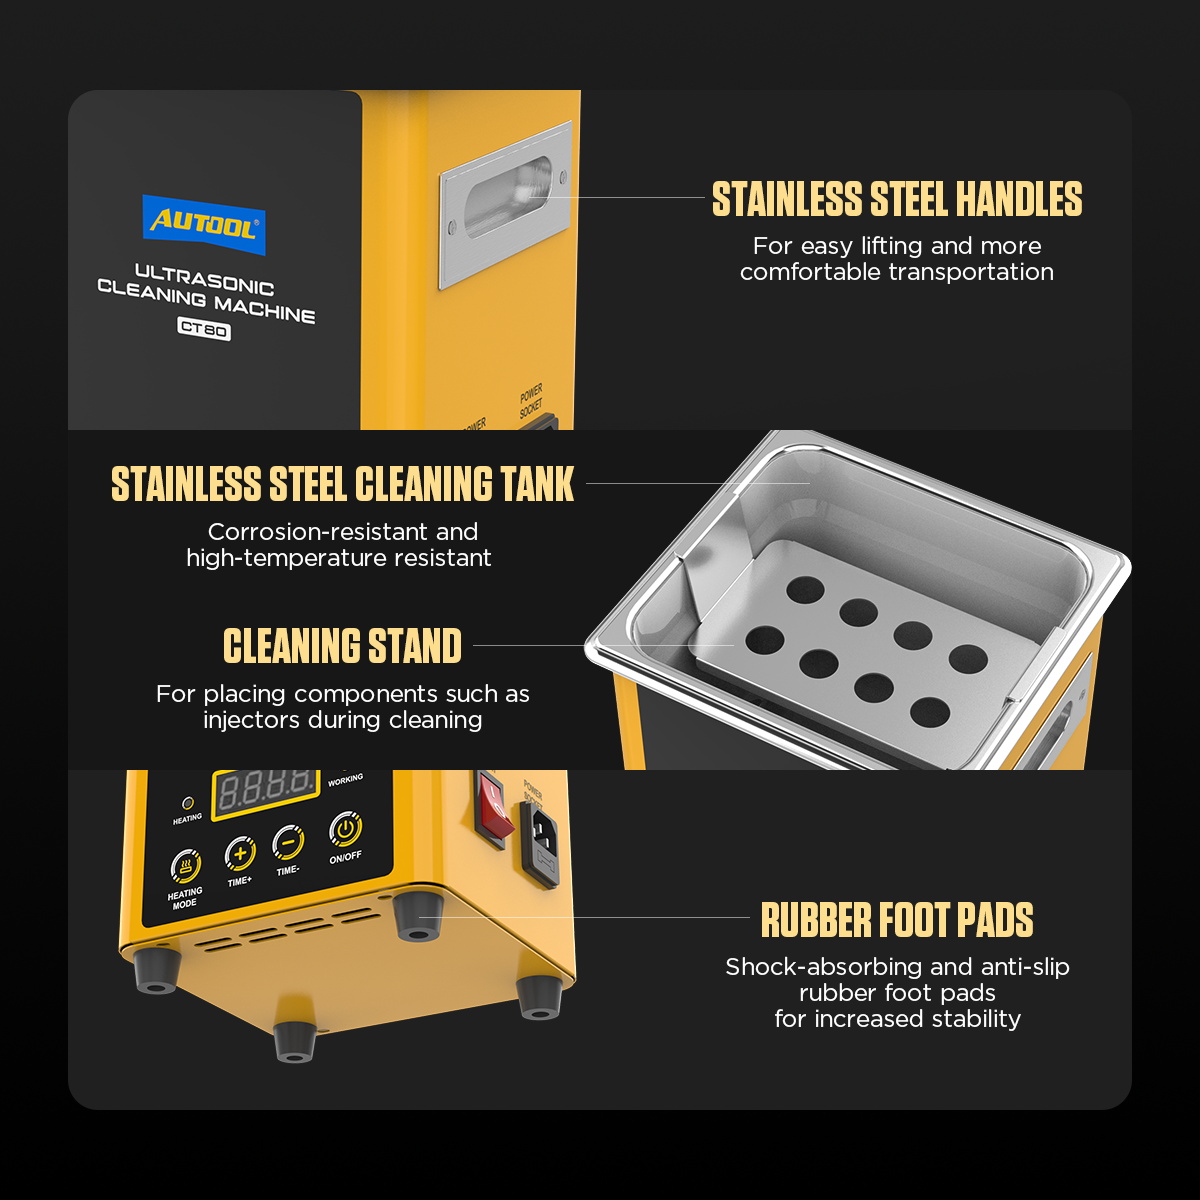
If your delivered controls or labels differ, use that unit’s instructions rather than translating this sequence to a look-alike machine.
Step-by-step CT80 cleaning procedure
Step 1: Confirm that the item and liquid are compatible
Identify the material, coating, seals, adhesive joints and any electrical portions of the item. Obtain the item maker’s current cleaning limits. Then select a nonflammable liquid labeled for both ultrasonic-cleaner use and the material being cleaned.
For an automotive component, remove loose dirt outside the bath using a method approved for that part. Blocked passages, trapped air and sealed cavities may need a part-specific orientation, but do not guess an immersion position. Never assume that a broad application category proves that your exact injector, circuit board, jewelry item or coated part can be submerged.
Completion check: The exact item, permitted wet surfaces, cleaning liquid, maximum temperature and handling method are known. If any one is unknown, do not proceed.
Step 2: Inspect and position the CT80
Keep the rocker switch off and the power plug disconnected. Place the CT80 upright on a level, dry, stable work surface where the cord cannot be pulled and liquid cannot run toward the socket, switch, controls or plug. Leave enough room to lift the item without passing it over energized parts.
Inspect the tank for debris, damage or residue from an incompatible liquid. Check the stand for distortion or sharp damage. Inspect the cord, plug, case and controls for cuts, looseness, discoloration, corrosion or evidence of liquid entry.
Completion check: The machine is dry, stable and undamaged, and its input label matches the supply you intend to use.
Stop: Keep the unit out of service after liquid intrusion, a cracked or loose case, a damaged cord or plug, unreadable electrical markings, or repeated abnormal display behavior.
Step 3: Load the item while the machine is isolated
Fit the supplied perforated stand in its intended orientation. Place the compatible item on the stand without forcing it against the tank or overloading one side. Keep parts separated if contact could damage a finish or create unstable movement.
Do not place the item directly on the tank bottom unless the instructions for your exact unit expressly permit it. Use the delivered support and the loading method approved for that item and CT80 version.
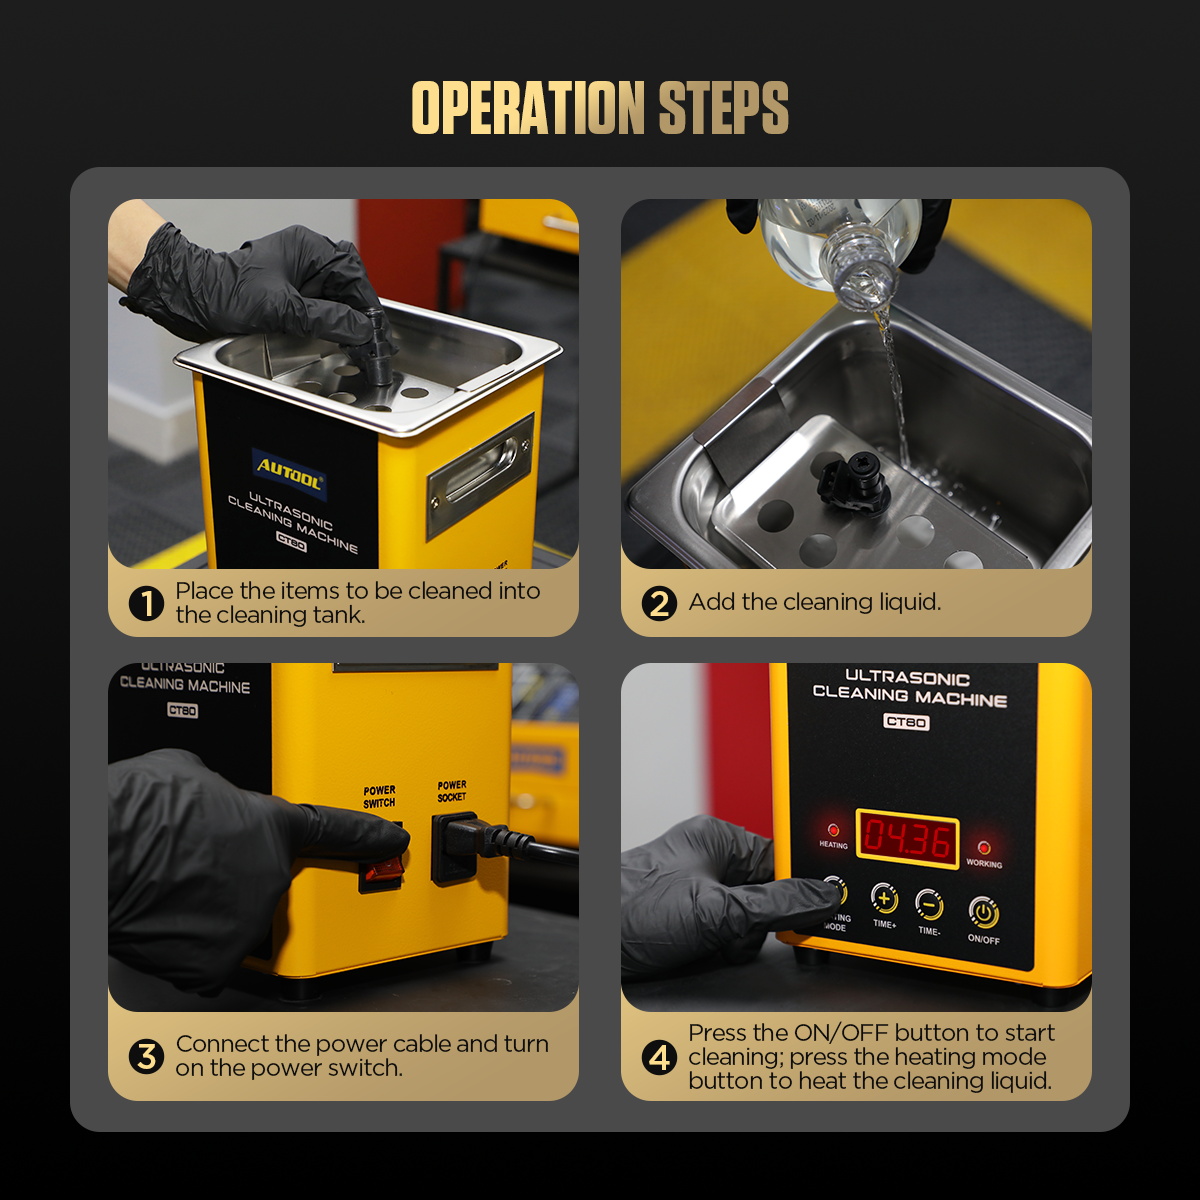
Completion check: The item sits securely on the stand, cannot tip or jam, and will not expose a prohibited surface to liquid.
Step 4: Add the approved cleaning liquid
Add the approved liquid slowly while the unit remains unplugged. Use the minimum/maximum marks or fill instructions supplied for your exact CT80. Allow for the liquid displaced by the item, and keep the outer case, front panel, side socket, switch, cord and plug dry.
Do not turn a listed tank-capacity number into a fill line. Do not energize an empty or underfilled bath, and do not fill so high that inserting the item, bath movement or lifting the stand can cause overflow.
Use the lid only as directed by the instructions for your exact CT80, item and liquid. Do not assume that one lid position is correct for every heated or unheated cycle.
Completion check: With the item loaded, the liquid level complies with the markings or instructions supplied with your unit. No liquid has reached an electrical area, and the setup is stable.
Step 5: Connect the voltage-matched unit
Dry your hands and the work area. Recheck the CT80 input label, cord and outlet. Connect the supplied power cord to the exact unit and a matching protected supply, then turn on the side rocker switch.
The display should start normally. Do not use an adapter or transformer arrangement unless it is expressly approved for your delivered CT80 version.
Completion check: The display and indicators behave normally, the cord remains cool and secure, and no liquid is moving toward the electrical side of the machine.
Stop: Switch off and isolate the supply for flickering, smoke, unusual odor, a hot plug or cord, a breaker trip, an unstable display or visible liquid near an electrical area.
Step 6: Set a short justified cleaning time
Use TIME + or TIME − to set the interval supported by the item’s cleaning instructions and the liquid label. Begin with a short controlled interval when the approved process provides a range, then inspect the result before repeating.
The panel can display values within a 0–40 minute range, but any pictured value is only an example. Do not choose 20 or 40 minutes simply because the machine can display it.
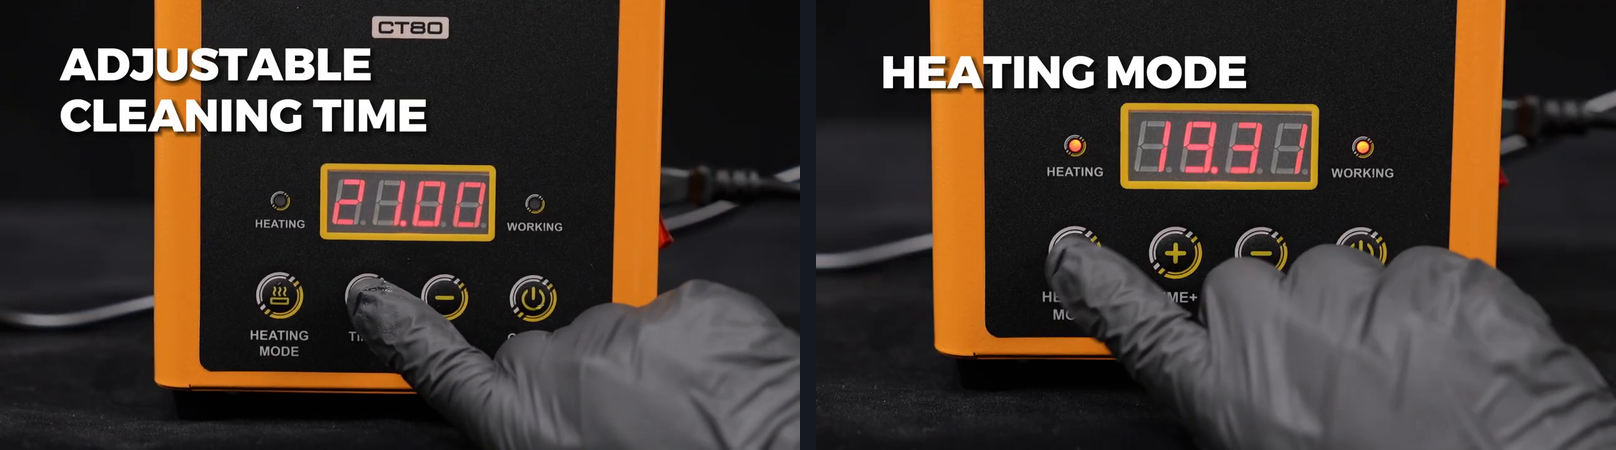
Completion check: The displayed time is deliberate, recorded and within every applicable item and liquid limit.
Step 7: Start ultrasonic cleaning
Confirm that the item is stable, the liquid level complies with the instructions for your unit and your hands are dry. Press the front ON/OFF control to start ultrasonic cleaning. Observe the working indicator and timer from outside the bath.
Do not reach into the liquid, hold the item, rearrange a part or test bath activity by touch while the machine is energized. Stop and isolate the unit before correcting the load or liquid level.
Completion check: The working state is visible, the machine remains stable, and the liquid stays inside the tank without contacting electrical areas.
Step 8: Use Heating Mode only when all limits allow it
Heat is optional. Press HEATING MODE only when the item maker, cleaning-liquid label and exact CT80 instructions all allow a heated bath. The lowest permitted temperature among those limits controls the job.
The published heating capability is up to 50°C, but that figure is not a required setpoint and does not prove that the panel regulates a user-selected temperature. If the approved process does not call for heat, leave Heating Mode off.
Completion check: Heating is either intentionally off or expressly permitted by every applicable instruction. Never use heat to compensate for uncertain chemistry or an unsuitable item.
Step 9: Monitor the cycle without touching the bath
Stay with the machine. Watch the timer, working/heating indicators, item stability and liquid level. Some surface movement may be visible, but do not use touch or a bare-hand test to confirm ultrasonic activity.
Stop the cycle for overflow, leakage, an item shifting or striking the tank, unusually harsh or changing noise, excessive vibration, abnormal heat, hot wiring, smoke, odor, display fault or a tripped protective device. Switch off at a safe control and isolate the plug without reaching through spilled liquid.
If cleaning appears uneven, do not reposition the item while energized. Stop, isolate and let the setup become safe before changing anything.
Step 10: Stop, isolate and let the bath cool
When the planned interval ends, press the front ON/OFF control to stop ultrasonic cleaning. Turn Heating Mode off if it was used, switch off the side rocker and disconnect the plug with dry hands.
Treat the tank, liquid, stand and item as hot until they have cooled to a handling temperature permitted by the item and liquid instructions. Do not rely on the front display alone as proof that every surface is safe to touch.
Completion check: Ultrasonic action and heat are off, the side switch is off, the supply is disconnected and the item can be handled without burn or spill risk.
Step 11: Remove the item and close the job
Lift the stand or item using the method approved for the exact setup. Allow liquid to drain back into the tank without moving it over the controls or power socket. Complete any rinse, drying, corrosion protection or lubrication required by the item maker and cleaning-liquid instructions.
Inspect the cleaned surfaces under good light. If the item is an injector or another functional component, move it to the correct test process before declaring it serviceable.
Do not assume that the unit has a drain or that one pouring direction is safe for every version. Handle the used liquid only by the instructions supplied with your exact machine and the liquid’s disposal requirements. Keep the housing, front panel, socket, switch, cord and plug dry. Store the unit only after it is cool, clean and dry.
Completion check: The item has completed its required post-cleaning process, used liquid is controlled, and the CT80 is isolated and dry.
What a successful CT80 cycle proves
A successful cycle proves that a compatible item completed a controlled ultrasonic-cleaning interval without an electrical, heat, liquid or loading problem. It may leave accessible surfaces visibly cleaner.
It does not prove that an injector has correct flow, seals under pressure or responds electrically. It does not verify a circuit board, bearing, valve or other part against its service limits. Inspect and test the component using the method required for that component before returning it to service.
CT80 troubleshooting and stop rules
| What you see | What to check after isolation | Do not do |
|---|---|---|
| No display | Delivered input label, matching supply, cord seating and protective device | Try a different voltage or unapproved adapter |
| Timer will not change | Dry controls, display state and the exact unit instructions | Strike the panel or continue with an unknown setting |
| No visible working state | ON/OFF selection, timer and indicators after the setup is isolated and rechecked |
Put a hand or tool into the energized bath |
| Item rattles or shifts | Stand position, load stability and contact between parts | Hold or rearrange the item while running |
| Liquid rises or spills | Item displacement and the exact delivered fill boundary | Continue to see whether the level settles |
| Cord, plug or case becomes hot | Supply match, damage, loose connection or liquid intrusion | Restart for a shorter cycle |
| Smoke, odor, breaker trip or display fault | Keep the machine isolated and arrange qualified inspection | Bypass protection or open the electrical housing |
| Part looks cleaner but the fault remains | Component-specific functional test and vehicle diagnosis | Treat appearance as proof of repair |
Keep the machine out of service after smoke, repeated protective-device trips, damaged insulation, liquid intrusion, persistent abnormal noise, a loose internal part or repeated abnormal heating.
Frequently asked questions
How much liquid should I put in the CT80?
Use the minimum/maximum marks or fill rule supplied with the exact unit after accounting for the liquid displaced by the item. Do not use an online capacity figure as a fill instruction. Never run the tank dry or fill it high enough to overflow.
What cleaning liquid can I use in this ultrasonic cleaner?
Use a nonflammable liquid labeled for ultrasonic-cleaner use and approved for the exact item and stainless tank. Follow its concentration, temperature, ventilation, protective-equipment and disposal instructions. Do not place gasoline, fuel, a flammable solvent or an unidentified chemical in the bath.
How long should a CT80 cleaning cycle run?
Use the item and liquid instructions. When they provide a range, start with a short interval and inspect before repeating. The machine’s 0–40 minute range does not create a universal 20- or 40-minute setting.
Should I turn on Heating Mode?
Only when the item, liquid and exact machine instructions all permit heat. The lowest applicable temperature limit controls. The marketed 50°C capability is not a default target.
Can CT80 clean a fuel injector?
Only if the injector maker’s procedure permits ultrasonic immersion of the exact removed component and specifies which seals and electrical areas may contact liquid. CT80 supplies cleaning only; it does not pulse, pressure-test, flow-test or diagnose the injector.
Can I clean circuit boards, jewelry or coated parts?
Not from the category name alone. Batteries, powered assemblies, displays, microphones, porous parts, adhesives, coatings, plating, soft stones and moisture-sensitive components may be damaged. Continue only with explicit item-maker approval for the exact assembly and liquid.
Should the lid be on during cleaning or heating?
Follow the instructions supplied for the exact CT80 version, item and liquid. Do not infer one universal lid position from a product image.
Where can I get the CT80 instructions?
Use the document supplied with the unit and match its model and electrical rating to the physical label. If it is missing or does not match, obtain the exact current instructions before performing any step that depends on a fill limit, lid rule, heat boundary or liquid-removal method.
Make each cleaning cycle controlled and repeatable
The best CT80 result begins before the power switch: a verified voltage version, a compatible removable item, an approved nonflammable liquid and a stable load. Record the chosen time and whether heat was used, monitor the bath without touching it, and isolate and cool the machine before handling the result.
When an item, liquid, fill boundary, heat limit or closeout method is uncertain, stop. Confirming that boundary is safer—and usually faster—than damaging the part or turning a cleaning task into an electrical, fire or spill problem.


Comments 0
Questions, fixes, and real-world diagnostic notes from readers.
Be the first to share a diagnostic result or ask a follow-up question.