
How to Use the AUTOOL S1 Quick Diagnostic and Repair Kit

The AUTOOL S1 is an automotive quick diagnostic and repair kit. This guide turns the current model-specific controls and official operating sequence into a practical start-to-finish workflow.
Quick answer: Use the S1 as an organized multi-tool cart: park it on level ground, lock the casters, inventory the labeled layers and define one vehicle test. Select one exact instrument and its matching accessories, follow that instrument's current instructions, restore the vehicle safely, then clean, segregate and return every item before closing and moving the cart.
In this guide
Before you start
The S1 combines a mobile steel cart with several independent diagnostic and inspection instruments. The cart provides organization and controlled access; it does not turn the included tools into one universal tester. A wrong instrument, mixed accessory, unlocked caster or open drawer can create a bad connection, contamination or tip and pinch risk before the vehicle test begins.
- choose a clear, level location outside lift movement, traffic and hot-work zones and lock the cart’s casters;
- use the exact layer diagrams and delivered list to account for every instrument, lead, hose, probe and adapter;
- define one vehicle system, test point, expected result and safe operating condition from current service information;
- select one exact instrument, its current instructions and only the accessories assigned to that tool and system;
- quarantine missing, damaged, contaminated, unidentified or calibration-due equipment; and
- keep all other drawers closed and prepare the power, pressure, refrigerant or moving-part controls required by the chosen test.
Use the AUTOOL manual download center to locate the current instructions when a manual is available. The delivered model label and current vehicle service information control if an older image or remembered setting differs.
S1 kit configuration and cart specifications
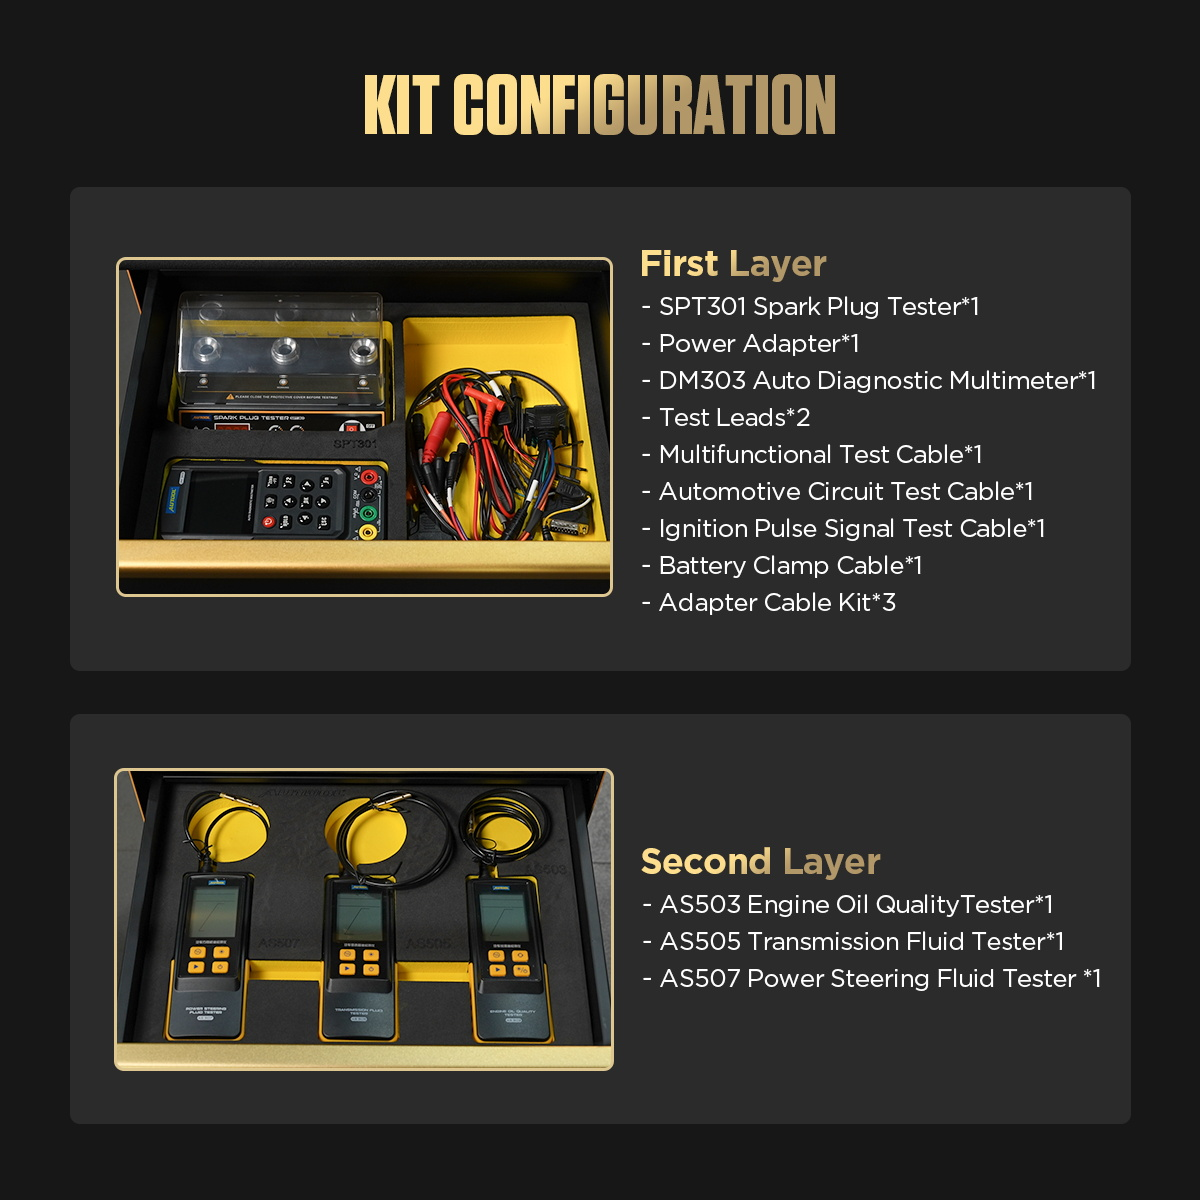
The AUTOOL S1’s recorded configuration includes Convenient and efficient, Comprehensive instrumentation, Neat storage, Excellent Weight Support, High-Quality Swivel Casters. Verify the delivered layer inventory and select the exact instrument before use; the cart specification does not replace the individual tool’s range or instructions.
| Specification or function | Current model |
|---|---|
| Product size | 530×750×1000mm |
| Product weight | 49kg |
| Product material | Cold-rolled steel plate |
| Plate thickness | Bottom plate 2.0mm, layer 1.2mm, upright post 1.5mm |
| Load bearing | 100kg |
| Caster size | 4 inches |
The cart’s 100kg load rating, dimensions and caster specification describe the storage platform, not the measurement limits of its contents. Every selected instrument keeps its own electrical, pressure, temperature, refrigerant, fluid and compatibility boundary. Where the vehicle, instrument, lead, hose or adapter limits differ, the lowest applicable limit controls.
How to use the S1
Step 1: Park and secure the S1 tool cart
Move the unloaded or closed-drawer cart over a clear level route, push rather than pull where site practice requires and keep hands and feet out of caster paths. Place it outside vehicle lift and traffic zones, close every drawer and lock the casters before opening or removing a tool.
Before moving on, confirm the cart is level with casters locked, every non-active drawer is closed and the complete delivered layer inventory has been checked.
Step 2: Match all four S1 layers to the delivered inventory
Use the S1 layer diagrams and delivered list to identify every tester, lead, hose, adapter and the inspection scope. Keep each item in its assigned compartment. Quarantine anything missing, damaged, contaminated or unlabeled instead of substituting a similar-looking part.
Step 3: Define one diagnostic question
Use current vehicle service information to name the circuit, symptom, test point, expected range and vehicle state before selecting equipment. The S1 is a collection of different tools; it does not provide one universal connection or one test that diagnoses the whole vehicle.
Step 4: Select one exact instrument and its instructions
Choose the specific meter, tester, gauge, stethoscope, scope or other supplied tool that supports the planned test. Match its exact model label, leads, adapters and current manual. Do not combine accessories from another drawer merely because a thread or connector fits.
Step 5: Make the vehicle and chosen energy source safe
Secure the vehicle and apply the exact electrical, pressure, vacuum, fuel, temperature or moving-part precautions required by the selected test. Isolate stored energy before connection and keep leads or hoses away from belts, fans, exhaust, sharp edges and vehicle controls.

Step 6: Inspect and connect only the chosen test path
Inspect the selected tool and every component in its connection path. Confirm polarity, units, range, material compatibility and the lowest-rated component, then connect with power, pressure or motion in the safe state required by that tool's instructions.
Step 7: Run the tool-specific procedure
Create only the condition defined by the vehicle and selected instrument procedure. Watch the tool, connection and vehicle continuously and stop for heat, odor, leakage, unstable readings, damaged insulation, hose movement or an unexpected vehicle response.
Step 8: Record context and verify the result
Record the exact instrument, units, range, test point and vehicle condition with the reading or observation. Repeat an unexpected result after checking the setup, changing only one controlled variable. A result from one S1 tool narrows diagnosis; it does not prove a failed part by itself.
Step 9: Return the vehicle to a safe state
Stop the selected test, isolate power or stored pressure and prove the connection is safe before removal. Restore caps, connectors, trim and fasteners and complete the vehicle-specific leak, communication or functional check.
Step 10: Clean, inventory and close the cart
Clean each item by its own instructions, segregate anything exposed to fuel or fluid and return it to the labeled layer without forcing the drawer. Account for all tools, close every drawer before unlocking the casters and record missing, damaged or calibration-due equipment.
Do not end the job at the first plausible indication. Repeat or confirm the observation under the same controlled condition, then restore the vehicle connection and check for leakage, warnings or an abnormal response.
Read and verify the result
A useful result identifies the exact instrument, units, range, test point and vehicle condition. Repeat an unexpected observation only after checking the selected tool and connection, and change one variable at a time. The reading supports the next diagnostic decision; it does not prove a failed component merely because the equipment came from a comprehensive kit.
- Keep the original units and instrument model with every recorded value or observation.
- Verify that the accessory came from the selected tool’s layer and supports the tested system.
- Separate a connection or setup problem from a vehicle fault by repeating under the same controlled condition.
- After the test, account for every part and record any missing, damaged, contaminated or calibration-due item.
Stop if the cart moves, a drawer binds or opens unexpectedly, an item cannot be identified, a connection leaks or heats, a hose swells, a lead approaches moving parts, the reading is unstable without explanation or the vehicle responds abnormally. Make the selected energy path safe before changing tools or returning equipment to the cart.
Common mistakes and care
- The S1 is a multi-instrument cart; identify the exact tool and follow that tool's current instructions for every test.
- Lock the casters and keep drawers closed except for the one being accessed; never move the cart with an open drawer.
- Never select a lead, hose or adapter by fit alone, and never mix contaminated accessories between systems.
- Account for every tool before closing the cart and remove damaged or calibration-due equipment from service.
- Do not move the cart with a drawer open or use its worktop as a seat, step or uncontrolled load area.
- Do not select an adapter, lead or hose by physical fit alone or transfer a contaminated accessory between systems.
- Do not treat the cart load rating as the pressure, voltage or measurement range of any included tool.
- Do not run several unrelated tests at once; close one tool-specific workflow before selecting the next instrument.
- Do not return a wet, fluid-contaminated, damaged or hot item to a closed drawer.
Frequently asked questions
Does the S1 have one operating procedure for every included tool?
No. The cart controls organization and access; each included instrument retains its own setup, limits, accessories and current instructions.
Can I use an adapter or lead from another drawer when it fits?
Physical fit does not prove electrical, pressure, fluid, refrigerant or material compatibility. Use only the accessory identified for the selected exact instrument and vehicle test.
Can the cart be moved with a drawer open?
No. Return and account for the tools, close every drawer, clear the route and only then unlock the casters and move the cart under the site's handling practice.
Final S1 checklist
- S1 cart parked level, casters locked and non-active drawers closed
- Delivered layer inventory checked; selected instrument and accessories positively identified
- Exact vehicle test point, expected range and operating condition documented
- Tool-specific instructions followed within the lowest applicable connection limit
- Vehicle connection restored and required leak, communication or functional check complete
- Used equipment cleaned or segregated and every item returned to its labeled layer
- All drawers closed and cart path clear before casters are unlocked
The S1 is most effective when organization is treated as part of diagnosis: secure the cart, select one exact tool for one defined question, preserve the full test context and return the complete kit in a known condition.











Comments 0
Questions, fixes, and real-world diagnostic notes from readers.
Be the first to share a diagnostic result or ask a follow-up question.