
TPMS Light Flashes, Then Stays On? Read the Timing Before Buying a Sensor

A TPMS lamp that flashes for roughly a minute after startup and then remains on usually indicates that the monitoring system has detected a malfunction; a lamp that comes on and stays solid usually indicates significant underinflation. Neither pattern lets you skip a physical tire check. Inspect all tires for damage and measure cold pressures at the door-jamb placard value before deciding whether the next branch is a leak, a sensor/communication fault, incompatible hardware, or an incomplete vehicle-specific relearn.
What to do first
- If a tire is visibly low, damaged, bulged, cut, losing air rapidly, or the vehicle pulls or handles abnormally, do not continue driving on it.
- When the tires are cold, measure all road tires—and the spare if the vehicle monitors it—with an accurate gauge. Set them to the vehicle placard/manual value, not the tire sidewall maximum.
- At the next startup, time the lamp: solid immediately, on only during cold weather, or flashing for about 60–90 seconds before becoming solid.
- Record recent tire rotation, wheel/tire replacement, puncture repair, sealant use, sensor replacement, seasonal-wheel swap, battery disconnect, or module service.
In this guide
1. Read the lamp pattern before resetting
Solid lamp
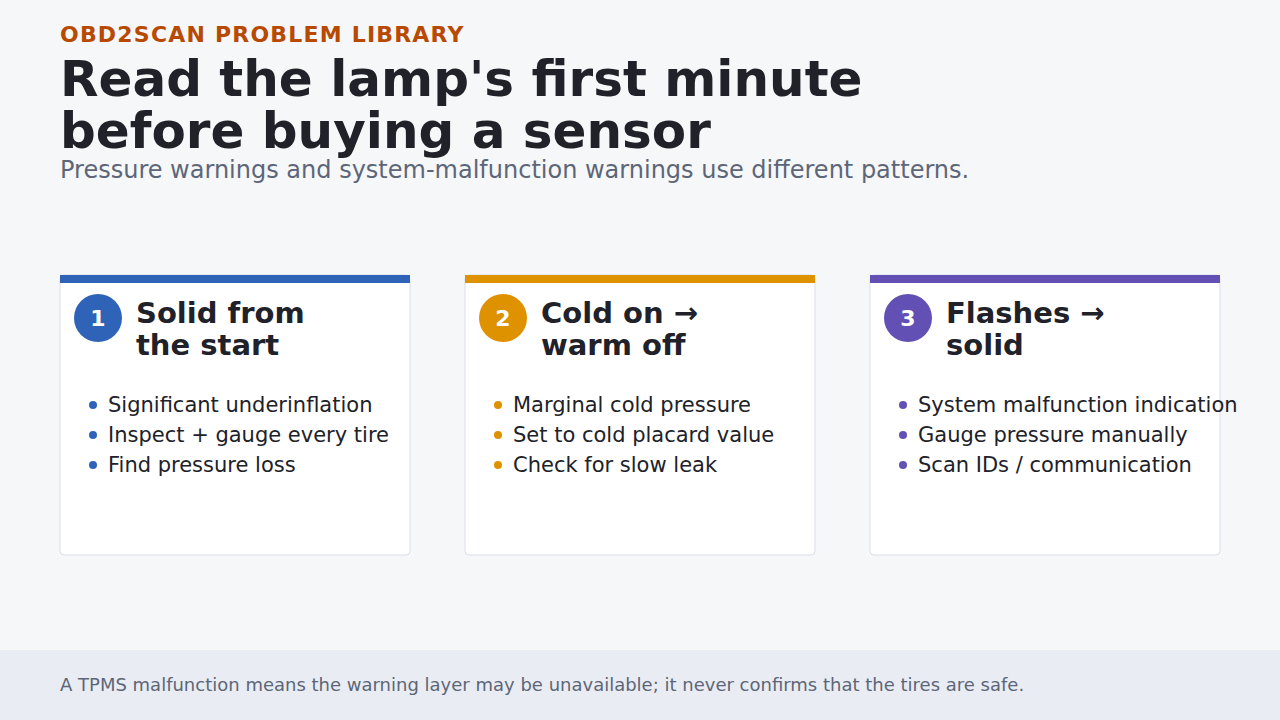
NHTSA says the solid symbol indicates at least one tire is significantly underinflated. Inspect and measure promptly. The cause could be ordinary pressure loss, temperature change, a puncture, valve-stem leak, wheel/rim leak, or another physical problem. Correct pressure does not repair a leak; recheck after time and under the same cold condition.
On during a cold morning, then off after driving
Pressure falls as temperature falls. A tire near the warning threshold can trigger the lamp cold and rise above it as driving warms the tire. NHTSA still advises inspection and pressure checking. Set pressure when cold to the placard value and look for a slow leak rather than adding air by feel every morning.
Flashes for about 60–90 seconds, then stays solid
NHTSA identifies this sequence as a TPMS malfunction indication. GM describes a similar about-one-minute flash when its system fault criteria are met, such as a sensor that fails to transmit for the specified driving period. That pattern moves communication, sensor ID, power, receiver/module, compatibility, and learning status forward—but it does not prove which sensor or component failed.
A malfunctioning TPMS cannot confirm safe pressure
Use an accurate gauge and physical inspection until the system is repaired. TPMS is a warning layer, not a replacement for monthly cold-pressure checks or a tool for inflating tires.
2. Prove tire pressure and condition first
- Let the vehicle sit for the owner’s-manual cold-tire period.
- Find the Tire and Loading Information label on the driver’s door edge/B-pillar or the value in the manual.
- Measure every applicable tire with the same accurate gauge and record each value before adding air.
- Inspect tread and sidewalls, valve stems/caps, wheel flanges, and repair areas for damage or leakage evidence.
- Adjust to the placard value, then remeasure after enough time to reveal a continuing loss.
GM notes that cold weather, a road hazard, long intervals between checks, valve-stem leakage, rim leakage, or wheel porosity can produce a low-pressure warning. It also gives a rule-of-thumb temperature relationship, but the practical localized rule is simpler: set and compare pressure cold, at the placard value, under the expected seasonal condition.
The 10-minute tire pressure and tread routine provides a complete condition record without using TPMS as the gauge.
3. Separate a leak from a system malfunction
If one pressure falls again
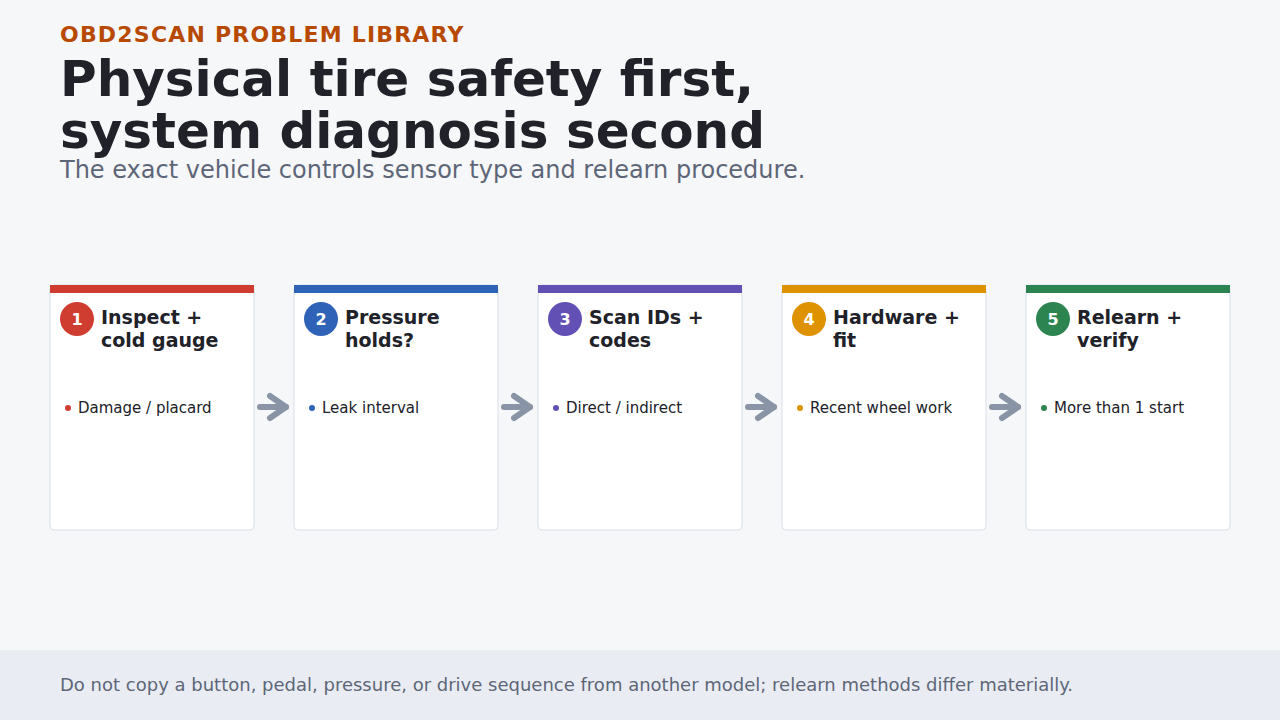
The problem remains physical until proven otherwise. A tire-service professional should locate the leak and determine whether the tread injury is repairable under current industry and manufacturer guidance. Valve, sensor seal, bead, rim, and wheel casting can also leak. Do not treat tire sealant as a permanent repair; some owner manuals warn it may affect a sensor.
If pressures are correct but the lamp flashes
Scan the TPMS/body module rather than relying only on the generic engine-code reader. Record DTCs, learned sensor IDs/positions, live pressure and temperature values if supported, and which sensor responds to an activation tool. A missing response may involve the sensor, an exhausted sensor battery, damage, wrong protocol/frequency, wheel incompatibility, receiver coverage, or learning state. Test identity and communication before demounting a tire.
If the fault followed tire or wheel work
Confirm that the installed sensors match the vehicle, every sensor ID was learned to the expected position, front/rear placard differences are respected, and no sensor or valve was damaged during service. Some systems learn automatically; others require a scan tool, activation tool, button sequence, specified pressure preparation, driving conditions, or initialization.
If the vehicle uses indirect TPMS
An indirect system infers pressure loss from wheel-speed and other vehicle data instead of receiving a pressure value from each valve-mounted sensor. Equalizing pressure, tire size/wear mismatch, rotation, ABS faults, and initialization can therefore change the path. Do not buy four valve sensors before identifying the system architecture.
4. Use the exact relearn or initialization procedure
There is no safe universal “TPMS reset.” Mazda’s model-specific bulletin demonstrates how particular systems can require cold-pressure preparation, a scan-tool reset, controlled driving, an ignition-off wait, and final initialization. Copying that sequence to another vehicle can fail or teach incorrect positions.
- Identify direct versus indirect TPMS and the exact model year/trim.
- Obtain the current owner’s manual and service procedure.
- Set correct cold placard pressures and repair physical leaks first.
- Verify sensor part number/protocol and readable IDs on a direct system.
- Perform only the specified learn/initialize sequence and record the accepted IDs/positions.
- Clear codes only at the stage directed, then verify actual data and lamp behavior.
If wheel service is needed, the complete wheel and tire service checklist explains why pressure, sensor handling, balance, centering, torque, and post-service verification belong in one record.
5. Verify more than one start and temperature condition
Useful shop handoff
- solid, cold-intermittent, or flash-then-solid timing;
- all cold pressure readings and the placard values;
- leak/damage inspection and pressure-loss interval;
- direct or indirect system, module DTCs, sensor IDs/positions, and activation results;
- recent rotation, tire/wheel/sensor/sealant work;
- exact relearn procedure and accepted-state evidence.
Verify with correct cold pressures, more than one key cycle, the required drive/learn condition, and the temperature state that originally triggered the complaint. Confirm all expected sensors or indirect-system data are present, the warning stays off, position labels match the tires where applicable, and pressure remains stable. A lamp that goes out only because the tires warmed is not a cold-pressure repair.
Official references
The useful outcome
You should finish knowing whether the immediate problem is pressure loss, physical damage, or a monitoring-system fault—and with the exact evidence needed for leak repair, sensor diagnosis, compatibility correction, or relearn.




Comments 0
Questions, fixes, and real-world diagnostic notes from readers.
Be the first to share a diagnostic result or ask a follow-up question.