
How to Use the AUTOOL SC611 Coolant Flush and Exchange Machine

The AUTOOL SC611 is an automatic coolant flush and exchange machine. Use the delivered machine labels to keep every connection within the SC611’s supported cooling-system functions.
Quick answer: Cool and depressurize the vehicle, separate the SC611 new- and used-coolant tanks, connect every hose by the delivered machine labels, then use only the vacuum-check, vacuum-fill, circulation-flush or exchange function required by the current vehicle procedure. Monitor pressure, flow and tank levels continuously.
In this guide
Before you start
Cooling systems can retain heat and pressure long after shutdown. Park and secure the vehicle, allow the complete system to become cold, confirm zero pressure by the approved method, and identify the specified coolant plus every circuit that the vehicle procedure requires you to service.
- confirm that the model label reads AUTOOL SC611 and read every power, pressure, vacuum and hose marking on the delivered unit;
- inspect tanks or containers, hoses, seals, valves and adapters for damage, contamination and incompatible residual coolant;
- open the exact vehicle filling, flushing, bleeding and final-level procedure before disconnecting anything;
- prepare the correct new coolant and a separate stable recovery path with enough capacity;
- wear eye protection and coolant-resistant gloves, and keep spills away from belts, electrical connectors and walking areas; and
- plan how the system will be restored, bled, warmed, cooled and checked for leaks after machine service.
Use the AUTOOL manual download center to locate the current instructions when a manual is available. The delivered model label and current vehicle service information control if an older image or remembered setting differs.
SC611 controls and specifications
The current product record highlights Automatic coolant exchange, Vacuum hold-pressure test, Vacuum filling, Visual fluid monitoring, Pressure protection. Confirm each relevant control on the physical unit before use; related AUTOOL models can look similar while using different ranges, air sources or operating modes.
| Specification or function | Current model |
|---|---|
| Power Supply | AC 100-240V |
| External Air Source | Not required; electric-pump design |
| Vacuum Adjustment | -35 to -80 kPa |
| System Pressure | 0-3.5 kg/cm² |
| Fluid Tank Capacity | 25L new-coolant tank + 25L used-coolant tank |
The current first-party overview identifies AC 100-240V input, two 25L tanks, 0-3.5 kg/cm² system pressure and -35 to -80 kPa vacuum adjustment. The delivered labels and screen instructions still control the exact hose mapping and commands; do not infer them from another exchange machine.
How to use the SC611
Step 1: Confirm the vehicle procedure and cool the system completely
Use the SC611 only in a qualified workshop with the exact vehicle cooling-system procedure open. Identify every circuit, the specified coolant, required bleeding process and recovery method. Let the complete system cool and depressurize before opening any cap or service connection.
Before moving on, confirm the complete cooling system is cold and depressurized, the coolant chemistry is correct, and the recovery path has enough capacity.
Step 2: Inspect the exact SC611 and its delivered instructions
Confirm the model label, AC 100-240V input marking, clean 25L new- and used-coolant tanks, hoses, sight lines, seals and adapters. Because hose labels and control prompts govern the actual machine, do not begin if the delivered instructions, machine labels and vehicle procedure do not agree.
Step 3: Prepare new coolant and an isolated recovery path
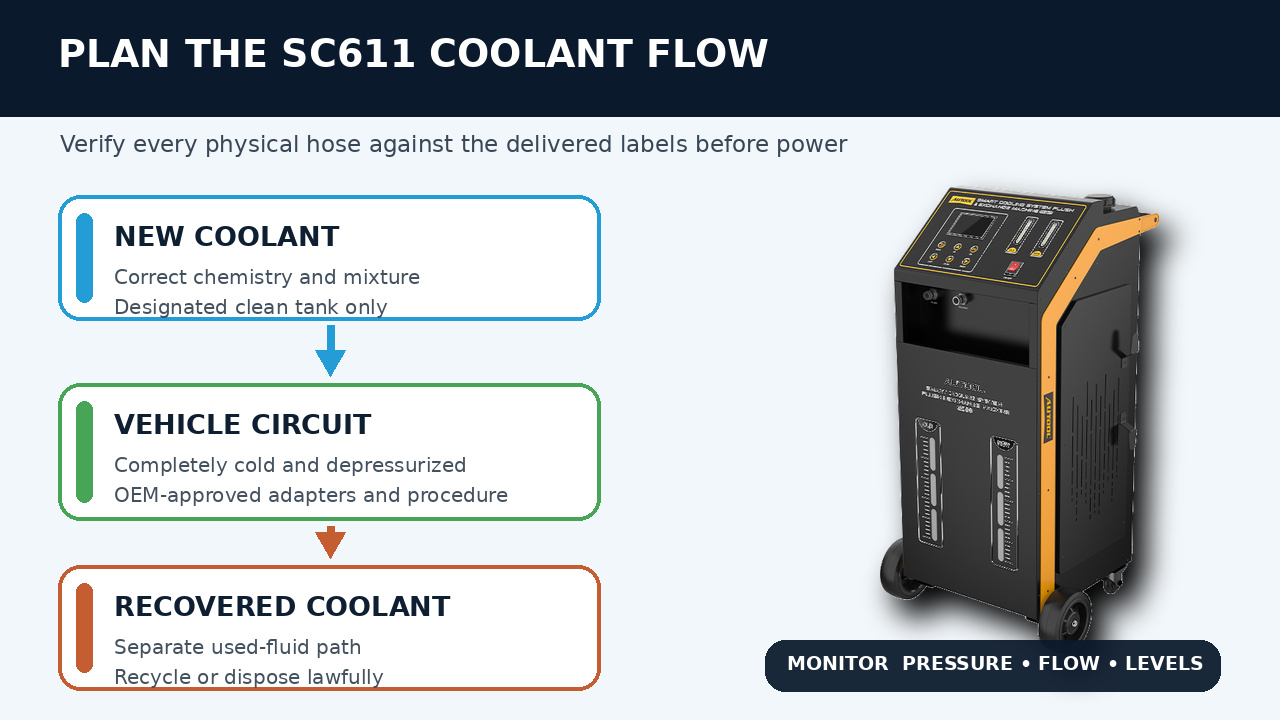
Fill only the designated new-coolant tank with the vehicle-specified coolant and leave enough capacity in the used-coolant tank for the planned service. Never mix incompatible coolant types or reuse recovered coolant. Arrange lawful disposal before starting.
Step 4: Connect each hose by its SC611 label
With power off, connect the new-fluid, used-fluid and vehicle-side hoses exactly as identified on the delivered SC611 and current instructions. Fit the approved vehicle adapters securely, route hoses away from heat and moving parts, and verify that supply and return have not been reversed.
Step 5: Power on and confirm the idle setup
Connect the machine to the marked AC supply, power it on and confirm tank levels, hose routing and an idle system with no unintended flow. Select only a service function supported by the current screen and the vehicle procedure; do not explore an unfamiliar control by trial.
Step 6: Use vacuum hold testing only when the vehicle permits it
If the vehicle procedure allows a vacuum integrity check, run the documented hold-pressure function and monitor the system. Failure to hold vacuum can come from the temporary adapter, hose routing or the vehicle; resolve the setup and diagnose the vehicle before filling or exchanging coolant.
Step 7: Choose vacuum filling, circulation flushing or exchange deliberately
Select the service method required by the vehicle procedure. During vacuum filling or circulation exchange, watch pressure, flow, tank levels and the transparent fluid path continuously. Stop for a leak, collapsed hose, pressure warning, pump noise, loss of flow or fluid moving in the wrong direction.
Step 8: End the cycle at the documented machine criterion
Let the current SC611 screen and instructions determine completion; do not substitute a fixed time or a claimed exchange percentage. If the old-fluid appearance does not stabilize or the machine cannot maintain controlled flow, stop and correct the setup instead of extending the cycle blindly.
Step 9: Depressurize, disconnect and complete vehicle bleeding
Return the machine and vehicle circuit to the safe state specified by both procedures, then disconnect without spilling or cross-contaminating coolant. Restore every cap, hose and connector, complete the vehicle-specific bleeding and level process, and check for leaks through the required warm-up and cool-down cycle.
Step 10: Recover coolant and clean the machine
Transfer used coolant for compliant recycling or disposal, clean the SC611 fluid paths as its current instructions require, and leave the two tanks and hoses identified for the next compatible coolant service. Record the coolant type and any unresolved leak or flow finding.
Before closing the job, confirm every vehicle cap, hose and connector is restored and complete the required bleed, warm-up, cool-down, final-level and leak checks.
Read and verify the result
Judge the service by controlled flow, stable pressure, correct tank movement and the vehicle’s completion criteria—not by a memorized cycle time or an advertised exchange percentage. A vacuum-hold failure can come from the temporary setup or the vehicle and must be resolved before filling.
- New coolant must leave only the designated clean tank while recovered coolant returns only to the used-fluid tank.
- Pressure and flow should remain controlled with no collapsed hose, leakage, overload warning or abnormal pump noise.
- Fluid appearance can support progress monitoring, but the vehicle procedure and current machine indication define completion.
- After exchange, the vehicle may still require a dedicated bleed, heater-circuit operation and cool-down level check.
Stop immediately for residual heat or pressure, leakage, a moving or collapsed hose, incorrect fluid direction, pressure overload, loss of flow, abnormal pump or air noise, or a container approaching empty or full. Return the machine and vehicle to their documented safe state before changing a connection.
Common mistakes and care
- Do not open or connect to a hot or pressurized cooling system.
- Follow the delivered SC611 hose labels and current instructions; do not infer ports or prompts from another machine.
- Never mix incompatible coolant types or place recovered coolant in the new-fluid tank.
- Stop for leakage, pressure overload, collapsed hoses, abnormal pump noise or unintended flow direction.
- Service an electric or multi-circuit vehicle only when its current procedure and the supplied adapters explicitly permit the connection.
- Do not guess hose direction, port purpose or a control command from appearance alone.
- Do not publish or rely on an unresolved rated-wattage value; read the delivered unit label.
- Do not mix coolant types or let recovered fluid enter the clean tank.
- Do not assume one procedure covers every electric, hybrid or multi-circuit cooling system.
Frequently asked questions
Can I open the cooling system while it is still warm before using the SC611?
No. Let the complete system cool and depressurize it by the vehicle-approved method. A warm reservoir can still release pressurized coolant and steam.
Does a successful vacuum hold prove the whole cooling system is fault-free?
No. It supports the connected setup under that vacuum condition. Temperature-dependent, pressure-dependent and intermittent leaks may require additional vehicle-specific tests.
Can I use universal coolant for every vehicle?
No. Use the chemistry, concentration and bleeding procedure specified for the exact vehicle. Mixing incompatible coolant can create deposits, corrosion or service problems.
Final SC611 checklist
- Exact SC611, delivered hose labels and current vehicle procedure matched
- Cooling system cold; coolant type and every circuit identified
- New and used tanks separated with enough working capacity
- Pressure, flow, fluid direction and tank levels monitored throughout
- Machine returned safe before disconnecting; vehicle connections restored
- Vehicle bleeding, final level, leak check and used-coolant disposal completed
The SC611 supports efficient coolant service only when the operator controls fluid compatibility, connection direction and vehicle-specific completion. Treat its automation as a monitored process, not an unattended shortcut.










Comments 0
Questions, fixes, and real-world diagnostic notes from readers.
Be the first to share a diagnostic result or ask a follow-up question.