
How to Use the AUTOOL AS509 Coolant Boiling Point Tester Step by Step

The AUTOOL AS509 measures the boiling point of a removed coolant sample. Let the cooling system become fully cold and unpressurized, identify the exact coolant, place more than 40 ml but no more than 50 ml in the beaker, connect correct 12 V power, select the matching mode, fully immerse the sampling hole, and hold START until the progress bar finishes.
AS509 heats and changes the sample. The test rod and liquid become hot, and tested coolant must never return to the vehicle. A boiling-point result is one coolant-service input; it does not measure freeze protection, concentration, pH, inhibitor reserve or cooling-system pressure, and it cannot diagnose a leak, cap, thermostat, pump, radiator or head gasket.
In this guide
Decide whether AS509 fits the coolant test
| Situation | Decision | Why |
|---|---|---|
| Exact coolant and approved cold sampling point are known, and a trained operator can remove and replace 40–50 ml cleanly | Test is possible | The sample and reference can be linked to the correct vehicle and fluid |
| Engine or cooling system is warm, hot or pressurized | Wait until it is fully cold | Opening a pressurized cooling system can release scalding coolant and steam |
| Coolant type, mixture, service history or reservoir identity is uncertain | Identify the system before testing | AS509 cannot identify an unknown fluid or prove that the correct coolant is installed |
| Vehicle has no approved way to remove and restore the sample | Do not improvise | A wrong opening, low level or trapped air can damage the vehicle |
| Coolant is visibly oily, heavily contaminated, mixed or contains stop-leak material | Diagnose the contamination first | A boiling-point number cannot identify the contaminant or validate the mixture |
| Vehicle is overheating, losing coolant or showing a temperature warning | Diagnose the cooling system | Do not use one sample result to clear an active vehicle fault |
The current AS509 manual covers ethylene glycol, propylene glycol and water-based selections. That does not make every coolant interchangeable. Use the vehicle label, service information and coolant record to confirm the exact formulation and mixture before choosing a tester entry.
Prepare for a heated coolant-sample test
Have the current vehicle service information, coolant safety data, the AS509 beaker, a dedicated clean syringe and hose, eye protection, coolant-resistant gloves, absorbent material, 50 ml of clean water for the cleaning cycle and an approved waste container. Work on a stable surface in a dry, ventilated area away from flames, sparks and children.
Park securely, apply the parking brake, switch the engine and ignition off, and allow the vehicle to become fully cold. Confirm the correct cold sampling point, level procedure and any required air-bleeding method before loosening a cap. Do not rely on elapsed time alone; the system must have no heat or pressure hazard.
AUTOOL AS509 step-by-step procedure
Step 1: Confirm the exact tester and measurement
Verify that the unit is an AS509 and that the task is to measure the boiling point of an identified automotive coolant sample. Do not use it for brake fluid, oil, fuel or another liquid.
Completion check: The tester, vehicle fluid and intended measurement all match.
Step 2: Identify the coolant formulation
Use the vehicle label, service information and service record to confirm the specified coolant, base type and mixture. Do not infer chemistry from color or use the tester to identify an unknown fill.
Stop: If the system contains mixed, unknown or visibly abnormal fluid, resolve that condition before selecting a reference.
Step 3: Read the vehicle sampling and refill procedure
Confirm which cold opening is approved, how the cap is released, where a representative sample may be taken, how the 40–50 ml removal will be restored and whether the vehicle needs a specific bleeding procedure.
Completion check: The vehicle can be sampled without opening the wrong container, introducing dirt, leaving a low level or trapping air.
Step 4: Make the cooling system fully cold and unpressurized
Park securely with the engine and ignition off and wait until the cooling system is fully cold. Follow the vehicle procedure for verifying that the cap can be opened safely; keep your face and body away from the cap path.
Stop: Never loosen a radiator, expansion-tank or reservoir cap on a warm, hot or pressurized system.
Step 5: Wear protection and prepare the work area
Put on goggles and coolant-resistant gloves. Keep the beaker on a stable, heat-resistant surface and prepare absorbent material and a labeled waste container before handling coolant.
Common mistake: Starting without a waste container encourages unsafe transfer or reuse after the sample has been heated.
Step 6: Inspect the AS509 and accessories
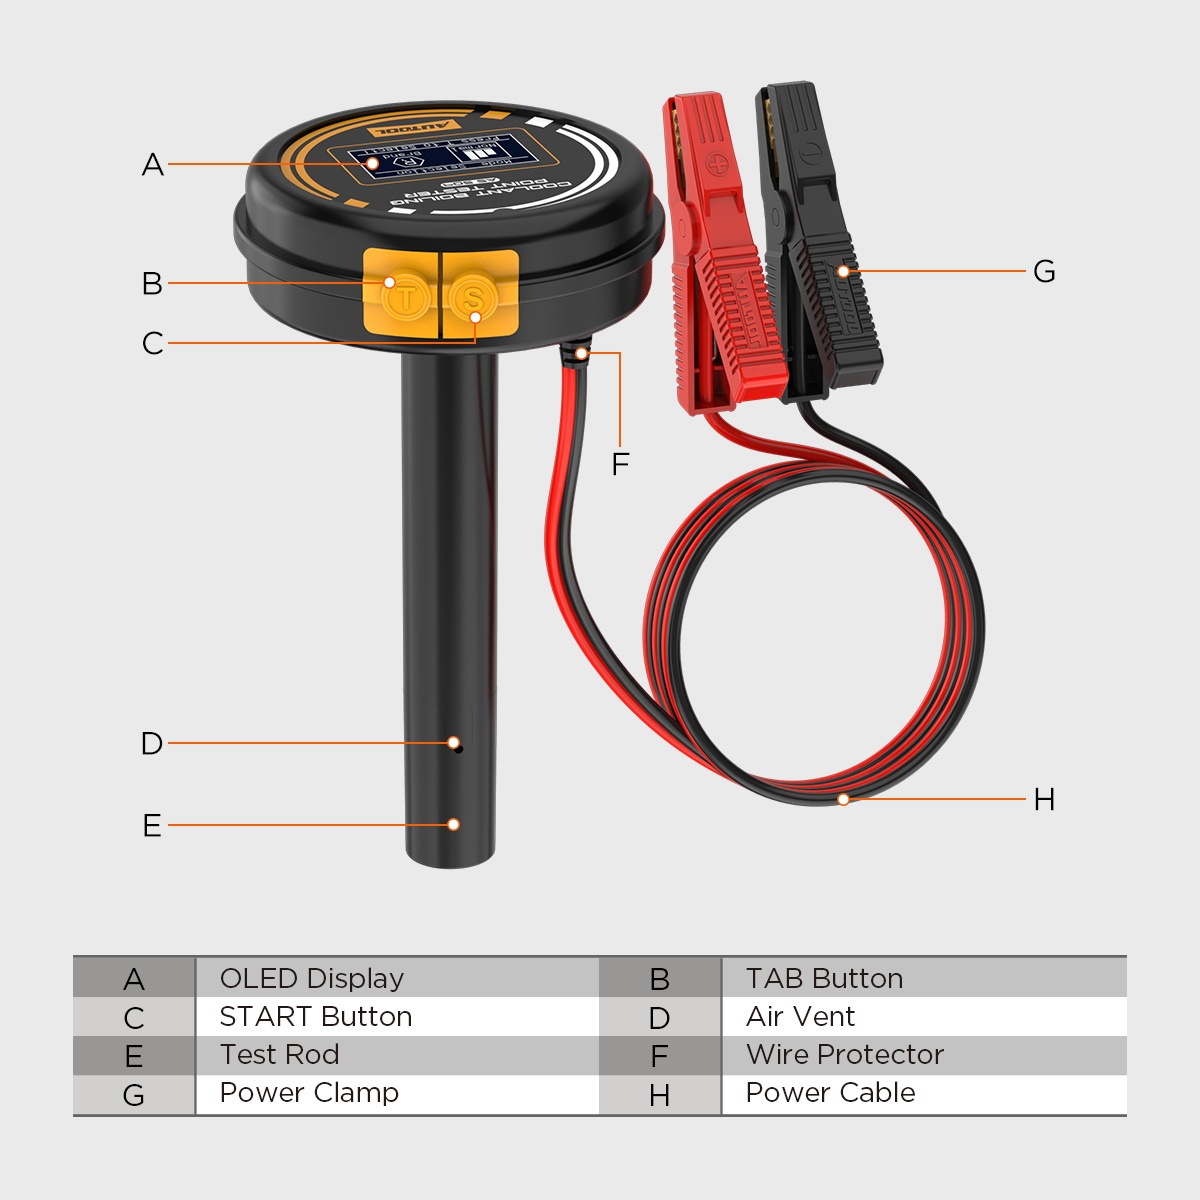
Check the OLED display, TAB and START keys, test rod, sampling hole, air vent, wire protector, cable insulation and battery clamps. Inspect the beaker, syringe and hose for cracks, residue or moisture.
Stop: Do not use a damaged cable, loose or bent rod, obstructed vent, cracked beaker or contaminated sampler.
Step 7: Prepare dedicated clean sampling equipment
Use one clean, dry, coolant-compatible syringe, hose and beaker reserved for this task. Water, previous coolant, cleaner or another vehicle’s residue can change the sample and boiling result.
Completion check: The complete liquid path is dry, visibly clean and compatible with the identified coolant.
Step 8: Clean around the closed sampling point
Remove loose dirt around the approved cold cap while it remains closed. Open it only according to the vehicle procedure, and keep lint, tools and debris out of the system.
Stop: If pressure, heat or an unexpected fluid release appears, close the area if safe and stop the procedure.
Step 9: Draw one representative 50 ml sample
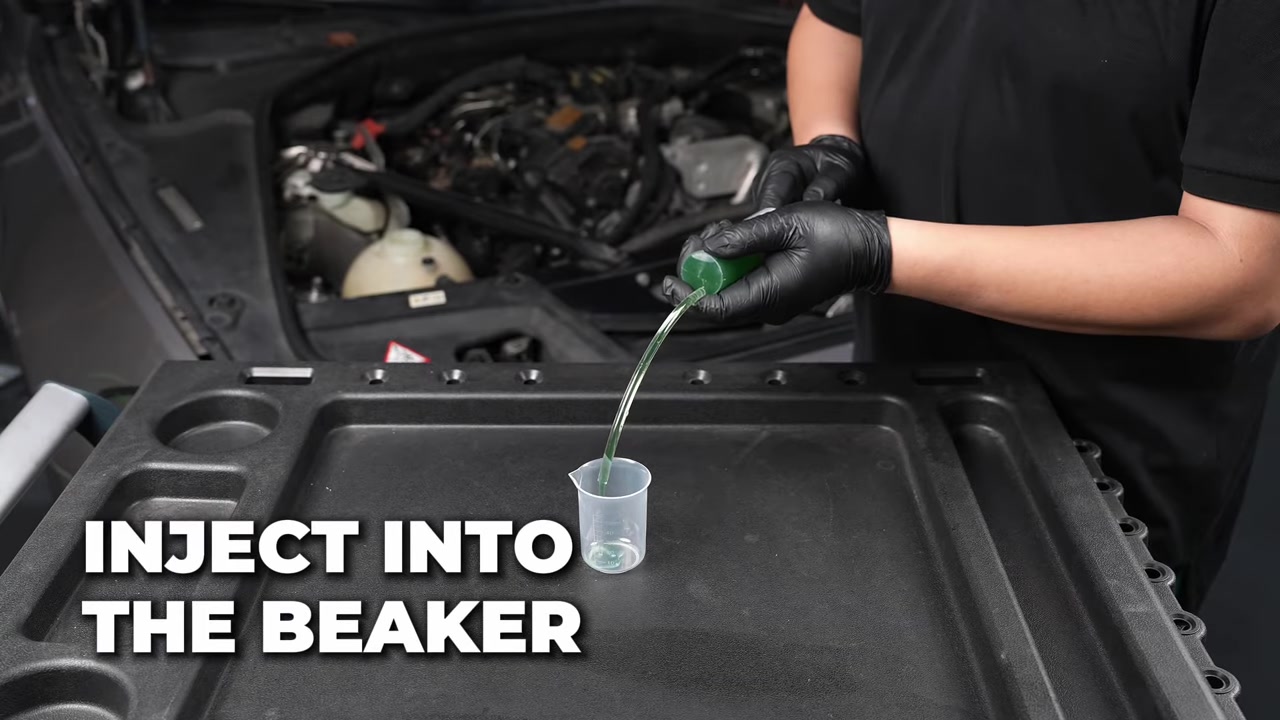
Use the dedicated syringe and hose to draw coolant from the approved point without touching dirty surfaces. Transfer it directly into the clean AS509 beaker.
Completion check: The sample belongs to the identified vehicle and coolant, with no contamination introduced during collection.
Step 10: Set the beaker volume above 40 ml and no higher than 50 ml
Check the beaker scale on a level surface. The manual requires more than 40 ml and no more than 50 ml; insufficient liquid can expose the heating section and damage the test rod.
Stop: Do not estimate the volume from a tilted beaker and never run the tester dry.
Step 11: Restore the vehicle before heating the sample
Close the approved sampling point and restore the cold coolant level only with the exact new coolant and method specified for the vehicle. Complete any required bleeding or inspection before the vehicle is released.
Completion check: The vehicle side is clean, correctly filled and sealed while the isolated sample remains in the beaker.
Step 12: Connect the AS509 to correct 12 V power
With the engine and ignition off, connect the red clamp to battery positive and the black clamp to battery negative. The tester powers on automatically. Its documented operating range is 10–14 V.
Stop: Disconnect if voltage, polarity, clamp contact or battery condition is uncertain. Never let the clamps touch each other or short against the vehicle body.
Step 13: Choose Normal or Brand mode
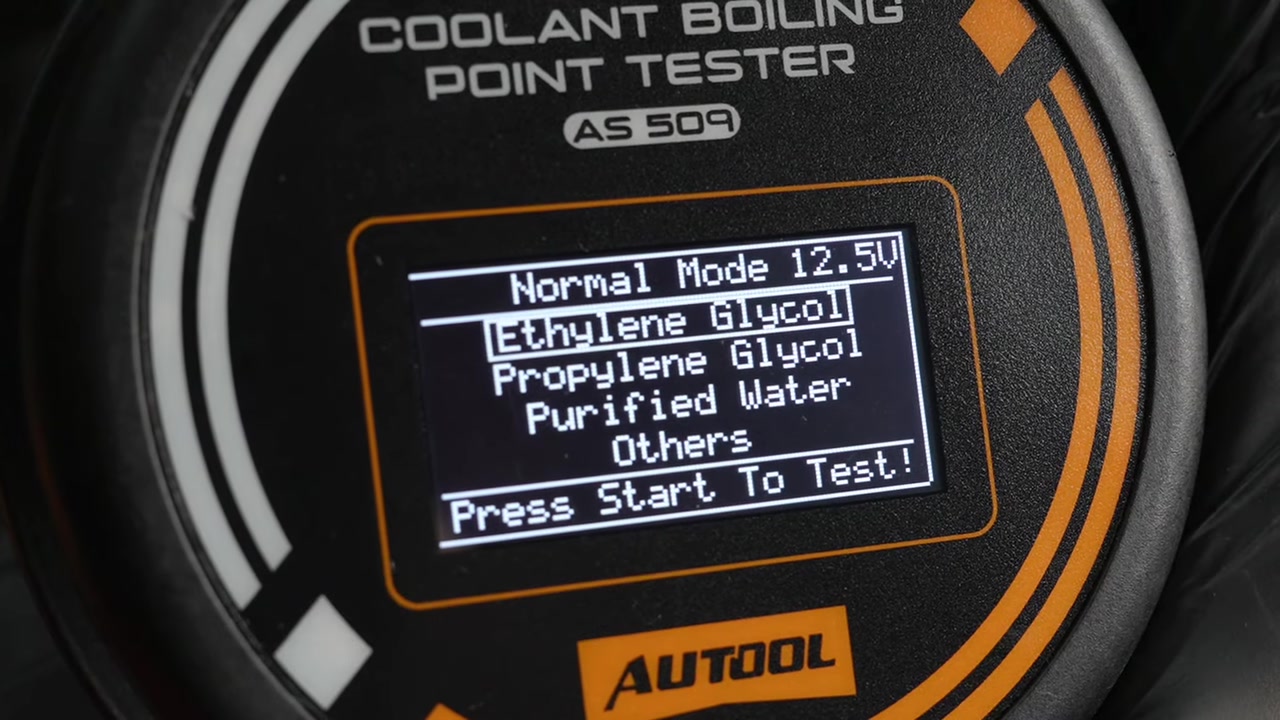
At the main screen, press TAB to highlight Normal or Brand, then press START to enter. Normal selects a coolant base category; Brand uses one of the 23 built-in brand references.
Completion check: The mode is supported by facts you know about the sample, not by color or vehicle make alone.
Step 14: Select the exact displayed coolant entry
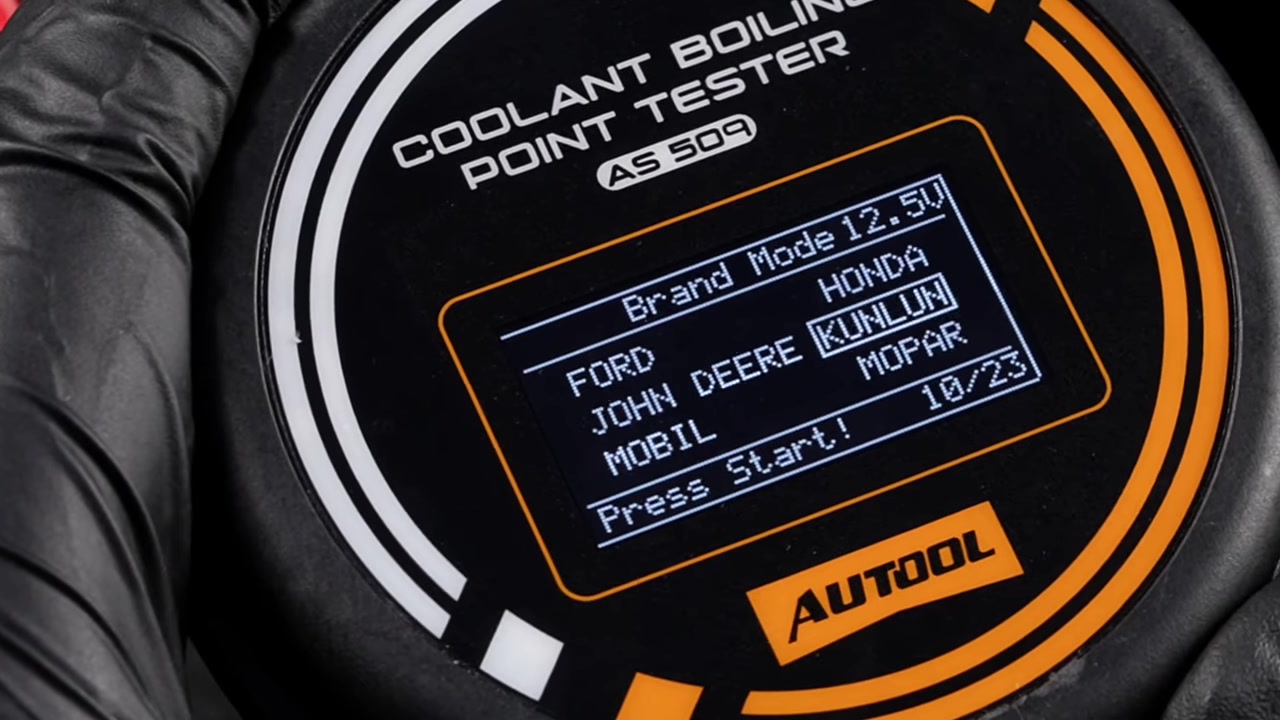
In Normal mode, use TAB to choose the confirmed category—such as ethylene glycol or propylene glycol—and press START to confirm. In Brand mode, use TAB to find the exact built-in brand, then press START.
Stop: A brand name does not prove that every product, grade or dilution uses the same reference. If the installed coolant cannot be matched confidently, do not force an approximate entry or use Others as an unexplained substitute.
Step 15: Review the ready screen
Confirm the selected type or brand, displayed reference boiling point and battery voltage. Return to the main screen if the reference or selection does not match the intended sample.
Completion check: The ready screen can be recorded with the vehicle, coolant and sample identity.
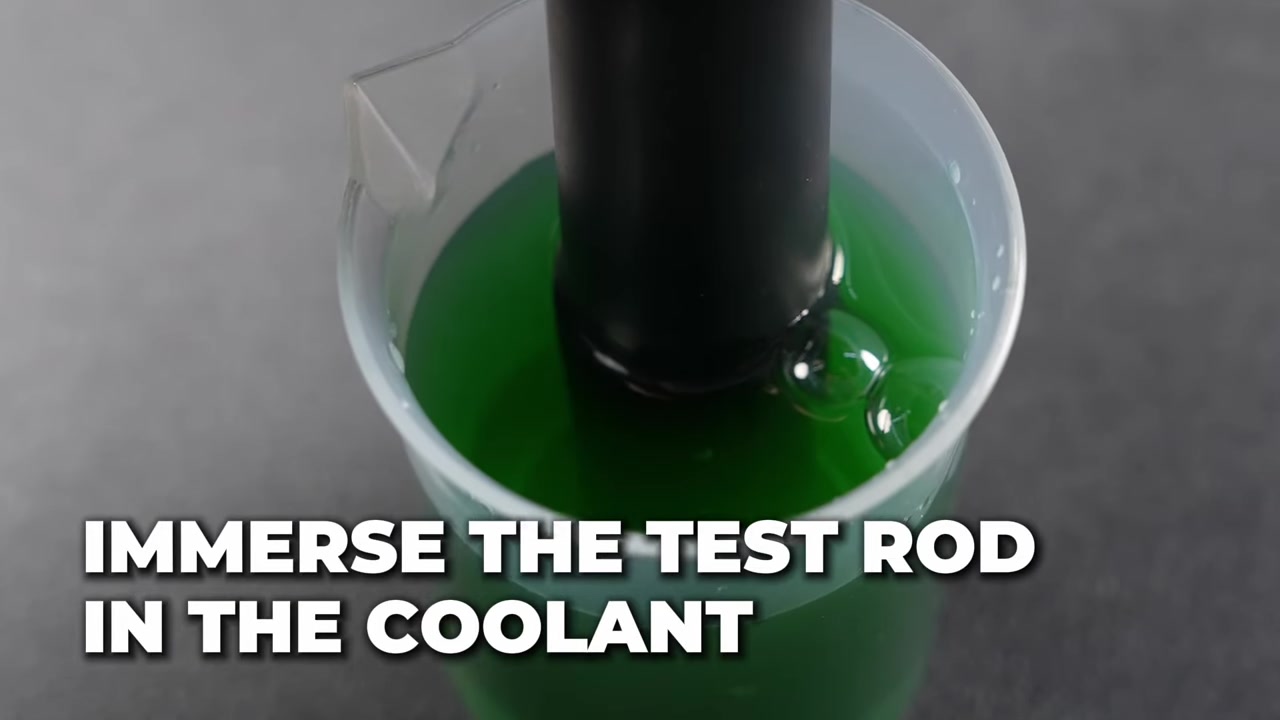
Step 16: Fully immerse the sampling hole and release trapped air
Lower the test rod vertically into the beaker until the sampling hole is fully below the coolant surface. Gently position it so trapped air leaves the test-rod cavity, and keep the beaker upright.
Stop: Do not strike, shake, tap or drop the rod, and do not begin if the liquid cannot keep the sampling hole covered.
Step 17: Hold START until the progress bar finishes
Keep the beaker and tester steady, then hold the START or “S” key. The manual describes about 30 seconds, within a 20–40 second test range; use the completed progress bar rather than a separate timer. Coolant temperature and battery voltage appear during heating.
Stop: End the test if the beaker tips, the sample no longer covers the hole, power becomes unstable or abnormal heating occurs. Do not touch the rod or liquid.
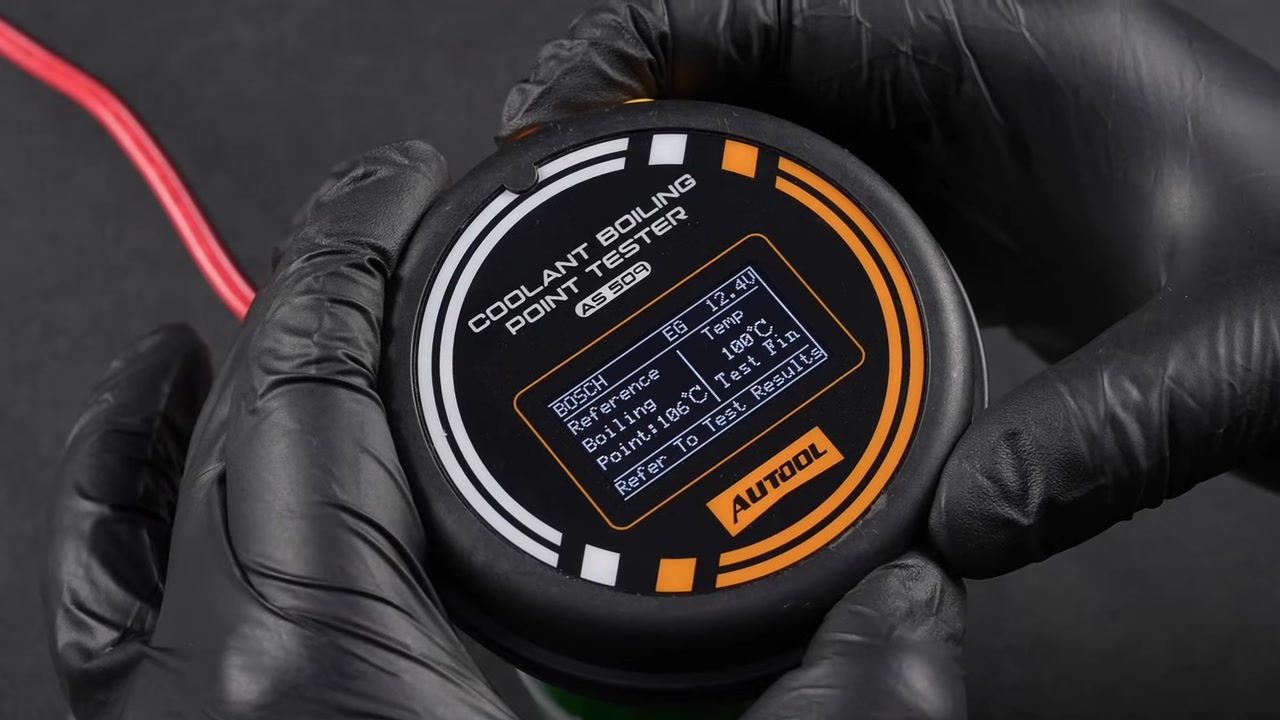
Step 18: Read and record the complete result
When Test End appears, record the measured boiling point, selected mode, selected type or brand, displayed reference, battery voltage, vehicle/sample identity and test date. A number without its selection and reference is not traceable.
Completion check: Another technician can tell exactly which sample, mode and reference produced the result.
Step 19: Interpret the boiling point conservatively
Compare the measured value with the correct coolant specification, mixture, built-in reference and vehicle service requirements. The open beaker does not reproduce the vehicle’s pressurized cooling-system limit, and local atmospheric pressure can affect boiling temperature.
A low or unexpected value can support coolant service or further diagnosis, but it does not reveal freeze point, glycol concentration, pH, additive reserve, contamination source, cap pressure, circulation or the cause of overheating.
Step 20: Do not repeatedly heat the same sample
The manual notes that consecutive tests of one sample can differ because the first test has already heated and changed it. If verification is necessary, allow the rod to cool below 50°C and use a new representative sample collected by the same controlled method.
Common mistake: Averaging repeated boils of one sample can hide the fact that the sample is no longer in its original state.
Step 21: Let the rod cool and remove it vertically
Keep hands and flammable materials away while the test rod and coolant cool. Lift the rod vertically without shaking or swaying so hot coolant does not spill or run toward the housing.
Stop: Do not touch the rod or sample immediately after the test, and do not begin another test until the probe is below 50°C.
Step 22: Dispose of the tested coolant
Place the cooled sample in the approved coolant-waste container. Never pour it back into the vehicle: the AS509 has boiled and changed the liquid.
Completion check: Tested coolant is segregated from new coolant and cannot be mistaken for reusable fluid.
Step 23: Run the 50 ml clean-water cycle
After the equipment is safe to handle, put 50 ml of clean water in the beaker and follow the same water-test cycle to remove residual coolant from the rod. Apply the same immersion, stability and burn precautions, then dispose of the rinse appropriately and let the rod dry.
Completion check: No coolant residue remains on the test rod and the equipment is dry before storage.
Step 24: Disconnect and store the tester
Disconnect the black negative clamp first, then the red positive clamp, unless the vehicle service information requires another safe sequence. Store the clean, dry AS509, beaker and sampling tools in the case without bending the cable or striking the rod.
Common mistake: Packing a wet or coolant-coated rod can corrode the tool and contaminate the next test.
Use the clean-water check without overcalling calibration
The manual describes a clean-water result around 100°C / 212°F ±3% as a quick functionality check. Water’s boiling point changes with atmospheric pressure and altitude, so compare with the expected local value. Do not adjust the tester from this field check; repeated unexplained deviation requires manufacturer recalibration.
What a complete AS509 test looks like
A complete AS509 test starts with a fully cold, unpressurized vehicle and an identified coolant. It uses one clean 40–50 ml isolated sample, correct 12 V polarity, an exact menu selection, full sampling-hole immersion and one uninterrupted heating cycle. The measured value stays linked to its reference and vehicle context, while the changed sample is discarded and the test rod is cleaned before storage.
If the delivered menu, reference values or operating instructions differ from this guide, find the current AS509 revision in the AUTOOL manual download center before continuing.


Comments 0
Questions, fixes, and real-world diagnostic notes from readers.
Be the first to share a diagnostic result or ask a follow-up question.