
Cooling System Pressure Test: Safe Setup and Result Guide

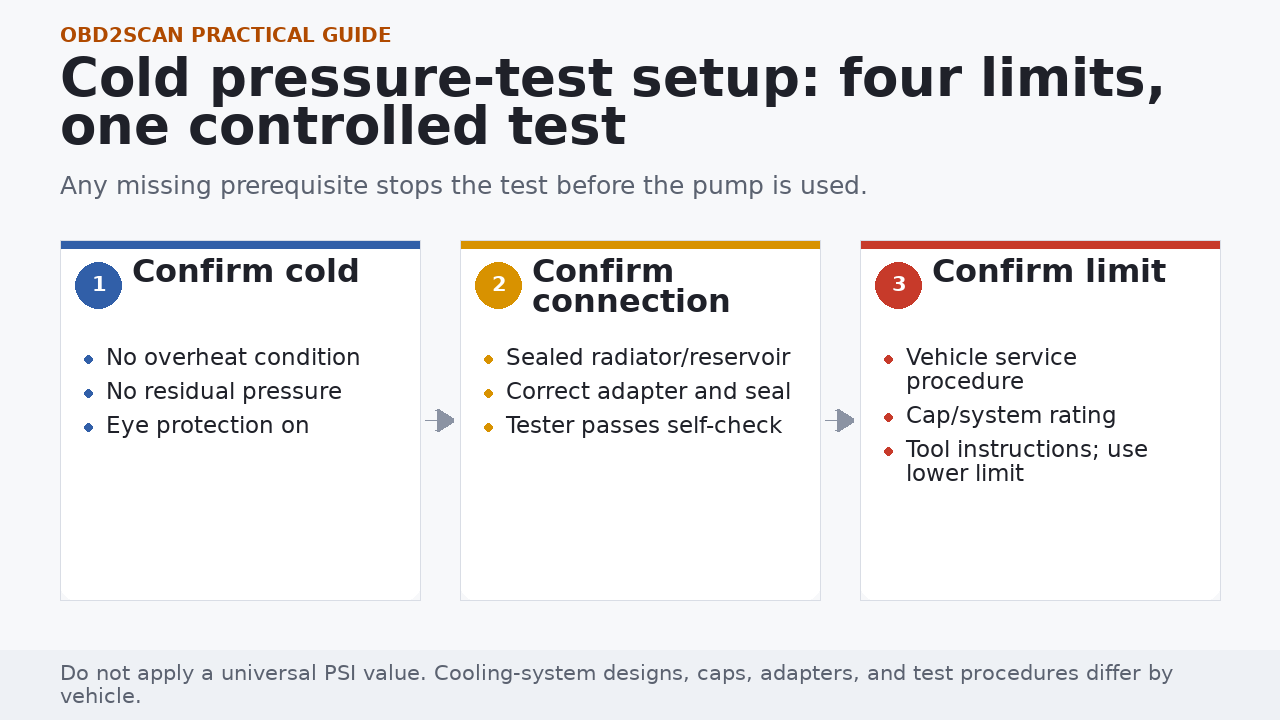
Never remove a radiator or pressurized reservoir cap from an overheated or still-pressurized system. Let the vehicle cool fully, read the vehicle and tester instructions, identify the sealed-system connection, and never exceed the lower applicable limit stated by the vehicle, cap, or tool procedure.
What to do first
- Test only after the system is fully cool and depressurized; wear eye protection and keep coolant away from people, animals, belts, and electrical parts.
- Use the correct adapter and exact vehicle procedure. An atmospheric overflow bottle is not a pressure-test connection.
- A falling gauge is an observation, not an automatic head-gasket diagnosis; first verify adapter sealing, tester integrity, temperature stability, and visible leakage.
In this guide

1. Know when not to open or test the system
Heat and stored pressure can cause severe burns
If the temperature warning is active, steam is present, or the system remains hot, shut the vehicle down safely and follow the owner’s manual. Do not loosen the cap to “see if it has pressure.”
Do not run this test on a visibly empty system without first finding out why it is empty and following the correct fill/bleed procedure. Coolant on the floor is slippery and toxic; collect it and follow local disposal rules.
2. Prepare the tester and make the correct connection
- Read the vehicle’s cooling-system test procedure and the pressure tester manual.
- Verify the engine and coolant are fully cool. Wear eye protection.
- Inspect the tester hose, gauge, pump, quick coupler, adapter seal, and relief control. Self-test the tool as its maker directs.
- Identify whether the pressure cap is on the radiator or a sealed expansion/degas tank. Do not connect to a vented overflow bottle.
- Fit the correct adapter squarely and secure any required retention strap.
- Raise pressure slowly while watching the gauge; stop at the specified test value and never exceed the lower applicable limit.
The cap may be outside the test
Many system tests remove the vehicle’s pressure cap and put the adapter in its place. That setup cannot prove the removed cap seals or relieves correctly; use the specified separate cap test if the complaint points there.
3. Observe pressure and inspect without jumping to a cause
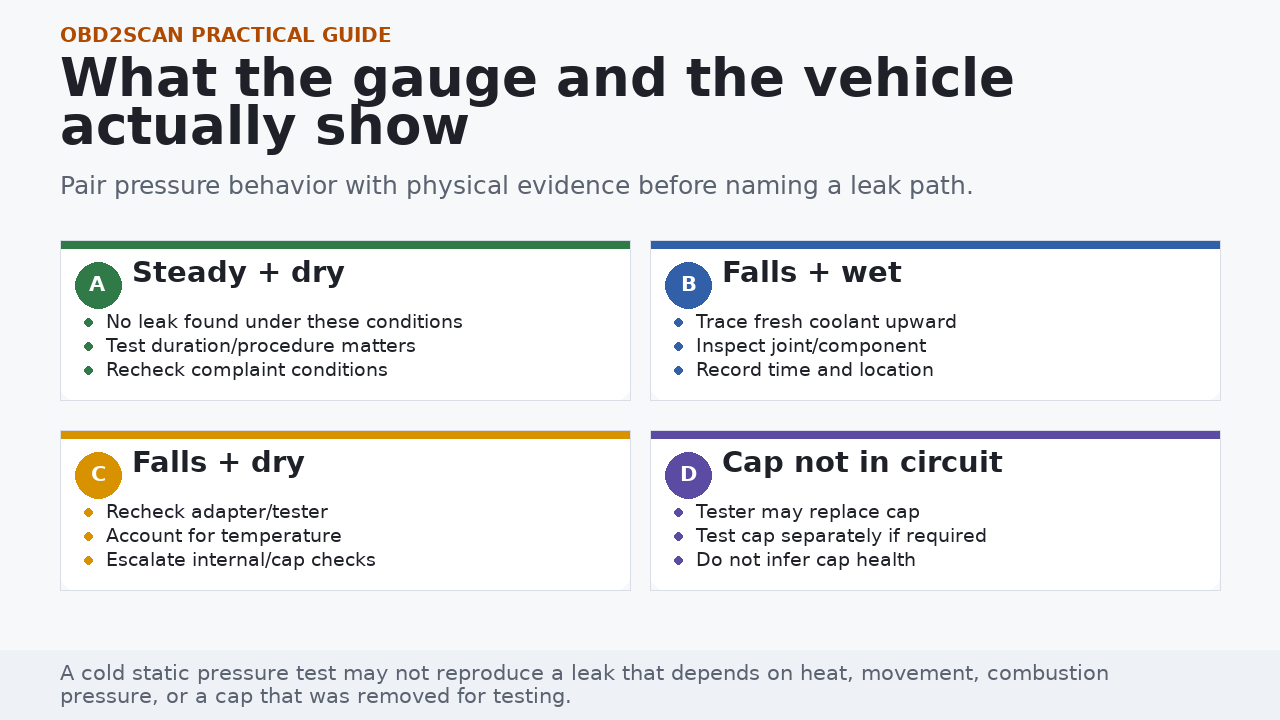
Record starting pressure, elapsed time, ending pressure, coolant temperature if available, and the exact location of any fresh wetness. Inspect accessible hose joints, radiator seams, thermostat housing, pump area, reservoir, heater connections, and the ground—without putting hands near a running engine.
If pressure falls with no visible coolant, repeat only after verifying the adapter and tool seal. A small pressure movement can also follow temperature change. Persistent unexplained loss may require a model-specific internal-leak, combustion-gas, heater-core, cap, or hot-condition diagnosis by a trained technician.
4. Release pressure and verify the repair correctly
- Use the tool’s relief control and confirm the gauge returns to zero before disconnecting anything.
- Capture any coolant released from the adapter and restore the specified cap.
- Correct the identified fault using vehicle-specific service information.
- Refill and bleed with the specified coolant and procedure; trapped air can create misleading level or temperature behavior.
- Repeat the bounded cold test if the repair procedure calls for it, then verify operating temperature and cabin heat under controlled conditions.
A pass is condition-specific
A stable cold test means no leak was detected during that setup and interval. It does not prove the system is leak-free under every temperature, load, vibration, or combustion condition.
Official references
Use these sources for the principles in this guide, then use the owner’s manual and current service information for your exact vehicle.
- Matco MV4534 Cooling System Pressure Tester Instructions (matcotools.com)
- OTC: Universal Cooling System Pressure Test Kit (otctools.com)
The useful outcome
The useful result is a documented pressure/time observation tied to fresh physical evidence. If the tool, adapter, temperature, cap, or test boundary remains uncertain, label the result inconclusive instead of naming an expensive internal failure.




Comments 0
Questions, fixes, and real-world diagnostic notes from readers.
Be the first to share a diagnostic result or ask a follow-up question.