
How to Reverse-Flush a Fuel Injector with AUTOOL CT500

A normal injector test sends fluid in the same direction used on the engine. Reverse flushing sends approved test fluid through a compatible injector in the opposite direction so contamination trapped near the inlet can leave by the larger opening. On the AUTOOL CT500, that requires a different physical mounting arrangement before selecting function 11.
Quick answer: confirm that reverse flow is permitted for the exact injector, record a forward-flow baseline, fit the correct sealing adapter to the injector outlet, mount the injector backward on the oil distributor, secure the support rail, connect the correct pulse lead and select 11 Reverse Flushing. Stop for any leak, then reinstall the injector normally and repeat the same test to prove the result.
In this guide
When reverse flushing helps—and when it does not
Reverse flushing is a targeted cleaning step, not a substitute for diagnosis. It is useful when a compatible injector shows restricted or uneven forward flow and the injector construction permits fluid to be driven backward. It cannot repair a damaged coil, worn valve seat, cracked body, failed seal or an injector that remains electrically or mechanically inoperative.
| Decision point | Proceed when | Stop when |
|---|---|---|
| Injector identity | Part number, drive type and flow direction are known | The injector or permitted reverse-flow method is uncertain |
| Adapter fit | The adapter seats squarely and seals without force | The outlet is distorted, loose or side-loaded |
| Electrical drive | The exact injector voltage and pulse connection are confirmed | The connector fits but the drive specification is unknown |
| Cleaning result | A repeat forward test shows a measurable improvement | Leakage, coil fault or unstable operation remains |
If you still need the tank, ultrasonic bath, forward test and control-panel sequence, start with the complete CT500 operating guide. This page assumes the machine is already commissioned and the injector has been safely removed and identified.
Before you start
- Inspect the injector body, electrical connector, inlet, outlet and O-ring lands for damage.
- Record the injector part number and use its current service information to confirm drive voltage and reverse-flow suitability.
- Run a controlled normal-direction test first and record leakage, spray pattern and delivered volume under the same settings you will use later.
- Use only the qualified CT500 test and cleaning agents. The exact manual prohibits gasoline, kerosene and unapproved substitutes because they can damage seals, hoses and the pump.
- Wear eye protection and fluid-resistant gloves. Keep ignition sources away and provide ventilation.
- Do not mix injector types on one comparison rail; height, adapter, pressure and pulse requirements must agree.
How to reverse-flush an injector with the CT500
Step 1: Identify the injector inlet and outlet
Mark the normal fuel inlet and nozzle outlet before changing the setup. In reverse-flush mode, the adapter shown in the official demonstration connects at the injector outlet. Do not decide by connector position or body shape alone.
Step 2: Match and test-fit the outlet adapter
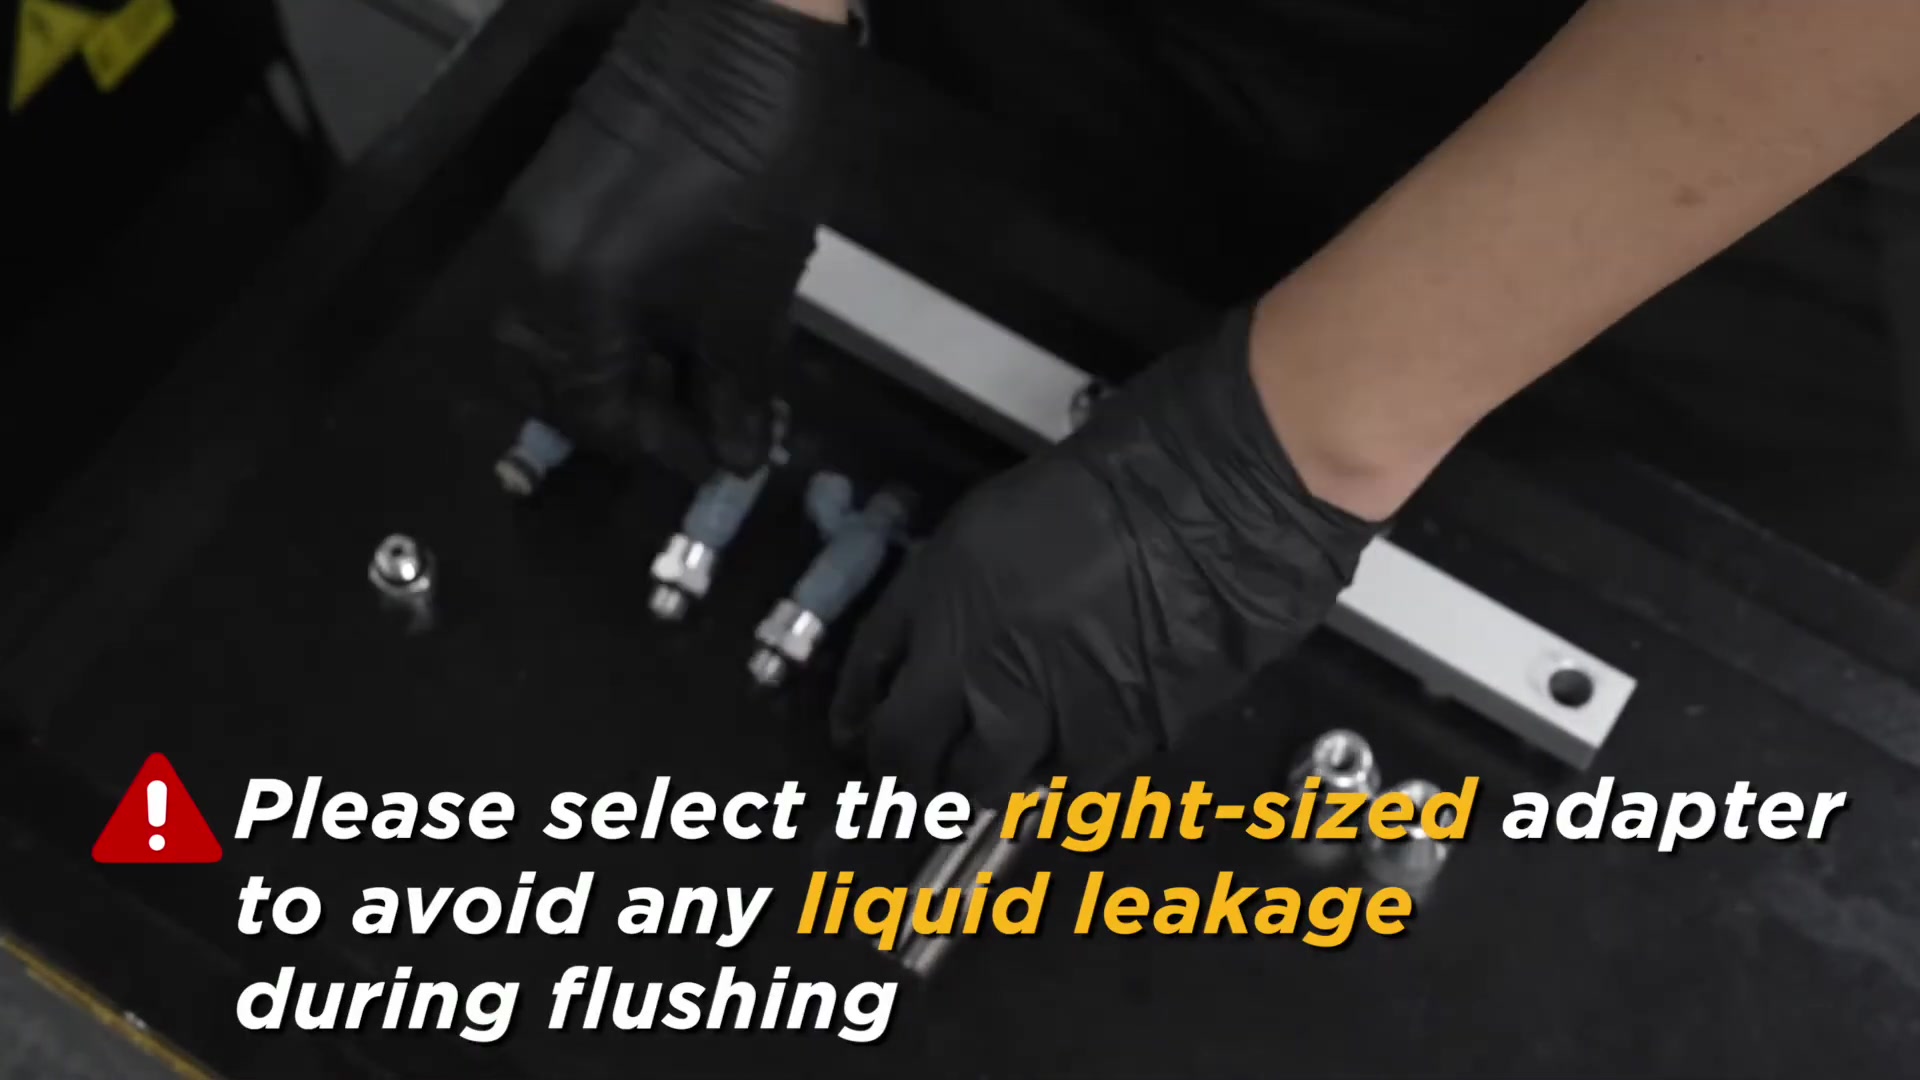
Select the smallest correct adapter that seats concentrically on the outlet and supports its seal. The official video explicitly warns that the wrong size can leak during flushing. Test-fit by hand; do not use rail pressure to force a poor match into sealing.
Step 3: Mount the injectors to the oil distributor in reverse
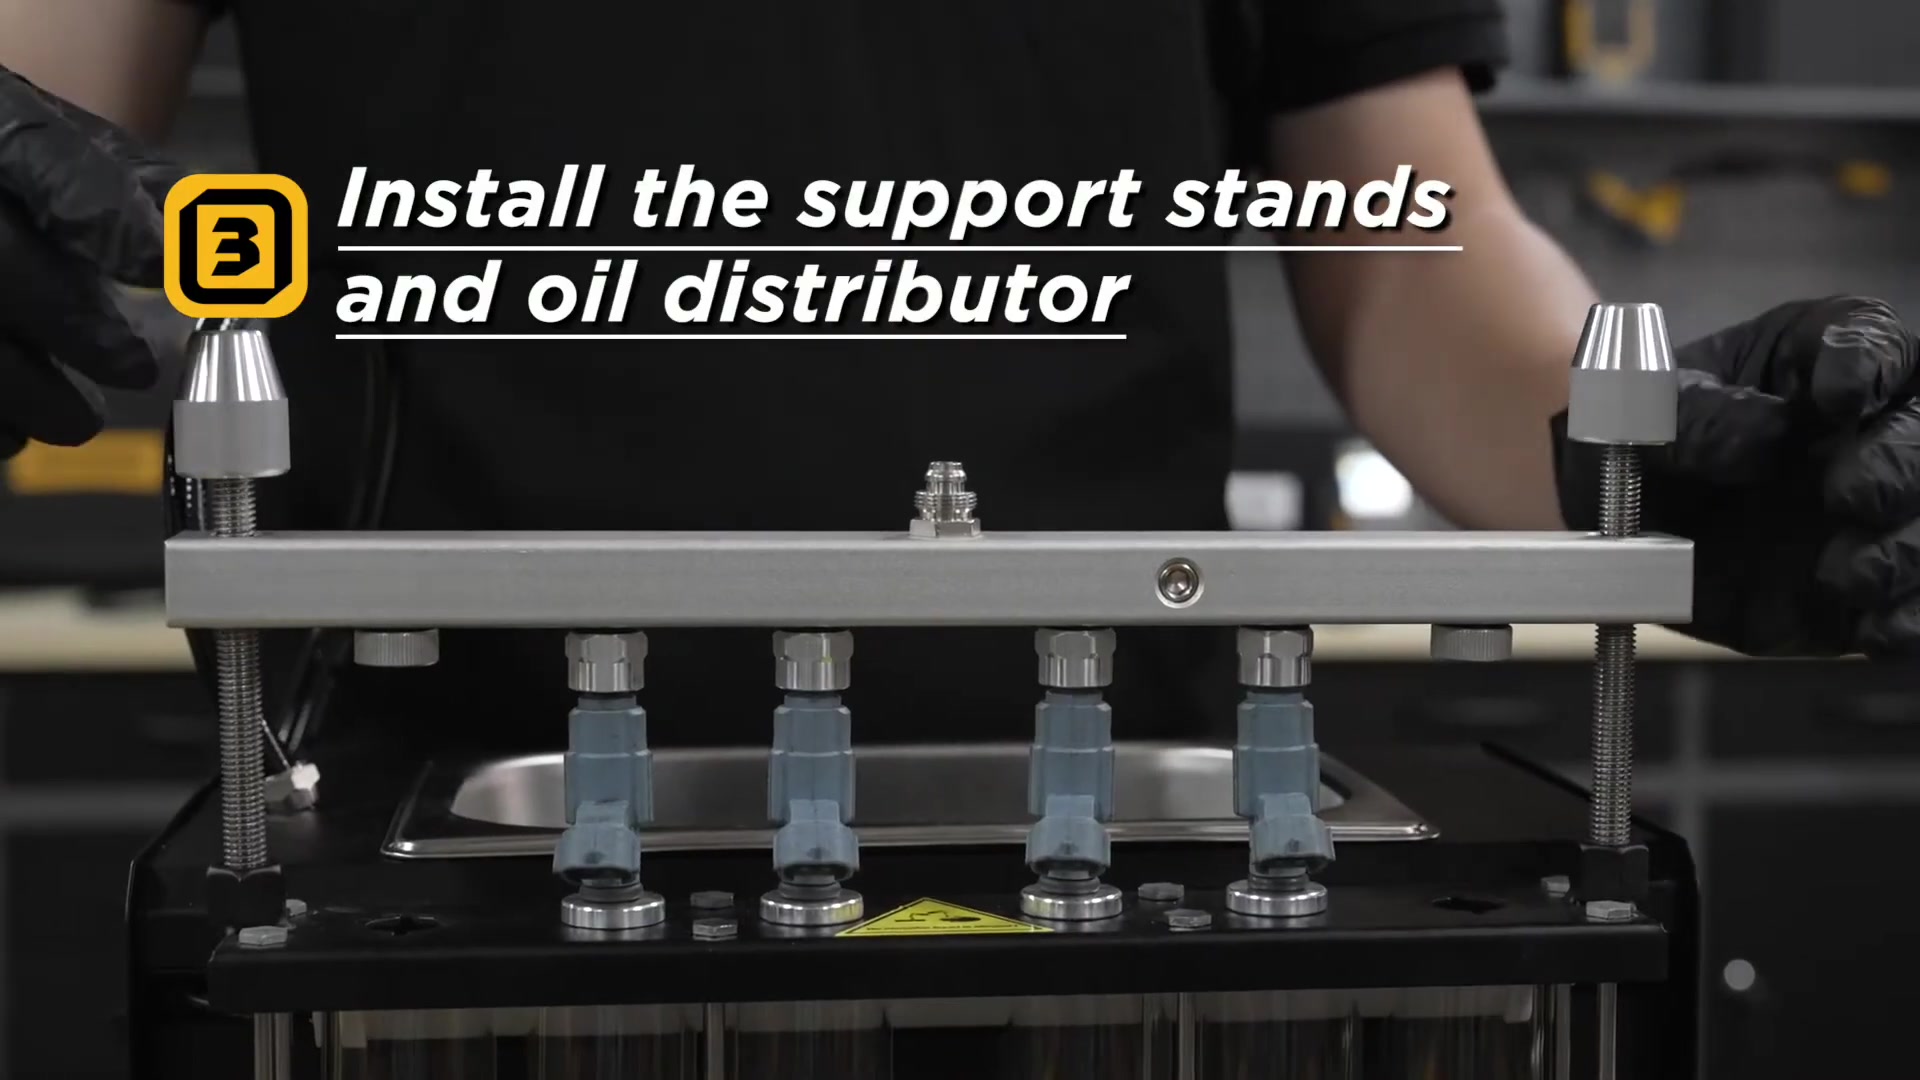
Fit each prepared injector to the distributor so fluid will enter through the normal outlet and leave through the normal inlet. Keep every injector vertical and equally supported. If one adapter binds or an injector sits at an angle, remove it and correct the fit before installing the rail.
Step 4: Install the support posts and distributor
Install the two support posts on the CT500, lower the distributor assembly into position and tighten both sides evenly. Set the height so the reversed injectors are captured without bending the bodies, crushing seals or loading the electrical connectors.
Step 5: Connect the fluid line and pulse leads
Connect the CT500 fluid outlet to the distributor and prove the quick coupling is locked. Attach each pulse lead to its injector. The official video uses an extension lead where a short injector cannot reach safely. Route the leads clear of wet areas and keep the channel order consistent with your baseline record.
Step 6: Confirm test fluid and injector drive selection
Confirm that the reservoir contains the approved test agent and that the machine has been purged and prepared as the manual requires. Select the drive setting for the exact injector—CT500 supports different injector drive levels, but the presence of a matching connector does not prove the voltage.
Step 7: Select function 11, Reverse Flushing
Use the item keys to select 11 Reverse Flushing. Enter only the time, pressure or pulse choices permitted for the injector and current CT500 instructions. There is no single safe setting for every port, direct or motorcycle injector, so do not copy a value simply because the adapter fits.
Step 8: Start at a controlled setting and watch every seal
Start the cycle while watching the outlet adapters, distributor joints, hose and injector bodies. Stop immediately for seepage, an unstable injector, abnormal pump sound or a pulse channel that does not operate. Tightening a live, pressurized connection is not a repair.
Step 9: Depressurize and return the injectors to normal direction
When the cycle ends, use the CT500 shutdown and drain sequence before touching the rail. Disconnect the pulse leads, remove the distributor and adapters, inspect the O-rings, then reinstall the injectors in their normal flow direction for verification.
Verify the result in normal flow direction
Repeat the same leakage, spray and volume test used for the baseline. Keep fluid, pressure, pulse setting, test time and measuring-cylinder position unchanged. The reverse flush is useful only if the normal-direction result improves and remains repeatable.
- Compare delivered volume across matched injectors, not against a different test setting.
- Look for a stable spray pattern without external seepage.
- Repeat a suspicious channel after checking its adapter and pulse lead.
- Reject or repair an injector that still leaks, remains electrically unstable or cannot meet the service limit.
Stop and depressurize if fluid appears at an adapter, seal, hose or injector body. Do not place a hand over a suspected high-pressure leak and do not tighten the assembly while the pump is running.
Common reverse-flush mistakes
- Skipping the forward-flow baseline, leaving no result to compare.
- Choosing an adapter by appearance and accepting a loose or angled seal.
- Mounting the injector in its normal direction while selecting Reverse Flushing.
- Using gasoline, kerosene or another unapproved fluid in the CT500.
- Selecting injector drive voltage from the connector shape instead of the injector specification.
- Calling dirty return fluid proof of a successful repair without repeating the normal test.
Frequently asked questions
Should every injector be reverse-flushed?
No. Use reverse flow only when the injector construction and service information permit it and the baseline gives a reason to perform the step.
Can reverse flushing fix a leaking injector?
It may remove contamination that affects closure, but it cannot repair a worn needle, damaged seat, cracked body or electrical fault. A final leakage test decides whether the injector is serviceable.
Which pressure and time should I use?
Use the current CT500 instructions and the injector’s permitted test conditions. The exact reverse-flush section does not establish one universal value for every injector family.
CT500 reverse-flush checklist
- Injector identity, normal flow and drive setting confirmed
- Forward-flow baseline recorded
- Correct outlet adapter fitted without force
- Injectors reverse-mounted and rail tightened evenly
- Approved test agent and pulse leads confirmed
- Function 11 selected with permitted settings
- Cycle stopped for any leak or unstable injector
- Normal-direction test repeated after flushing
A good reverse-flush job ends where diagnosis began: with the injector back in its normal direction and a controlled test that proves whether flow, pattern and sealing actually improved.








Comments 0
Questions, fixes, and real-world diagnostic notes from readers.
Be the first to share a diagnostic result or ask a follow-up question.